Category Archives: Support

How to Import Numbers from Excel Into SMS360


  1. Use the Excel file that was installed. The Excel file is located in C:\Program Files\MOBITEK SMS360\Basic Edition.
    SMS360-import-01
  2. Insert contacts details into Excel File
    SMS360-import-02
  3. Save the Excel File, the extension should be .xls
    SMS360-import-03
  4. At SMS360 application, click this button to import contacts from excel into SMS360 address book
    SMS360-import-04
  5. Once, the contact manager tab appear click the browse button to search for the excel file and select it.
    SMS360-import-05
  6. The selected excel file will be shown in the textbox
    SMS360-import-06
  7. Click proceed
    SMS360-import-07
  8. Number of imported contacts will be shown
    SMS360-import-08
  9. The imported contacts will be shown at the address book of SMS360.
    SMS360-import-09


How to Set-Up Sierra Wireless GL6110 GSM Modem

  1. Connect the antenna to the modem
    GL6110-setup-01
  2. Connect the power adapter to the modem.
    GL6110-setup-02
  3. Plug in the power adapter, turn on power
    GL6110-setup-03
  4. Insert the SIM card, modem green LED will blink.GL6110-setup-04
  5. Attach serial Cable to modem and the other end to the USB-to-serial converter.
    GL6110-setup-05
  6. Plug the USB cable into the USB port of the PC.
    The USB driver is the same as MOBITEK Q24 Modem.
    GL6110-setup-06

Control Panel for MobiGATE SMS Engine — Enterprise Edition version 1.6.2 is Released

Version 1.6.2: fixed “unhandled exception” bug when monitoring status of modem.

More Information

How to Send SMS Using Command Line (CLISMS version 6)

Install CLISMS version 6

  1. Install Setup.exe
    CLISMS6-01
    CISMS v6 wil be installed in C:/Program Files/Mobitek/CLISMS
    CLISMS6-02
  2. Open the Device Manager and look into the Ports to find the modem is connected in which port on “Sierra Wireless AT Command Port (UMTS)”. CLISMS6-03


How to Use CLISMS by Using “bat” File

  1. Open Right click on sms.bat. Then choose Edit.CLISMS6-04
  2. Then the notepad will display like this. Change the port, phone number and message with necessary. Save it.CLISMS6-05
  3. Go back to your path file C:/Program Files/Mobitek/CLISMS. Double click at sms.batCLISMS6-06
  4. Then it will apear on command line form. This will automatically closed once the transaction of sending SMS is done.CLISMS6-07
  5. You can see the log file is generated on your path C:/Program Files/Mobitek/CLISMS.CLISMS6-08
  6. You may click on the log to see the transaction. Now you can see the record is there. CLISMS6-09


How to Use CLISMS in Command Line

  1. To sent out sms :-
    clisms.exe /port=2 /to=0162211600 /msg=Alert [press “Enter”]
    echo “sent” [press “Enter”]
    CLISMS6-10

More Information

Refer to the manual https://www.mobitek.my/main/how-to-send-and-read-sms-by-using-command-line/

MobiGATE SMS Engine — Enterprise Edition version 6.2.1 is Released

New: minor improvement; log file correctly state the version number.

Version 6.1: has fixed a bug — in the inbox table, both “scts” and “dateime_recv” have the same time stamp; by right “scts” should take the value from properties “scts” which is the time stamp of network operator.

Version 6.0: supports concatenation of multiple part of SMS when sending out, i.e. it can send SMS with more than 160 characters.

MOBITEK SMS Engine is able to work in Windows Server 2003 / 2008 / 2012, 32 bit and 6

MOBITEK SMS Engine — Enterprise Edition is a Windows Service that sends and receives SMS. System integrator and software developer do not need to write any code to build a SMS Gateway. The MOBITEK SMS Engine uses SQL Server database (MS SQL, MySQL, Oracle) to store incoming SMS, and to check if there is any pending SMS to be send out.

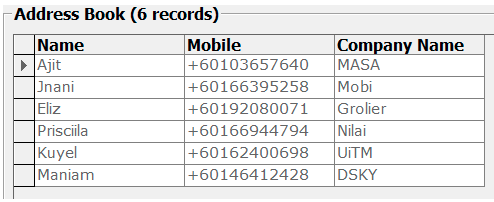
Your application or system just need to insert records into “outbox” table to send out SMS, and retrieve record from “inbox” table to read SMS.

MOBITEK SMS Engine has taken care all SMS transactions.

For Oracle support, separate license is required.

More Information

How to Recover Lost Partition in Hard Disk

Problem: partition(s) in external hard disk (using hard disk docking station) was lost due (cannot be seen), sometimes Windows will prompt for formatting the hard disk. This problem is caused by:-

  • “safely remove” was not used to remove the external hard disk;
  • hard disk corruption

Solution: there are various recovery tools available

TestDisk is the free and fast while the rest comes with limitations. In this tutorial, TestDisk will be used. The only disadvantage with TestDisk — using command line instead of GUI.

First of all, to recover the lost partition, the same hard disk docking station must be used. I have moved the external hard disk to another docking station and all the above recovery tools cannot detect the lost partition.

  1. run “testdisk_win.exe
  2. select “Create”:-
    TestDisk-01
  3. select the hard disk having lost partition:-
    TestDisk-02
  4. if hard disk is formatted using Windows, then select “Intel”:-
    TestDisk-03
  5. select “Analyse”:-
    TestDisk-04
  6. select “Quick Search”:-
  7. after “Quick Search”, it will detect lost partitions in green (in this example there are 2 partitions):-
  8. select “Write” to recover the lost partitions:-
  9. type “Y” to write partition:-
  10. select “Ok” to reboot:-
  11. select “Quit”:-
  12. select “Quit”:-
  13. After reboot the hard disk, the 2 lost partitions reappear:-
  14. for more information refer to http://www.cgsecurity.org/wiki/TestDisk_Step_By_Step#Quick_Search_for_partitions


How to Solve — An error was detected on device \Device\Harddisk2\DR2 during a paging operation

Problem: when copying a large files from external hard disk 1 to external hard disk 2 (both are connected to Windows 7 PC via USB port), Windows PC will hang.

Applies to: Windows 7 Pro

Trouble Shoot: goto “Event Viewer” to determine if there is an error message “An error was detected on device \Device\Harddisk2\DR2 during a paging operation.”

event viewer-paging error-01

Solution: enable “virtual memory” or “paging file” for the external hard disk.

Steps:

  1. goto “Advanced system settings”
    Enable Paging-01
  2. goto “Advanced  -> Performance -> Settings”
    Enable Paging-02
  3. goto “Advanced -> Change”
    Enable Paging-03
  4. uncheck “Automatically manage paging file size for all drives”, select the hard disk, check “System managed size”, then “Set”
    Enable Paging-04

Windows 7 PC will no longer hang or stall when copying large files.

Also refer to https://forums.techguy.org/threads/solved-an-error-was-detected-on-device-device-harddisk1-dr1-during-a-paging-operati.966724/


Manual for MOBITEK SMS Engine Enterprise Edition version 6, Edition no. 3 is Released

3rd

3rd of December, 2016

  • Removed “SMS Monitor”

  • Revised “ 5. New: support Oracle 11g (not in standard package, separate license is required)”

  • Added “ 3. New: manual routing”