Category Archives: Support

How to Configure Sunix USB-to-Serial Converter in VirtualBox

Applies to these MobiGATE models:

  • SG-4
  • SG-8
  • SG-4-U
  • SG-8-U


  1. Goto "VirtualBox -> Settings -> USB -> USB Device Filters". Add new filter.
    Configure Sunix USB-to-Serial Converter-01
  2. Run the virtual machine.
  3. Install the USB driver for Sunix USB-to-Serial Converter (pic).
    Configure Sunix USB-to-Serial Converter-02
  4. Connect Sunix USB-to-Serial Converter to PC. It will create 4 devices “Prolific Technology …” in VirtualBox.
    Configure Sunix USB-to-Serial Converter-03
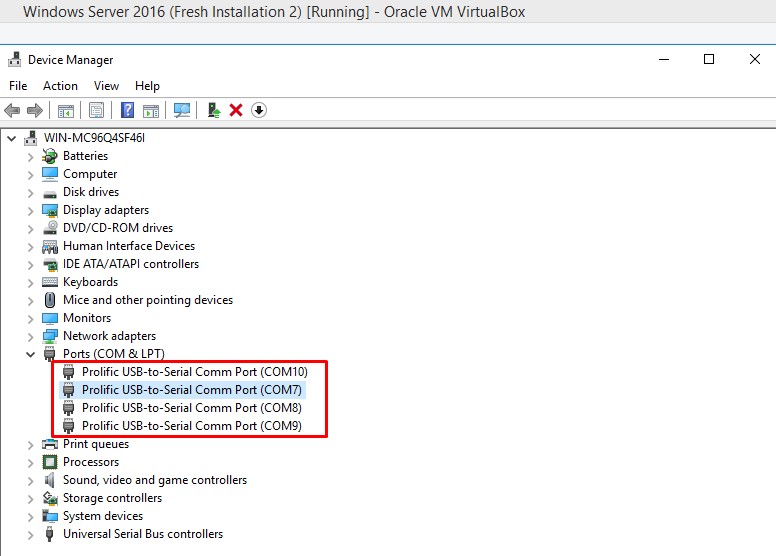
  5. The “Device Manager” in VirtualBox will also show 4 COM ports “Prolific USB-to-Serial Comm Port” have been added.
    Configure Sunix USB-to-Serial Converter-04

source: https://forums.virtualbox.org/viewtopic.php?f=8&t=42275

Note: If you skip step 1 and do not add a new “USB Device Filters”, instead you configure from "VirtualBox -> Devices -> USB" (Step 4), then there will be an error. “Failed to attach the USB device”.
Configure Sunix USB-to-Serial Converter-05

How to Configure MOBITEK S80 SMS Modem to Use SMS API and to Access Internet via 3G at the Same Time

  1. Goto “AirCard Watcher -> Setting -> Messaging -> Routing option”  and select  “Circuit Switched”.
    MOBITEK S80 SMS Modem to Use SMS API and to Access Internet via 3G-01
    MOBITEK S80 SMS Modem to Use SMS API and to Access Internet via 3G-02
  2. After you have set to “Circuit Switched”, you can use MOBITEK SMS API and access internet via 3G at the same time.
    MOBITEK S80 SMS Modem to Use SMS API and to Access Internet via 3G-03
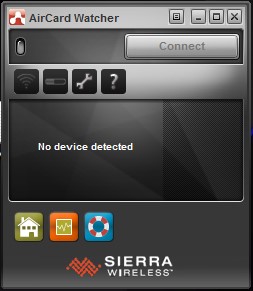
  3. Note that AirCard Watcher (through Sierra Wireless AirCard HSDPA Modem) uses different COM port, in this example, it is using COM port number 3.
    MOBITEK S80 SMS Modem to Use SMS API and to Access Internet via 3G-04


How to Use AirCard Watcher to Connect MOBITEK S80 3G Modem to 3G Network

  1. First, install AirCard Watcher.
  2. Insert SIM card into MOBITEK S80 3G Modem and connect it to PC or laptop.
  3. A new modem in “Device Manager” will appear — “Sierra Wireless AirCard HSDPA Modem”.
    AirCard Watcher-01
  4. Run AirCard Watcher.
    AirCard Watcher-02
  5. AirCard Watcher will automatically detect the MOBITEK S80 3G Modem and show the name of TELCO. In this example, it is “U Mobile”. It will also show “3G”.
    AirCard Watcher-03
  6. Click “Connect” button to connect to 3G network. If successfully connected then the red signal bar will turn to green and the “Connect” button will change to “Disconnect”.
    AirCard Watcher-04
  7. Try accessing the internet via a web browser. AirCard Watcher will show the upload and download speed (refer to red box).
    AirCard Watcher-05
  8. To check data usage, click on the “meter” icon (red box)
    AirCard Watcher-06

How to Set-Up MOBITEK S80 3G Modem in Linux Running in VirtualBox

Note: this guide is mapping the serial port of VirtualBox with the USB port of the host machine.
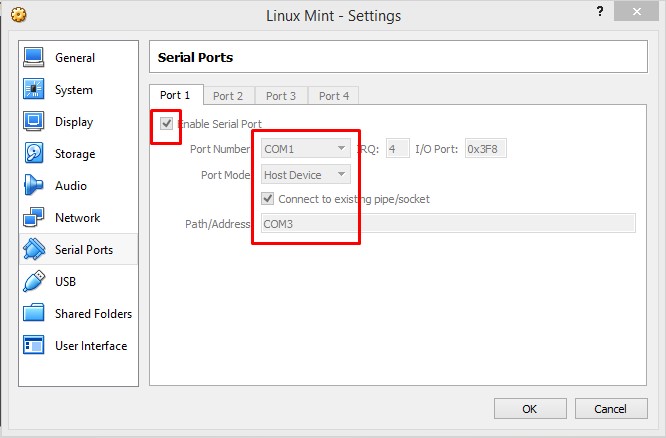
  1. In “Serial Ports” setting of VirtualBox, map the USB port of the host machine that is connected with S80 (COM3 in this tutorial) to COM1 (or any COM port number) in VirtualBox. If this step is missed, then MOBITEK S80 will not response in CuteCom or Putty (terminal).
    MOBITEK S80 3G Modem in Linux Running in VirtualBox-01
  2. To check if MOBITEK S80 is connected to the USB port, type “lusb”. It will show MOBITEK S80 Modem as “Sierra Wireless, Inc. MC8700 Modem”.
    MOBITEK S80 3G Modem in Linux Running in VirtualBox-02
  3. But in this  VirtualBox (virtual machine), MOBITEK S80 is connected via “Serial Ports” (as per step 1) and via “USB” of the VirtualBox. To check which serial port is MOBITEK S80 Modem connected, type in “dmesg | grep tty”. In this example, it shows “ttyS0” which is COM1 that was set in step 1 above.
    MOBITEK S80 3G Modem in Linux Running in VirtualBox-03
  4. Run CuteCom. Select “/dev/ttyS0” in device and click Open device. Then type the AT command.
    MOBITEK S80 3G Modem in Linux Running in VirtualBox-04

How to Set-Up MOBITEK S80 Modem in VirtualBox

  1. Connect modem to host OS.Open VirtualBox, go to the setting of your virtual machine.
    How to Set-Up MOBITEK S80 Modem in VirtualBox-01
  2. Go to Serial Ports and set the setting as below:
    • Enable Serial Port.
    • Set Port Number: (port number inside the guest OS)
    • Port Mode: Host Device
    • Path/Address: (port number of modem that is connected to host OS)
      Note: Windows provides legacy names only for COM ports 1 through to 9. For all other COM ports you must use the full device naming convention under Windows. So if you decide to use COM10 instead of COM9, using COM10 at Path/Address won’t work. Instead you have to use “\\.\COM10”. (source: https://stackoverflow.com/questions/37728628/connection-through-com-port-between-host-and-guest-in-virtualbox)
      Click OK
      How to Set-Up MOBITEK S80 Modem in VirtualBox-02
    • Note: if this step is skipped, hyper terminal will have no response if connected to the “Sierra Wireless AT Command Port”
  3. Run the virtual machine.
    How to Set-Up MOBITEK S80 Modem in VirtualBox-03
  4. Go to device manager in VirtualBox to check the COM Port. In this example, the MOBITEK S80 Modem that is connected to the USB port (COM6) of host machine, the USB port is then mapped serial port (COM1) of VirtualBox.
    How to Set-Up MOBITEK S80 Modem in VirtualBox-04
  5. In VirtualBox, the modem is connected to COM1 which is the serial port .
  6. In the host machine, the same modem is connected to COM6 which is the USB port.

How to Change the IP Address of MobiGATE Using “upgrade.exe”

Problem: unable to change the IP address via MobiGATE’s administrator web page (serial port server).

Applies to:

  • all models of MobiGATE SG-B-x-L-x and
  • MOBITEK Q24 STK Modem Hub B-8-L

Steps:

  1. Run the program “upgrade.exe”. Download from here … (upgrade.zip)
  2. Click “Search all devices” to find IP address of MobiGATE.
  3. Optional: click “connect to device” if want to connect to MobiGATE.
  4. If found, it will show a list of MobiGATE with IP address.
    Change the IP Address of MobiGATE-02
  5. Select MobiGATE (192.168.10.88).
  6. Click “Temporary change IP address”.
    Change the IP Address of MobiGATE-03
  7. Insert temporary IP address (192.168.10.98) and click OK.
    Change the IP Address of MobiGATE-04
  8. The new temporary IP address will be updated on the list. Note: it will revert back to its old IP address (192.168.10.88) after you power off.
    Change the IP Address of MobiGATE-05
  9. Now access the web menu of MobiGATE via web browser using the temporary IP address (192.168.10.98), change the IP address from 192.168.10.88 (old) to 192.168.10.98 (new), click on “Submit”.
    Change the IP Address of MobiGATE-06
  10. Then goto “Save Config” menu and click “Save”  to permanently change the IP address to 192.168.10.98 (new).

VCOM Showing “Connected” Then “Disconnected”

Issue: VCOM shows “Connected” then “Disconnected”.

Applies To:

  • MobiGATE Model SG-B-8-L-W
  • SMS Engine version 5 and 6

Cause:

  • if any modem does not have a SIM card inserted and engine is started, the engine  will try to initalise the modem, VCOM shows “Connected”
  • when the initialisation fails, VCOM shows “Disconnected”
  • refer video clip below, Modem ID 2 (COM port no. 17) has a SIM card inserted with blue LED blinking, but others do not have any SIM cards, only Modem ID 2 stays “Connected”, others will show “Connected” then “Disconnected”


USB Driver of MOBITEK S80 Supports Windows Server 2008, Windows Server 2012, Windows Server 2016 and Windows 10

We have conducted a test in 4 different OS which is:-

  • Windows Server 2008 32-bit;
  • Windows Server 2012 64-bit;
  • Windows Server 2016 64-bit; and
  • Windows 10 64-bit.

Note: all the above OS were running in a virtual machine (VirtualBox).

Then we left MOBITEK S80 running for 4 hours in each OS, and the COM Port DID NOT disappear.

MOBITEK S80 was not connected to power cable, it is using power from the USB cable.

The USB driver version is 11.5.


OS DID COM PORT DISAPPEAR
AFTER 4 HOURS (YES / NO)
SCREEN CAPTURE
 Windows 2008 32-bit No  

 Windows 2012 64-bit No  

 Windows 2016 64-bit No  

 Windows 10 64-bit No  

Therefore the USB driver, version 11.5, for MOBITEK S80 works in these 4 OS:-

    • Windows Server 2008 32-bit;
    • Windows Server 2012 64-bit;
    • Windows Server 2016 64-bit and
    • Windows 10 64-bit.

MOBITEK STK API version 5.0 End of Support Notice

MOBITEK® STK API version 5 is no longer supported effective on 26th of October, 2017. Please upgrade to version 6.

More Information