Category Archives: Support

Comparison of ReadAllText vs ReadLine vs ReadBlock vs ReadAllLines

When using ReadAllText method to read a log file with a size of 21.83MB, it takes between  7 seconds (for powerful CPU) to 12 seconds (for weak CPU).


SOLUTION SOLVED?
  1. I’ve used all possible method for loading .log/.txt extension file type into TextBox in VB.Net, eg. ReadLine, ReadAllLines, ReadAllText, ReadToEnd, but all methods result are the same. But the time load for the .log file is not actually long when execute in my laptop
  2. I think we should just stick with the current code because every solution that i found on the internet using the same all methods that i just mentioned. Probably will take much more longer time if want to solve this problem.
Failed
StreamReader.ReadLine

Source:

Dim file As New FileInfo("path\to\file")

Using reader As StreamReader = file.OpenText()
    While Not reader.EndOfStream
        Dim nextLine As String = reader.ReadLine()
        ProcessLine(nextLine)
    End While
End Using


NO

This method generates error maybe because the memory usage increase overtime due to many lines data read
I’m not sure what cause the error but the detail can be found here:
https://docs.microsoft.com/en-us/dotnet/framework/debug-trace-profile/contextswitchdeadlock-mda

Or maybe because i don’t actually know the correct way to use this method

StreamReader.ReadBlock

Source:

Const MAX_BYTES As Integer = 1048576 * 5 '=10 MB 
Dim bytesRead(MAX_BYTES) As Char
Dim numBytesRead As Integer
Dim currentPos As Integer = 0
Dim strFileName As String
Dim strm As System.IO.Stream
Dim TextLine As String
Dim FileDetail As IO.FileInfo

OpenFileDialogMain.ShowDialog()
strm = OpenFileDialogMain.OpenFile()
strFileName = OpenFileDialogMain.FileName.ToString()
  
Using reader As System.IO.TextReader = _
System.IO.File.OpenText(strFileName)
  numBytesRead = _
reader.ReadBlock(bytesRead, currentPos, MAX_BYTES)
  TextLine = reader.ReadLine()
End Using

txtEditor.Text = New String(bytesRead)
txtEditor.Text += TextLine
txtEditor.Text = txtEditor.Text & vbCrLf & Now


NO

This method can be used to fetch .log file but a bit slower than ReadAllText() method.

Completion time to load the log file into textbox is approximately 11-12 seconds

File.ReadAllLines

Source:

NO

This method opens a text file, reads all lines of the file into a string array, and then closes the file.

To load the string array into the textbox will use the same method as ReadLine() which is using Looping


Test Methodology


TEST DELL-E6410 MSI
StreamReader.Readline

How long does it take for Control Panel to load the log file
“X:\Support\Support Cases\264 (I19-2460-MACRO-ASP)\2020_1_14.log”, File size: 21.83MB

No result because of error No result because of error
StreamReader.ReadBlock

How long does it take for Control Panel to load the log file “X:\Support\Support Cases\264 (I19-2460-MACRO-ASP)\2020_1_14.log”, File size: 21.83MB

11-12 seconds 11-12 seconds
File.ReadAllLines

How long does it take for Control Panel to load the log file “X:\Support\Support Cases\264 (I19-2460-MACRO-ASP)\2020_1_14.log”, File size: 21.83MB

No result because of error No result because of error
What is the CPU? Intel(R) Core(TM) i5 CPU M560 @ 2.67GHz Intel(R) Core(TM) i5-4200 CPU @ 2.50GHz
What is the RAM? 4.00 GB (3.43 usable) 8.00 GB

Conclusion: stick with ReadAllText method to read a log file.

How to Run VB.net Code as an Administrator

Whenever you see this error message

“Cannot open [Windows service name] on computer “

error

you need to run the VB.Net code as an “Administrator”. There are 2 solutions available.

Solution 1: Modifying “app.manifest”

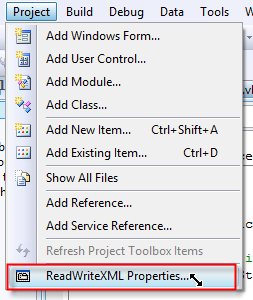
  1. Go to project and select “(Project Name) properties…”
    1
  2. Click on “View UAC Settings”
    2
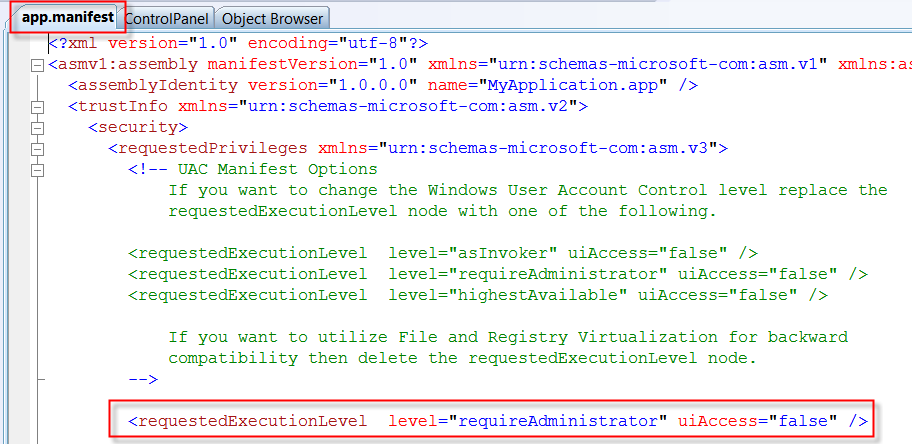
  3. Find the code “<requestedExecutionLevel level=”asInvoker” uiAccess=”false” />”
    3
  4. Replace the code with “<requestedExecutionLevel level=”requireAdministrator” uiAccess=”false” />”
  5. You will be able to run your sample code now.
  6. Later, when the code is compiled to executable (exe), this VB.Net application will also run as “Administrator”.


Source:


Solution 2: Running Visual Studio as an “Administrator”

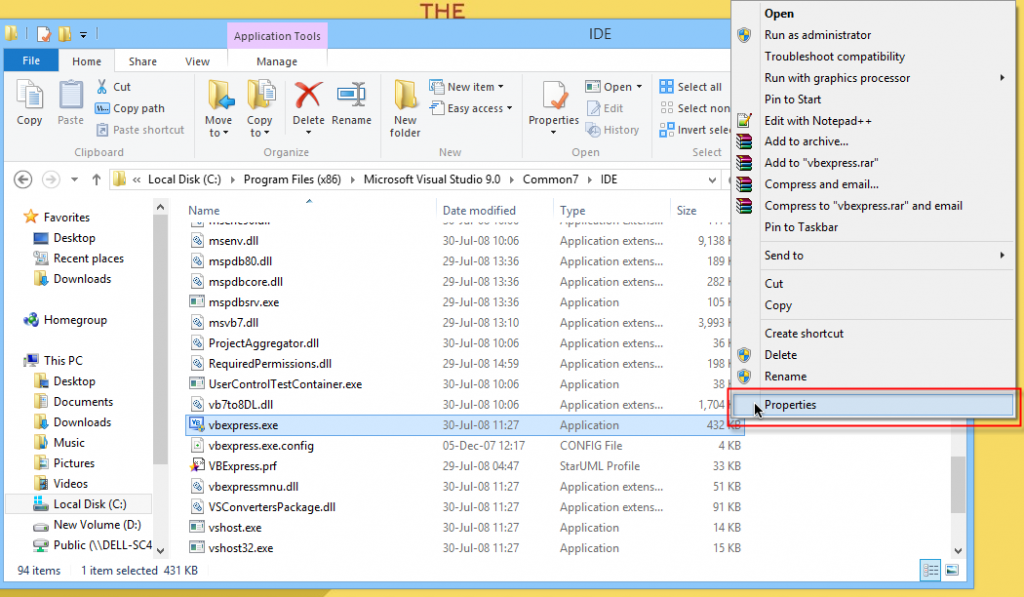
Step 1: Find Visual Studio IDE in program files, for my machine it is located at “C:\Program Files (x86)\Microsoft Visual Studio 9.0\Common7\IDE”a

Step 2: Right click on “vbexpress.exe” and select “Properties”b

Step 3: Click on “Compatibility”, then check on “Run this program as an administrator” , then click “OK”
c

Step 4: Run the program and it will run as administrator.

Fail to Get MOBITEK S80 to Work in USB port in VirtualBox

This method mentioned in https://www.wintips.org/how-to-setup-usb-on-virtualbox-guest-oracle/  was used to test the USB driver of MOBITEK S80 3G Modem in the virtual machine (Windows Server 2012 64-bit)

After installing Extension Pack in VirtualBox, USB 2.0 and USB 3.0 shown in the USB list

When virtual machine was started, the “Sierra Wireless” device was shown in the list:-

The COM PORT (COM6) appeared in “Device Manager”:-

However, in Hyper Terminal the “AT-OK” test could not be performed because it seems like the Hyper Terminal only catch the physical COM PORT of the MOBITEK S80, but the connection is not actually established with the modem. Nothing can be typed in Hyper Terminal to test the connection.


The same problem happens in Linux Mint running in VirtualBox

  • VirtualBox version: 6.1
  • OS in virtual machine: Linux Mint 17 ‘Qiana’ Cinnamon 64-bit

Mobitek S80 that attached to Linux Mint running in VirtualBox can be detected when running the “dmesg | grep tty” command in Linux Mint’s Terminal

But each interface from “ttyUSB0” until “ttyUSB4” which MobitekS80 is attached to cannot be tested with AT command in CuteCom. CuteCom will be frozen when the AT command was entered.

ERROR [HY000] [MySQL][ODBC 5.1 Driver]Host ‘175.xxx.xxx.xx’ is blocked because of many connection errors; unblock with ‘mysqladmin flush-hosts’

Problem: when using MOBITEK SMS Engine — Enterprise Edition v. 7.1 with MySQL database server in remote server (Exabytes), this error will appear after 2 days.

MOBITEK® SMS Engine — Enterprise Edition


SMS Engine was started on 23-Aug-2019, non-stop, until these error messages were received on 25-Aug-2019, Sunday, 1:41 am

01:42:21 ERROR [08S01] [MySQL][ODBC 5.1 Driver]Lost connection to MySQL server at 'reading initial communication packet', system error: 0
01:42:25 ERROR [HY000] [MySQL][ODBC 5.1 Driver]Host '175.xxx.xxx.xx' is blocked because of many connection errors; unblock with 'mysqladmin flush-hosts'
01:42:28 ERROR [HY000] [MySQL][ODBC 5.1 Driver]Can't connect to MySQL server on '72.xx.xxx.xx' (10055)
ERROR [HY000] [MySQL][ODBC 5.1 Driver]Can't connect to MySQL server on '72.18.132.28' (10055)


Trouble Shooting: The SMS Engine does not hold the database connection. It always close it after every execution of database query otherwise the engine would have failed long time ago.  Any other applications connecting to this database ? This error can also happen when there are too many connections issued to the database. Default concurrent connection for mysql is 151.


Conclusion: MOBITEK SMS Engine — Enterprise Edition only uses 1 database connection.


List of Problems with Facebook Page

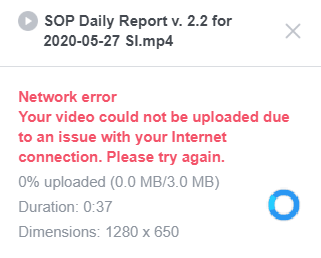
Problem: If the the post with video attached is edited, even though I did not remove the video, the video will be automatically removed.

Solution: none.


Problem:

  1. The default administrator account has problem with uploading video

    and accessing “Video library”
  2. The above 2 errors occurred when used in:-
    1. Opera browser Version:68.0.3618.125 in Asus laptop
    2. Chrome browser Version 83.0.4103.61 (Official Build) (64-bit) in Asus laptop
    3. Chrome browser Version 81.0.4044.138 (Official Build) (32-bit) in  Dell-E6410 laptop
    4. IE 11 in Asus laptop


Solution: add another FB account as “Administrator” and able to solve the above roblem — able to access “Video library” and successfully upload video.


(T, please add here …)

Demonstration of Automatically Form Filling of “Laporan Harian Pematuhan SOP”

This video demonstration shows how business can automate the report filling of “Laporan Harian Pematuhan SOP”  (https://notification.miti.gov.my) by using AutoHotkey.


To find out how you can do the same, please refer to the tutorial …

How to Automatically Fill-In Laporan Harian Pematuhan SOP

Quick Guide

  1. Install AutoHotkey (AHK).
  2. Select the script “SOP Daily Report v. 2.0 for 2020-05-21 (demo).ahk”.
  3. Unzip the “SOP Daily Report v. 2.2 for 2020-05-27 (Demo).zip”
  4. Run the script by double clicking on “ahk” file.
  5. Log into https://notification.miti.gov.my
  6. Go to “Laporan Harian Pematuhan SOP”.
  7. Run the hotkey by pressing <CTRL> then <1>,  all fields on that page will be automatically filled in less than 3 seconds.
  8. Finally, manually click “Hantar” to submit the report. Refer to video below for a demonstration …

If you require our service to customise the script or to provide training, please contact us …


BEFORE AFTER

Continue reading

How to Fix sfc Error “found corrupt files but was unable to fix” and DISM Error “The source files could not be downloaded”

Machine: Asus UX303

OS: Windows 8.1 64-but

Status as at 2020-05-25:  fail to solve

  1. sfc /scannow returns this message — “Windows Resource Protection found corrupt files but was unable to fix some of them. “
  2. Run “DISM” as follows:
    1. Type “cmd” in windows search bar
    2. Right click on “Command Prompt”
    3. Select “Run as Administrator”
    4. Type “DISM /Online /Cleanup-Image /CheckHealth” without quote and press ENTER
    5. Type “DISM /Online /Cleanup-Image /ScanHealth” without quote and press ENTER
    6. Type “DISM /Online /Cleanup-Image /RestoreHealth” without quote and press ENTER
      (source: https://answers.microsoft.com/en-us/windows/forum/all/sfc-scannow-found-errors-but-couldnt-fix-all-of/663ec1fa-a215-41b8-abbb-2aa1cca703e2)
  3. If “DISM /Online /Cleanup-Image /RestoreHealth” return this message — “The source files could not be downloaded. Use the “source” option to specify the location of the files that are required to restore the feature.”
    then

    1. mount the “iso” file of the Windows
      (the “iso” file is mounted as “E:\” drive)
    2. Type “DISM /Online /Cleanup-Image /RestoreHealth /Source:E:\” without quote and press ENTER
      (source: https://www.thewindowsclub.com/dism-fails-source-files-could-not-be-found/ )
  4. Same error message appeared — “The source files could not be downloaded. Use the “source” option to specify the location of the files that are required to restore the feature.