Author Archives: Taufiq

Own a SMS Gateway that You Can Fulfil Data Privacy and Data Protection

Instead of using 3rd party SMS service provider, you can own a SMS Gateway that can fulfil data privacy and data protection requirements for your Walnut Wellness.

Here is a case study where a wellness solution, MySalam, have their own SMS Gateway — MobiGATE.
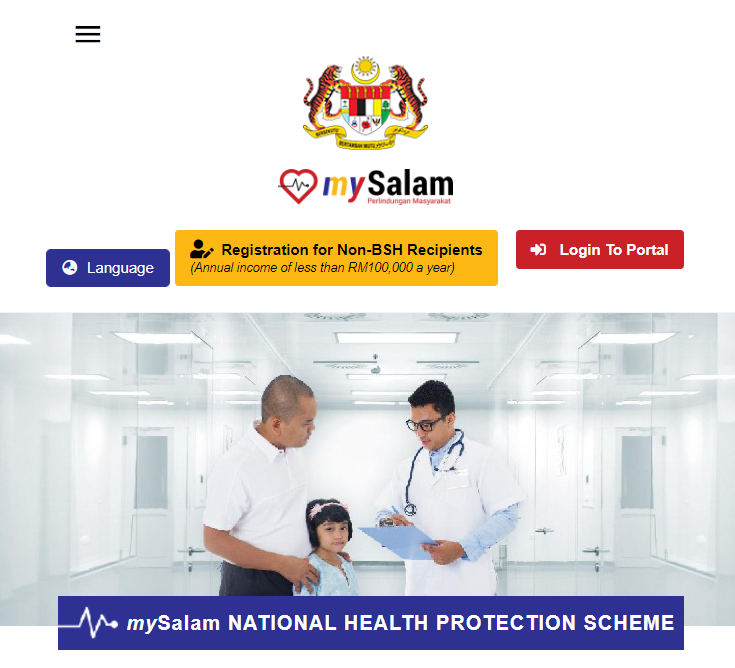
MySalam (https://www.mysalam.com.my/b40/info/?url=intro_EN) is national health protection scheme offered by Malaysia government.
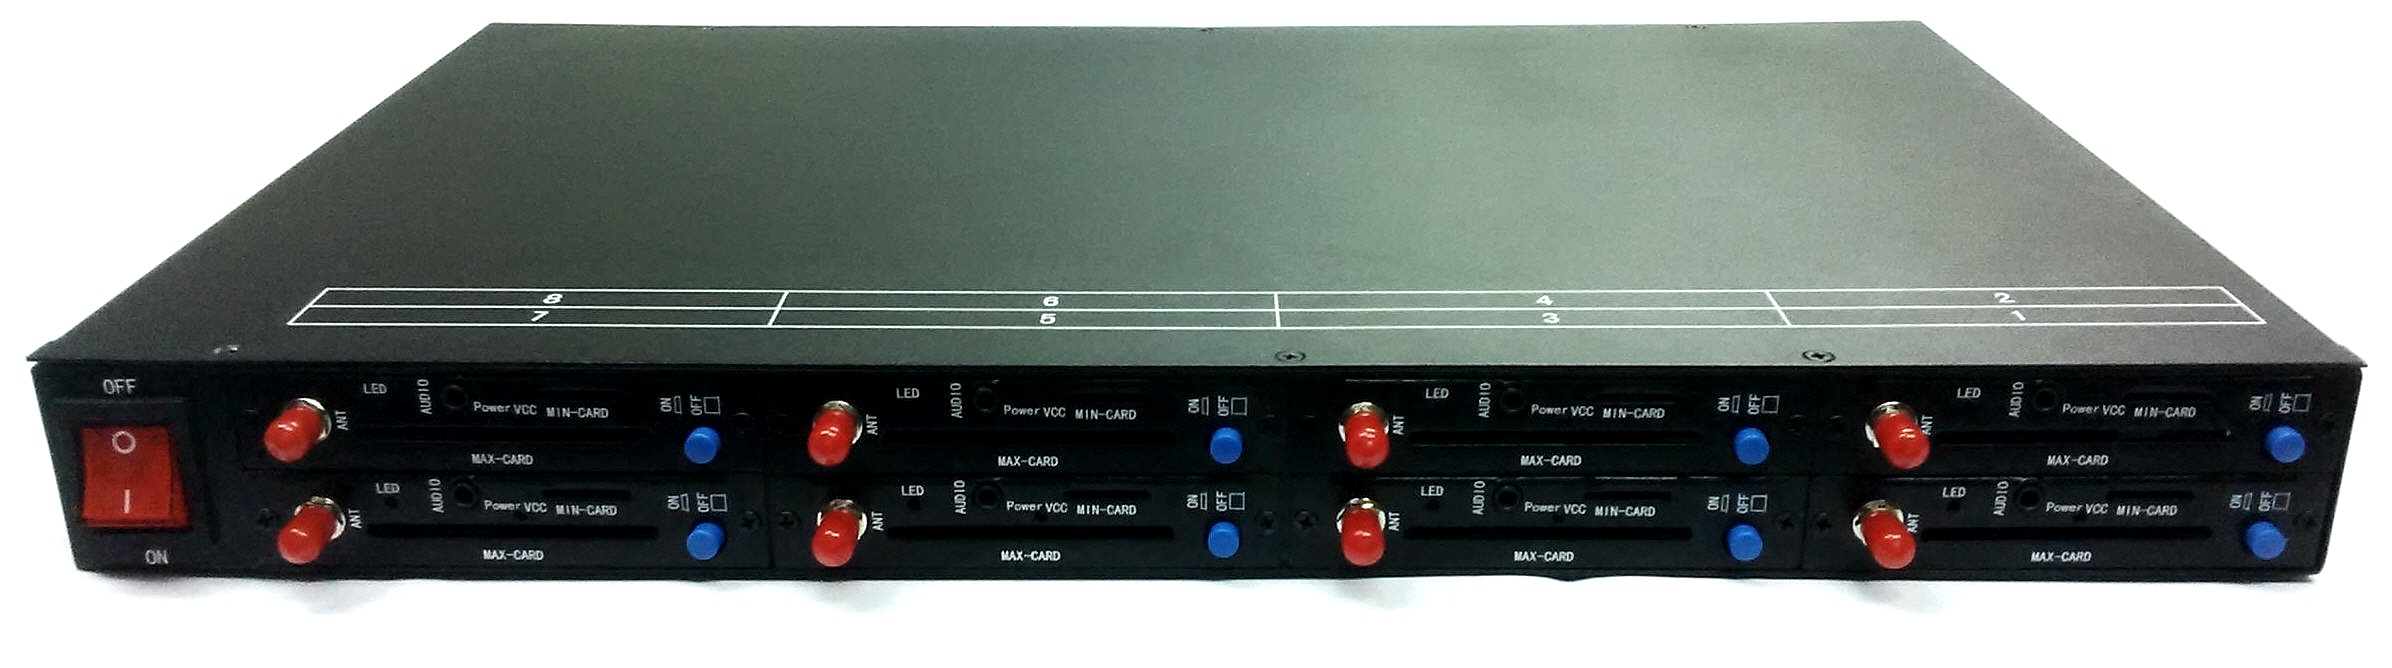
MySalam is using MOBITEK®  MobiGATETM as the SMS Gateway to:-

  • send out notification to applicants who are qualified for the scheme;
  • send out claims notices to insured parties on claim status


CASE STUDY

  • MySalam.com.my web portal, is hosted in a data centre in Puchong, Malayisa while MOBITEK®  MobiGATETM is located in Micare’s data centre in Shah Alam.
  • Advantages:-
    • MobiGATE can be placed anywhere, co-location or on separate location with the application server;
    • there are no internet connection to MOBITEK System therefore, all messages sent and received are protected and kept private by Micare; and
    • MobiGATE uses SIM card, support up to 8 SIM cards per unit, with SIM card, the SMS Gateway is directly connected with TELCO via GSM or 3G network without relying on internet.

For more information on MOBITEK®  MobiGATETM , visit its product page or contact us.

How to Disable Just-In-Time Debugger

If you received this error message

“Just-In-Time debugging this exception failed with the following error: No installed debugger has Just-In-Time debugging enabled. In Visual Studio, Just-In-Time debugging can be enabled from Tools/Options/Debugging/Just-In-Time.

Check the documentation index for ‘Just-in-time debugging, errors’ for more information.”

Solution is available at https://docs.microsoft.com/en-us/visualstudio/debugger/debug-using-the-just-in-time-debugger?view=vs-2019

How to Solve “You do not have permission to use the bulk load statement”

Applies to: MS SQL Express 2017

Error Message: You do not have permission to use the bulk load statement

Solution: SQL Management Studio (log in as administrator) → Security → Login → Choose username (right-click) → Properties → Server Roles → Check “bulkadmin”

(source: http://stackoverflow.com/questions/32417776/you-do-not-have-permission-to-use-the-bulk-load-statement-error )

How to Recover From Ransomware Attack

HISTORY OF ATTACK

  • 1st Attack: 2019-Nov-20
  • 2nd Attack: 2020-Jan-9, encrypted file with “Harma” suffix
  • 3rd Attack: 2024-Feb-14, encrypted file with “.mkp” extension


RECOVERY

  1. Shut down all PCs on the network.
  2. Disconnect all LAN/ethernet cable and disable Wi-Fi connection from all PCs to prevent any LAN or internet connection.
  3. A PC is infected by ransomware if the files in the PC are encrypted and cannot be opened.
  4. One by one, connect each PC to internet, update virus definition of Windows Defender (or anti-virus software) and run full scan.
  5. Take note of the date and time the files are encrypted on all PCs.
  6. The PC having encrypted files with the earliest date & time is the 1st PC being infected.
  7. On another clean PC that is not connected to the LAN, run full scan on the back-up files and Windows system image that were created by Windows Backup.
    1. If you do not have any back-up of files and a recent copy Windows image file before the attack then recovering from ransomware attack is impossible.
  8. Once the back-up files are scanned and certified clean, then create another back-up copy of all back-up files and Windows system image onto a separate external hard disk.
    1. In case the back-up files and Windows system image are infected when doing restore, you still have a back-up copy.
  9. After all PCs are scanned and cleaned by Windows Defender (or any anti-virus software), one by one:-
    1. restore each PC using Windows system image that is dated earlier then the date of ransomware attack.;
    2. run Windows update to update all Windows securities (KB);
    3. using Windows Defender (or any anti-virus software) to run a full scan to ensure that there is no trace of ransomware after Windows has been restored;
    4. then finally restore all files that are encrypted by ransomware from Windows Backup and Restore or from File History.
  10. DO NOT connect all PCs to the LAN at the same time.
  11. One by one, connect PCs to LAN and internet, monitor if there are any files that are encrypted. If there are none, then connect another PC to the LAN. Repeat until all PCs are connected to LAN and internet.


PREVENTION

  1. Usually, ransomware is an attachment in e-mail and if e-mail has been identified has the entry of attack, then change the e-mail address.
  2. Enable e-mail redirection for non-spam mail to the new e-mail address.
  3. Delete the old e-mail address that is constantly being attacked by spammer when all customers, suppliers, etc. has been notified on the new e-mail address.
  4. Configure e-mail client, e.g. Thunderbird:-
    1. NOT to download or retrieve all contents of e-mail;
    2. set to download e-mail without any attachment or only the header of e-mail only;
    3. if the e-mail is from a known sender, then only download the full message with attachment.


SECURITY

  1. Create 2 user accounts in Windows of UBS-SERVER:-
    1. adminstrator account
      • only adminstrator can perform back-up and access to back-up files in external hard disk
    2. standard user account — log-into  this account to run 24 hours
  2. Run UBS-SERVER in 24 hours using standard user account (do NOT use administrator account).
  3. If possible, avoid running UBS-SERVER in 24 hours x 7 days, set UBS-SERVER to sleep or shut down at 10 pm every night and wake up at 8 am every morning:-
    1. use Task Scheduler to put PC to sleep at night;
    2. use BIOS setting to boot up PC in morning or use Task Scheduler to wake-up PC.
      1. if using Task Scheduler, ensure that  “Allow wake timers” is enabled
  4. Change the RDP port number after recover from a ransomware attack.
  5. Set anti-virus software to perform a full scan  everyday instead of quick scan on PC.
  6. Remove all user accounts of Windows and replace them with new user accounts as hacker may have obtain the Windows user account.
  7. Review Windows Firewall — remove any unused applications or ports.
  8. For external hard disk drive that is used for back-up, only allow 1 user that is “administrator”  to access the hard disk. Do not make folders and files available to “everyone”.
  9. For SERVERLINK:-
    1. configure Brute Force

    2. set time period to allow external RDP connection in Working Hours

    3. enable Ransomware feature
    4. set Homeland to only allow IP address from home country


BACK-UP PROCEDURE

  1. Create a back up policy that back up files and Windows image in these locations:-
    1. external hard disk that is connected on LAN;
    2. cloud or web hosting that is connected via internet;
    3. removable external hard disk that is NOT connected on LAN or internet.
  2. Back up all files using Windows Backup on daily basis to external hard disk that is connected on LAN.
  3. Save Windows Image using Windows Backup on weekly basis or daily basis to external hard disk that is connected on LAN.
  4. Back up all files in external hard disk to cloud (Drop Box, One Drive, etc.) or to web hosting server that is connected via internet.
  5. Back up all files in external hard disk that is connected on LAN to removable external hard disk that is disconnected from LAN and internet.
  6. Here is a list of useful back up softwares:-
    1. SyncBack
    2. File History by Windows
    3. Windows Backup & Restore

Set-up Guide for MOBITEK S80 on LAN

Objective: to set-up MOBITEK® S80  and MOBITEK® Q25 to operate on local area network (LAN) via LAN port.

Applies to:-

  • MOBITEK® S80  Type S-L
  • MOBITEK® S80 Type E-L
  • MOBITEK® Q25 Type D
  • MOBITEK® Q25  Type M

MOBITEK® S80 for SMS Over 3G Network

MOBITEK® Q25 4G Modem for SMS, E-Mail, MQTT & GNSS


How to Configure LAN Port of MOBITEK® S80

There are 2 tasks:-

  1. How to Assign/Change IP Address of MOBITEK® S80
    1. IP address has to be assigned to the modem
  2. How to Add A COM Port for MOBITEK® S80
    1. on PC/server, a new COM port has to be added and mapped to the IP address of the modem


How to Assign/Change IP Address of MOBITEK® S80

  1. Connect the LAN  (ethernet) cable to the modem and the other end to your router or switch.
  2. Connect power adapter to the modem, turn on the power.
  3. Run the Windows application “USR-TCP232-T24-V5.1.1.20.exe“.
  4. Click “Search in LAN”.
  5. It will look for the IP address of MOBITEK® S80, if found it will display the address. In this example it is 192.168.31.7
  6. Click the “Device list in the net” , make the following changes in the “Parameters” section:-
    1. set to “TCP Server”;
    2. change the IP address in “Module IP” that matches your LAN, the IP address is for MOBITEK® S80 (e.g. 192.168.10.210);
    3. change the “Default Gateway” that matches the IP address of your router (e.g. 192.168.10.1);
    4. optional — change “Module port”;
  7. Finally, click “Set selected item via Net” or “Set selected item via LAN” to save changes.
  8. Exit the Windows application “USR-TCP232-Setup”.
  9. Check if the new IP address assigned to MOBITEK® S80 is discoverable by entering the IP address into the browser. The username and password are as below:
    • Username = admin
    • Password = admin
  10. Go to “Local IP Config” and see the “Static IP” and “Gateway”.


How to Add A COM Port for MOBITEK® S80

  1. In Windows PC/Server, install “USR-VCOM” then run it.
  2. Click “Smart VCOM” (you must first exit “USR-TCP232-Setup”, otherwise an error message “Search port 1901 is occupied” will appear):
    USR-VCOM_V3.7.1.520_Setup-01
  3. If MOBITEK® S80 is found, it will be displayed. Check it then click “Next” to create COM port.
  4. A new COM port number will be created under “COM Name”, in this example it is 2.
  5. Also the COM port number can also be seen either in “Device Manager -> Ports”

    or in  “Device Manager -> Virtual Serial Ports (Eltima Software)”. COM port number will be displayed.
    USR-VCOM_V3.7.1.520_Setup-04
  6. “Net State” will show “Connected”.
  7. Your application will communicate with MOBITEK® S80 via the above COM port number.
  8. When your application is connected to MOBITEK® S80  then “COM State” will show “Open”.
  9. When your application is communicating with MOBITEK® S80 to send and read SMS, the values in “COM Received” and “Net Received” will be increasing.
  10. Ensure “USR-VCOM” is set to “AutoRun” (red box) and ensure it is running, otherwise SMS application is unable to connect to MOBITEK® S80 Modem:


Appendix: Using “Search” to Find the IP address of MOBITEK S80

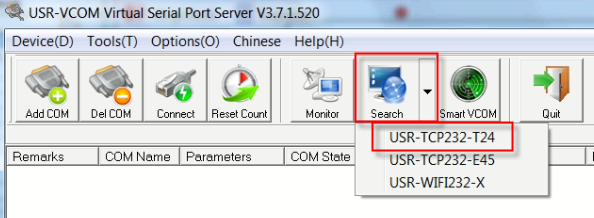
  1. If “Smart VCOM” fail to work, then use “Search” function. Select “USR-TCP232-T24”:
  2. If modem is found, it will list the IP address of modem:
  3. Click “Connect Virtual COM” to create a COM port:
  4. Select a COM port for the modem (e.g. COM2), and select “TCP Client”:
  5. MOBITEK® S80 Modem is connected to COM port number 2.

Difference Between “Bridge” and “NAT” Mode in VirtualBox


QUESTIONS BRIDGE MODE  NAT MODE
What is the IP address of VM (guest)?
Note: the IP address of host is 192.168.10.56

Note: the IP address of host is 192.168.10.56
Can VM (guest) shared a folder and allow host to access the shared folder?
Can VM see other PCs/laptops on the MOBITEK workgroup? Yes No
Can VM access the internet? Yes Yes


How to Set to “Bridge Mode” in VirtualBox

  1. Click on “Settings new window will pop up for settings.
  2. Then, go to “Network at “Attached to:” option select “Bridged Adapter” and click “OK”.

Note: Not required to stop the machine/ shutdown for this settings.


How to Allow OS in VirtualBox to Access Internet

  1. Click on “Settings“, new window will pop up for settings.
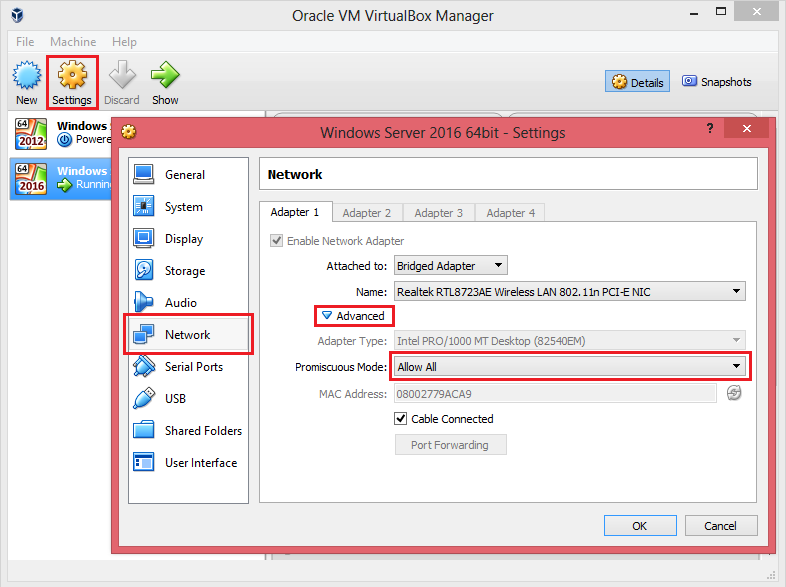
  2. Then go to “Network” -> “Advanced”. In “Promiscuous Mode”, select “Allow VMs” or “Allow All“.