Category Archives: Support
How to Solve “BadImageFormatException”
Applies to: SMS API v. 9.2 in Visual Studio Community 2019 and Windows Server 2019 64-bit
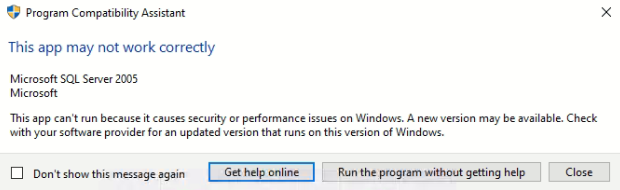
Problem: when SMS API v9.2 sample program in run in debug mode, Visual Studio Community 2019 always give this error :-
Inner Exception 1:
BadImageFormatException: Could not load file or assembly ‘Interop.MobitekSMSAPI9, Version=1.0.0.0, Culture=neutral, PublicKeyToken=null’ or one of its dependencies.
This assembly is built by a runtime newer than the currently loaded runtime and cannot be loaded.
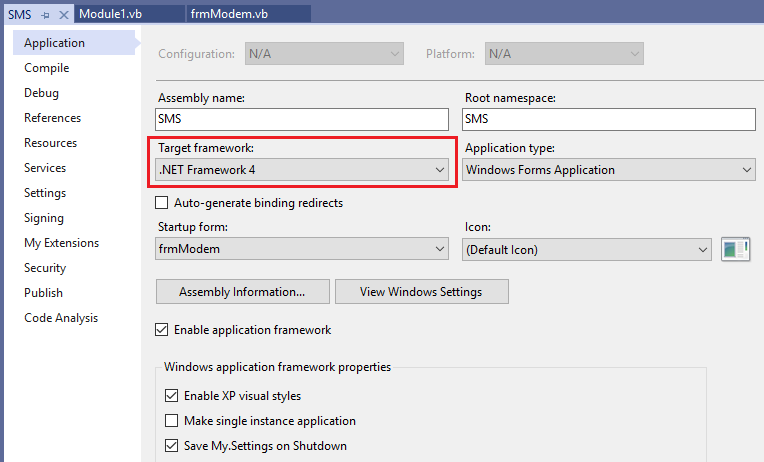
Solution: change the “Target Framework” of the project to “.NET Framework 4” with these steps:-
- Migrate the project “SMS API v. 9.2” to open in Visual Studio 2019.

- Open the project. Go to the project “Properties”. In “Application” tab, change the “Target framework” to “.NET Framework 4”.
- You will get below warning after changing the “Target framework”. Just click “Yes”.

- Close and reopen the project.
- Click “Start” button to start debugging the project. Please allow some times for the project to be built.

- After the project has completely built, try to click all menus and buttons to see if the problem occur again.

How to Install USB Driver of MOBITEK Q25 and Find the COM Port Number
Step 1: DO NOT connect USB cable or connect modem to PC/server.
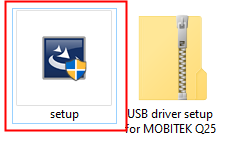
Step 2: Install the USB driver first by extracting the “.zip” file after downloaded and run the “setup.exe”. USB driver can be downloaded from here – Download USB Driver
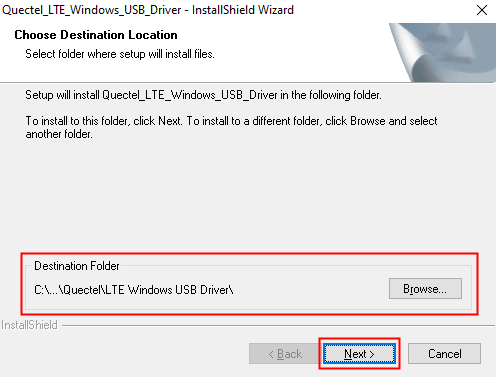
Step 3: Choose the installation folder or path, then click on ‘Next’.
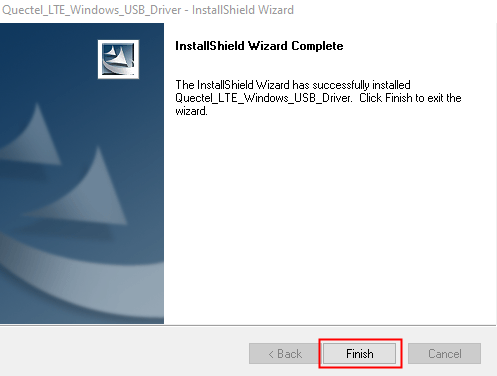
Step 3: Click on ‘next’. Wait until the installation complete.

Step 4: Click on ‘Install’.
Step 7: Make sure to restart the machine or computer in order to use the installed driver.
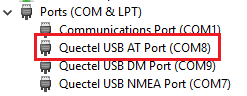
Step 8: After computer is restarted, connect the modem to the computer. In device manager, the connected modem is listed as ‘Quectel USB AT Port (UMTS)’. In this example, the modem is connected to COM port number 8.
How to Use MOBITEK E-Mail Address Extractor to Extract E-Mail Addresses from Inbox
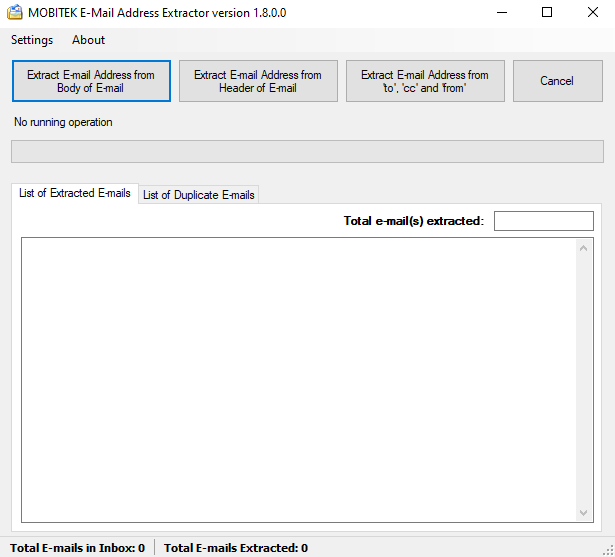
MOBITEK® E-mail Address Extractor is an useful digital marketing tool to extract the e-mail addresses from the body or the header of an e-mail. E-mail address extracted and then be imported into any e-mail broadcasting application or can be used to remove undeliverable e-mail address.
Note: free version does not support extracting e-mail address from Gmail and Yahoo Mail.
User’s Guide
- Run “MOBITEK E-mail Address Extractor.exe”.
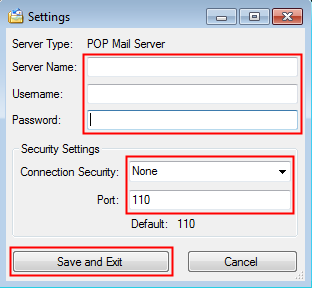
- Go to “Settings” -> “POP3 Settings”.

- In “Settings”, enter “Server Name”, “Username” and “Password” for POP3 e-mail. In “Security Settings” area, select the “Connection Security”, choose whether to use the default “None” or “SSL/TLS”. The “Port” will automatically change based on the selection.
- To extract e-mail address from the body of e-mail, select “Extract E-mail Address from Body of E-mail”.

- To extract e-mail address from the header of e-mail, select “Extract E-mail Address from Header”.

- To extract e-mail address from only “Cc”, “To” and “From” section, select “Extract E-mail Address from ‘to’, ‘cc’ and ‘from’.

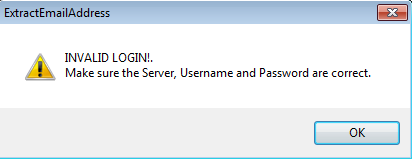
- If you entered the wrong login information, you will a warning message, please re-check the settings (user name, password, etc.).
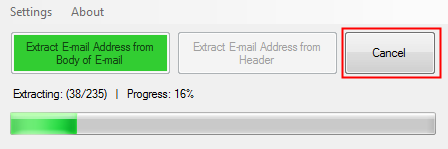
- To cancel the extraction process, click the “Cancel” button.
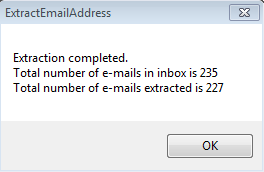
- After the extraction completed, a summary of the extraction process will be displayed.
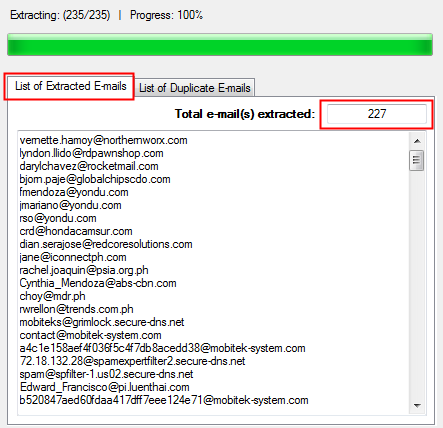
- All extracted e-mails will be shown in the “List of Extracted E-mails” tab. The total number of e-mails extracted will be shown in “The total e-mail(s) extracted”. Copy e-mail addresses and paste a spreadsheet (csv) file that can be imported into any e-mail broadcast application.
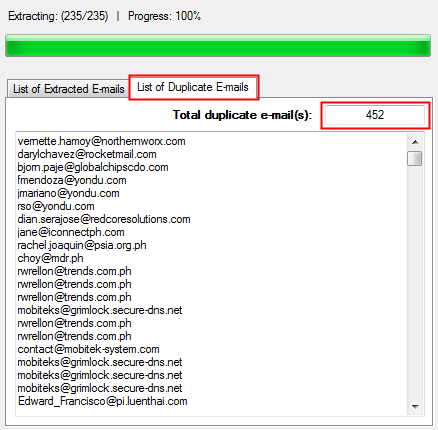
- Any duplicated e-mail extracted will be shown and added into “List of Duplicate E-mails” and the total number of duplicates shown in “Total duplicate e-mail(s)”.
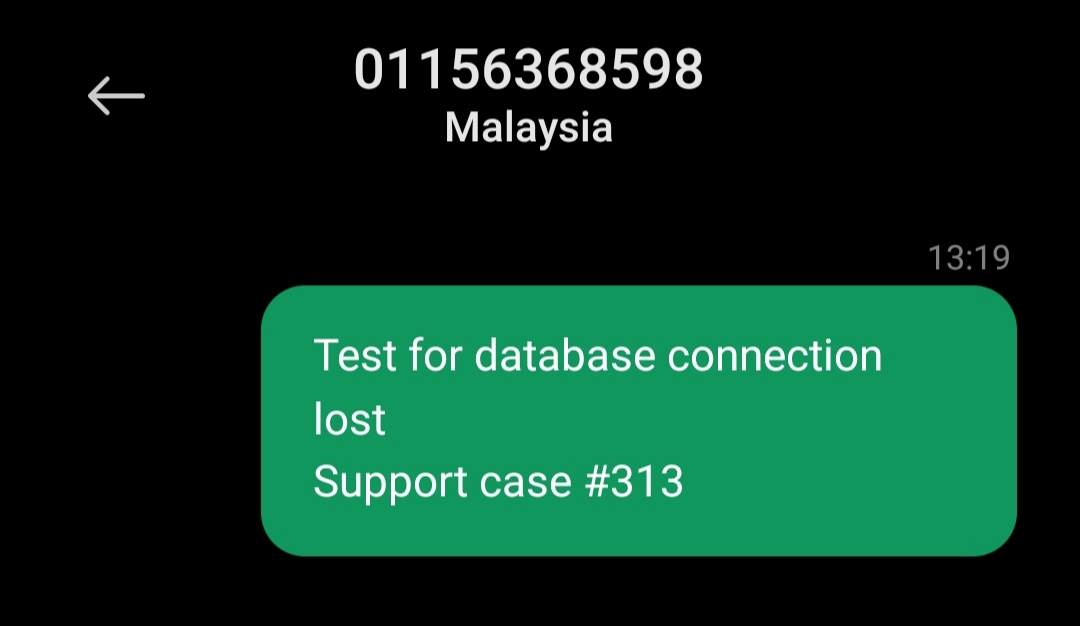
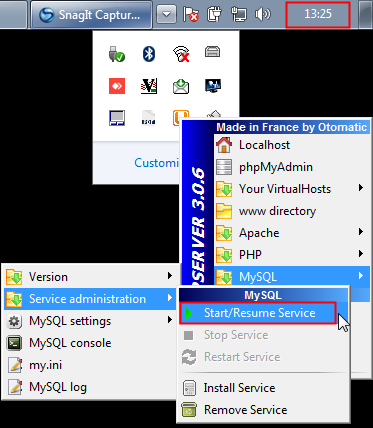
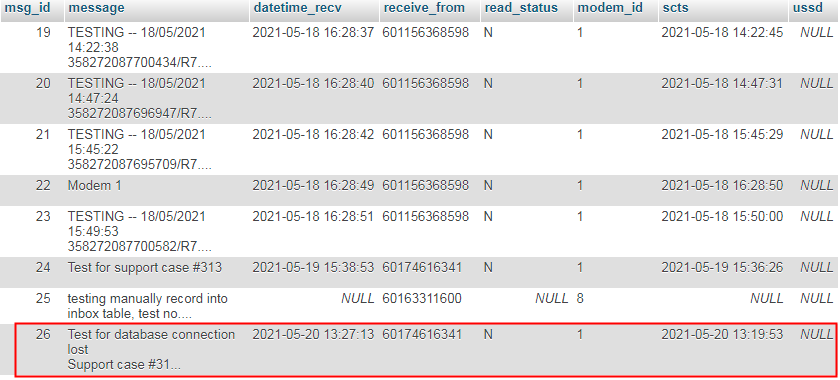
Incoming SMS is Not Lost Even When Database Connection or Network Connection is Lost
TEST OBJECTIVE: Is incoming SMS / message lost when MySQL database connection is lost while SMS Engine — Enterprise Edition version 7.x is running?
| TESTING METHODOLOGY | TEST RESULT | REMARK |
|
|
Incoming SMS is NOT LOST Even though the database connection is lost. |
|
|
Incoming SMS is NOT LOST even though network connection is lost. |

VB.Net: How to Get The Version Number of Windows Application?
Use My.Application.Info.Version.ToString
Source:
- AssemblyInfo.Version Property
- https://www.daniweb.com/programming/software-development/threads/484741/how-to-display-version
List of Functions Supported by MOBITEK EC20 4G Router & IoT Gateway

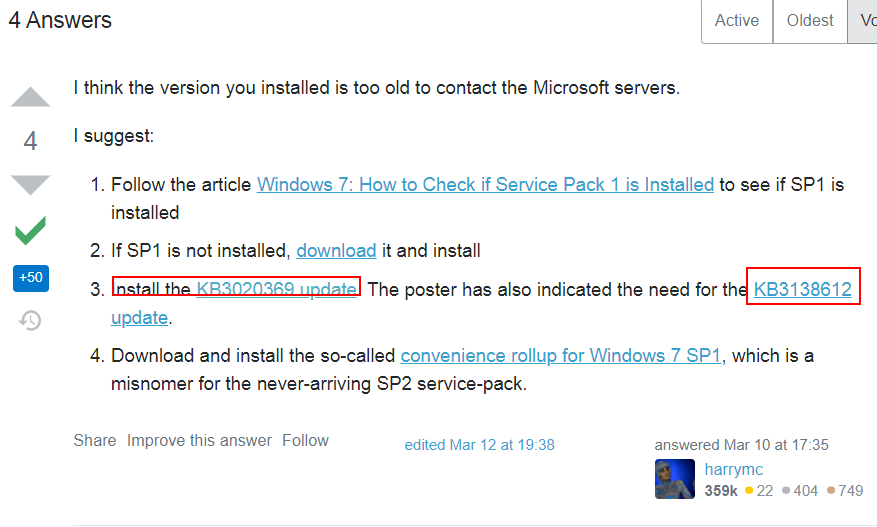
How to Solve “Windows could not search for new updates — Error Code 80072EFE”
Problem: after a fresh re-installation of Windows 7, when running Windows Update in Windows 7, this problem will appear– Error Code 80072EFE.

Solution: install the 2 KB — KB3020369 and KB3138612 as mentioned in https://superuser.com/questions/1631204/windows-7-windows-update-error-80072efe
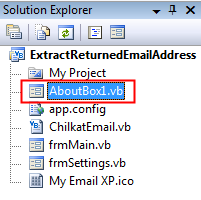
How to Reuse Existing VB.Net Form by “Add Existing Item”
- Copy VB.net form with the same filename having these file extensions — “.vb”, “.resx” and “Designer.vb” into the project folder.

- Open the project, in “Solution Explorer”, right-click on project “Add -> Existing Item…”
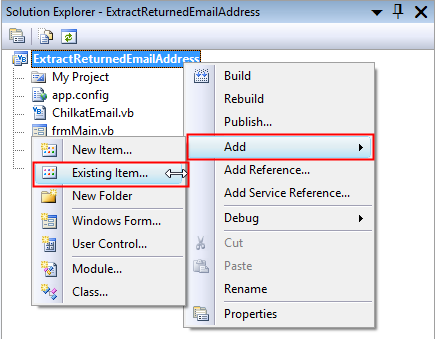
- Select the VB.net form file with “.vb” extension.
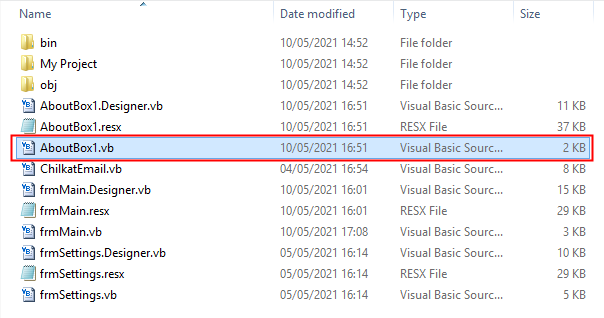
- The same file added should appear in “Solution Explorer”.
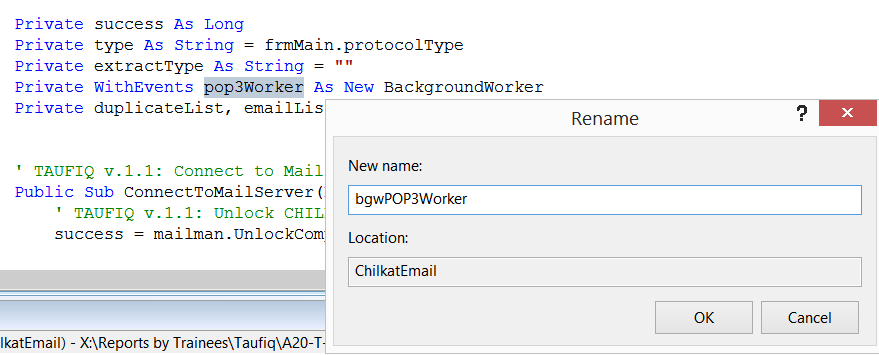
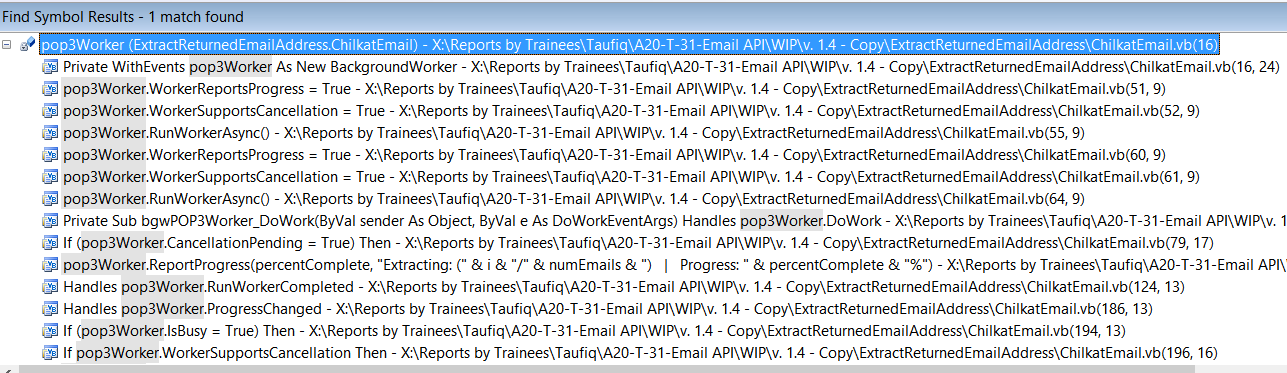
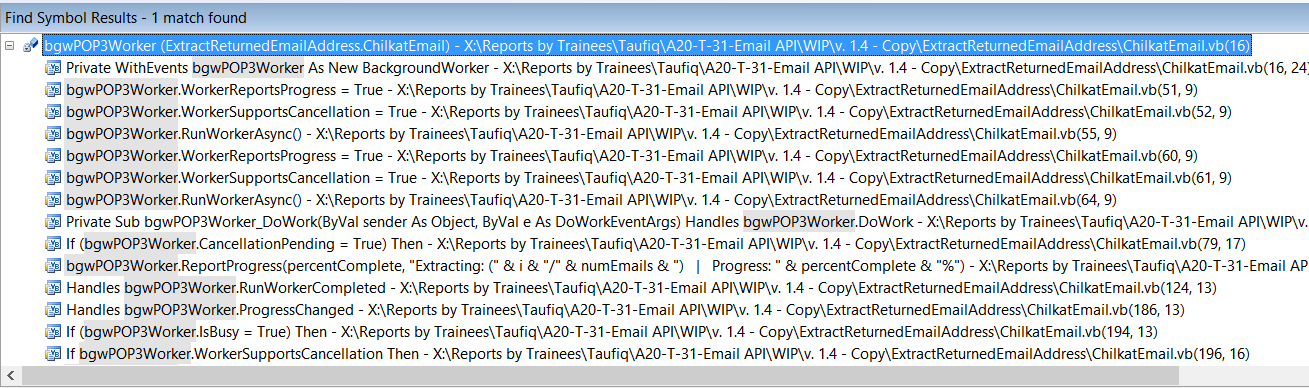
How to Rename a Code in VB.Net Which Will Replace All Instances of That Code
There are 2 ways:-
- Quick Replace
- Rename (this is faster and preferred for future VB.Net coding work)
“Rename” will automatically rename all instances.
Before:-
After:-
By using:-