Category Archives: SMS

How to Run VCOM as Windows Service Using “AlwaysUp”

VCOM

VCOM is a Windows Application. It is NOT a Windows Service. VCOM will auto-run when user has logged into (entering user name and password) Windows. Otherwise, VCOM will not run.

To run VCOM as a Windows Service you can install a 3rd party software call “AlwaysUp”.


Install & Configure VCOM in AlwaysUp

  1. Download “AlwaysUp” here … or from 3rd party web site ….
  2. Install it.
  3. Add a new service.
  4. Point to the path of “vcom.exe”.
  5. Ensure the status is “Automatic”.
  6. To view the GUI of VCOM, click on “Switch to Session 0”.
    then it will display the VCOM GUI:
  7. To return to Windows desktop from VCOM GUI, click “Return now”.


Warning

  1. After VCOM service is started by AlwaysUp, sometimes, this message by “Interactive Services Detection” will appear “A program running on this computer is trying to display a message”:
    click on “View Message” to switch to VCOM GUI:

  2. To return to Windows desktop from VCOM GUI, click “Return now”.


How to Run VCOM as Windows Service

VCOM is a Windows Application. It is NOT a Windows Service. VCOM will auto-run when user has logged into (entering user name and password) Windows. Otherwise, VCOM will not run.

To run VCOM as a Windows Service you can manually create a Windows Service using these steps. However, take note that you cannot run VCOM as both Windows Application and Windows Service mode at the same time.


CONFIGURE VCOM AS WINDOWS SERVICE

  1. First, IP address of MobiGATE and all 8 modems must be properly configured in VCOM application.
  2. Disable “auto-start” in VCOM application:
  3. Exit completely VCOM application.
  4. Download and install Windows Server 2003 Resource Kit Tools from Microsoft web page or from here …
  5. Only 2 executable files are needed:
    1. INSTSRV.exe
    2. SRVANY.exe
  6. After you have installed, run this command in command prompt:
    C:\Program Files\Windows Resource Kits\Tools>INSTSRV.exe VCOM "C:\Program Files\Windows Resource Kits\Tools\SRVANY.exe"
  7. Run Registry Editor (Regedt32.exe), check the registry to verify that the ImagePath value under “HKEY_LOCAL_MACHINE\SYSTEM\CurrentControlSet\Services\VCOM” is set to
    "C:\Program Files\Windows Resource Kits\Tools\srvany.exe"
    
  8. Right click on VCOM, from the Edit menu, click “Add Key”. Type the following and click “OK”:
    Key Name: Parameters
    Class : <leave blank>
  9. Select the “Parameters” key, click “Add Value”. Type the following and click “OK”:
    Value Name: Application
    Data Type : REG_SZ
    String : C:\Program Files\VCOM\VCOM\vcom.exe
    
  10. Exit Registry Editor and goto “Computer Management > Services” configure “VCOM” to run “Automatic”
  11. After service is started, 8 COM ports are created:

WARNING

  1. After VCOM service is started, then you start VCOM application, the application could NOT show all the 8 modems and 8 COM ports:
    VCOM application must be closed.
  2. If you want VCOM application to show all modems, then you must first stop the VCOM service, the only start VCOM application.
  3. VCOM cannot be running as both Windows Application and Windows Service mode at the same time.


Source: https://support.microsoft.com/en-my/help/137890/how-to-create-a-user-defined-service

VCOM Cannot Be Used to Change IP Address of MobiGATE

Conclusion:

  • VCOM Cannot Be Used to Change IP Address of MobiGATE. 
  • The “Configure” button in VCOM is NOT able to change the IP address.
Select the MobiGATE then click on the “Configure” in VCOM.
Enter the new IP address for the MobiGATE
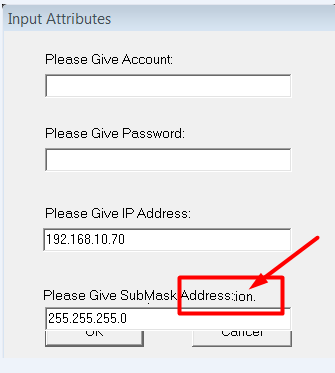
new IP address and Submask Address been entered
When OK is clicked, no response except .ion
Did the IP address changed? No, IP address remains at 192.168.10.69
What happens if I fill all the fields provided? — NOTHING
After OK is pressed -NOTHING HAPPENS


How to Solve SMS Engine Fails to Initialize Despite Hyper Terminal Can Communicate with MobiGATE

Applies to:

  • All SDK (SMS API, STK API, etc.)
  • all versions of SMS Engine — Enterprise Edition

Cause: “MSComm32.ocx” did not install properly or the date of the file is incorrect. This occur when MOBITEK SMS Engine — Enterprise Edition has been reinstalled a few times on the same Windows machine.

Solution:

  1. Uninstall MOBITEK SMS Engine — Enterprise Edition.
  2. Unregister “MSComm32.ocx”:
    1. for Windows 64-bit, run “cmd” or “Command Prompt” as “administrator”, then type
      1. “cd %systemroot%\SysWoW64\
      2. regsvr32.exe /u mscomm32.ocx
    2. for Windows 32-bit, goto Start → Run → type “regsvr32 /u mscomm32.ocx”
  3. Delete “MSComm32.ocx”.
  4. Re-install SMS Engine — Enterprise Edition.

or

  1. Unregister the “MSComm32.ocx” and delete it
    1. for Windows 64-bit, run “cmd” or “Command Prompt” as “administrator”, then type:
      1. cd %systemroot%\SysWoW64\
      2. regsvr32 /u mscomm32.ocx
    2. for Windows 32-bit, goto Start Run  type “regsvr32 /u mscomm32.ocx
  2. Copy the new “MSComm32.ocx” and manually register it:
    1. for Windows 64-bit, run “cmd” or “Command Prompt” as “administrator”, then type:
      1. “cd %systemroot%\SysWoW64\
      2. regsvr32 mscomm32.ocx
    2. for Windows 32-bit, goto Start Run type “regsvr32 mscomm32.ocx


source: https://support.microsoft.com/en-my/help/249873/how-to-use-the-regsvr32-tool-and-troubleshoot-regsvr32-error-messages

Set-up Guide for MOBITEK S80 on LAN

Objective: to set-up MOBITEK® S80  and MOBITEK® Q25 to operate on local area network (LAN) via LAN port.

Applies to:-

  • MOBITEK® S80  Type S-L
  • MOBITEK® S80 Type E-L
  • MOBITEK® Q25 Type D
  • MOBITEK® Q25  Type M

MOBITEK® S80 for SMS Over 3G Network

MOBITEK® Q25 4G Modem for SMS, E-Mail, MQTT & GNSS


How to Configure LAN Port of MOBITEK® S80

There are 2 tasks:-

  1. How to Assign/Change IP Address of MOBITEK® S80
    1. IP address has to be assigned to the modem
  2. How to Add A COM Port for MOBITEK® S80
    1. on PC/server, a new COM port has to be added and mapped to the IP address of the modem


How to Assign/Change IP Address of MOBITEK® S80

  1. Connect the LAN  (ethernet) cable to the modem and the other end to your router or switch.
  2. Connect power adapter to the modem, turn on the power.
  3. Run the Windows application “USR-TCP232-T24-V5.1.1.20.exe“.
  4. Click “Search in LAN”.
  5. It will look for the IP address of MOBITEK® S80, if found it will display the address. In this example it is 192.168.31.7
  6. Click the “Device list in the net” , make the following changes in the “Parameters” section:-
    1. set to “TCP Server”;
    2. change the IP address in “Module IP” that matches your LAN, the IP address is for MOBITEK® S80 (e.g. 192.168.10.210);
    3. change the “Default Gateway” that matches the IP address of your router (e.g. 192.168.10.1);
    4. optional — change “Module port”;
  7. Finally, click “Set selected item via Net” or “Set selected item via LAN” to save changes.
  8. Exit the Windows application “USR-TCP232-Setup”.
  9. Check if the new IP address assigned to MOBITEK® S80 is discoverable by entering the IP address into the browser. The username and password are as below:
    • Username = admin
    • Password = admin
  10. Go to “Local IP Config” and see the “Static IP” and “Gateway”.


How to Add A COM Port for MOBITEK® S80

  1. In Windows PC/Server, install “USR-VCOM” then run it.
  2. Click “Smart VCOM” (you must first exit “USR-TCP232-Setup”, otherwise an error message “Search port 1901 is occupied” will appear):
    USR-VCOM_V3.7.1.520_Setup-01
  3. If MOBITEK® S80 is found, it will be displayed. Check it then click “Next” to create COM port.
  4. A new COM port number will be created under “COM Name”, in this example it is 2.
  5. Also the COM port number can also be seen either in “Device Manager -> Ports”

    or in  “Device Manager -> Virtual Serial Ports (Eltima Software)”. COM port number will be displayed.
    USR-VCOM_V3.7.1.520_Setup-04
  6. “Net State” will show “Connected”.
  7. Your application will communicate with MOBITEK® S80 via the above COM port number.
  8. When your application is connected to MOBITEK® S80  then “COM State” will show “Open”.
  9. When your application is communicating with MOBITEK® S80 to send and read SMS, the values in “COM Received” and “Net Received” will be increasing.
  10. Ensure “USR-VCOM” is set to “AutoRun” (red box) and ensure it is running, otherwise SMS application is unable to connect to MOBITEK® S80 Modem:


Appendix: Using “Search” to Find the IP address of MOBITEK S80

  1. If “Smart VCOM” fail to work, then use “Search” function. Select “USR-TCP232-T24”:
  2. If modem is found, it will list the IP address of modem:
  3. Click “Connect Virtual COM” to create a COM port:
  4. Select a COM port for the modem (e.g. COM2), and select “TCP Client”:
  5. MOBITEK® S80 Modem is connected to COM port number 2.

MOBITEK S80 SMS Modem — Send SMS via SQL Statement

Problem: Many 3G modems allow you to send SMS via graphical user interface but not able to integrate with your software or system.


Solution: MOBITEK® S80 SMS Modem

MOBITEK® S80 allows you to integrate with your software or system send SMS via SQL statement.

  1. To send out SMS
    Insert into Outbox (Message, Mobile, DateTimeQueue, Status) 
    values (‘Hello!’, ‘0163311600’, mm/dd/yyyy hh:mm am, ‘P’)
  2. To read all new SMS
    Select * from Inbox where Status = ‘New’


How It Works?

  • Your application will connect to a MS Access database file.
  • SMS Engine — Basic Edition (Windows software) connects to both MOBITEK® S80 and with the database file.
  • Whenever there is a new record in the [outbox] table, SMS Engine — Basic Edition will pick-up and instruct MOBITEK® S80 to send out as SMS.
  • Whenever there is a new incoming SMS recevied by MOBITEK® S80, SMS Engine — Basic Edition will automatically insert into [inbox] table


More Advantages of SMS Engine — Basic Edition 

  1. Rapid Development: no need to waste time in developing a programme to handle incoming and outgoing SMS.
  2. SIM Unlock: enter the PIN, and the SMS Engine will unlock the SIM card.
  3. Polling: set the frequency of database polling – this will control the speed of the sending and receiving SMS.
  4. Delivery Status Report: a report will accompany with each outgoing SMS to report whether the SMS is delivered or not.
  5. Routing: able to configure multiple mobile number prefixes (by comma separated).
  6. Direction: to speed-up the broadcast, SMS Engine can be configured to send SMS only.
  7. Query Balance: if prepaid is used, the credit balance can be queried.
  8. Reload: if prepaid is used, a top-up can be performed.
  9. For more information, refer to https://www.mobitek.my/main/software-development-kit/mobitek-sms-engine-basic-edition/


New version 6 is available for existing customer to download. Please reply to this e-mail to receive the download link.


USB Driver of MOBITEK S80 SMS Modem Does Not Work in VirtualBox

Applies to:

MOBITEK® S80 for SMS Over 3G Network


Problem: when USB driver is installed, the following error message will appear:

Description:
  Windows was able to successfully install device driver
  software, but the driver software encountered a problem
  when it tried to run. The problem code is 10.

Problem signature:
  Problem Event Name:    PnPDeviceProblemCode
  Architecture:    x64
  Hardware Id:    USB\VID_1199&PID_68A3&REV_0006
  Setup class GUID:    {36fc9e60-c465-11cf-8056-444553540000}
  PnP problem code:    0000000A
  Driver name:    swiwdmbx64.sys
  Driver version:    1.0.0.9
  Driver date:    09-01-2014
  OS Version:    6.0.6001.2.1.0.272.7
  Locale ID:    1033

Suggested Solution: in VirtualBox map the USB port of host machine to serial port to virtual machine, refer to  “How to Set-Up MOBITEK S80 Modem in VirtualBox