Change Log of SMS360

v. 1.1 2024-01-03 Kaizen Completed

Add “Incoming SMS” tab

BEFORE AFTER
“Incoming SMS” tab that display ‘Inbox” table in grid format.

MODIFICATION in PHPRunner

  1. Add new connection to “SMSEngineVBNET.mdb”
  2. Add “Inbox” table to the project.
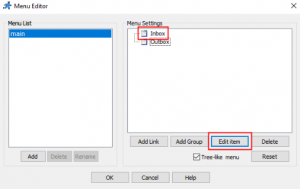
  3. Go to “Menu editor”. In “Menu Settings” section, select “Inbox” -> “Edit item”.
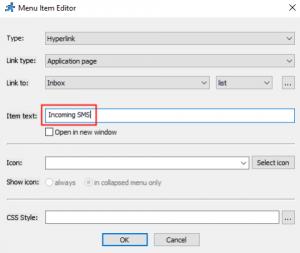
  4. In “Menu Item Editor”, rename the “Item text” to “Incoming SMS”.
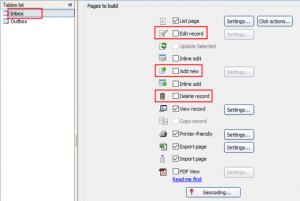
  5. Go to “Pages” tab. In Tables list, select “Inbox”. Uncheck “Edit record”, “Add new” and “Delete record”.
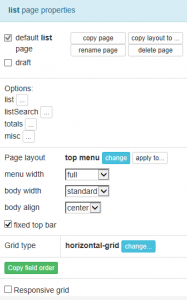
  6. Go to “Designer” tab, select “Inbox” in Tables list, set the page properties as below:
 

Add “Outgoing SMS” tab

BEFORE AFTER
“Outgoing SMS” tab that display “Outbox” table in grid format.

MODIFICATION in PHPRunner

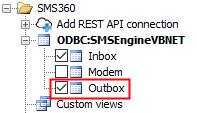
  1. Add “Outbox” table to the project.
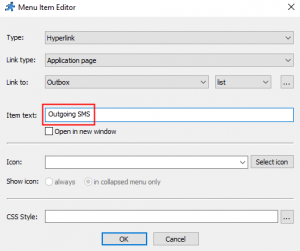
  2. Go to “Menu editor”. In “Menu Settings” section, select “Outbox” -> “Edit item”.
  3. In “Menu Item Editor”, rename the “Item text” to “Outgoing SMS”.
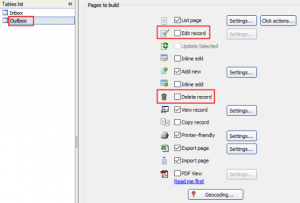
  4. Go to “Pages” tab. In Tables list, select “Outbox”. Uncheck “Edit record” and “Delete record”.
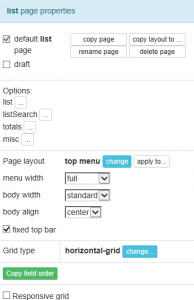
  5. Go to “Designer” tab, select “Outbox” in Tables list, set the “Page layout” as below:
 

Add button “Send SMS” into “Incoming SMS” tab

BEFORE AFTER
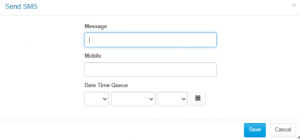
“Outgoing SMS” tab has a button “Send SMS” that insert a new record into “Outbox” table so that a SMS can be send out by SMS Engine — Basic Edition.

MODIFICATION in PHPRunner

  1. Go to “Designer” tab. Select “Outbox” in Tables list. Click on “list” tab, click “Add new” button. Rename the text in “label” to “Send SMS”.
  2. In the same “Designer” tab, select “add” tab. Click “Remove field” dropdown and remove all fields except “Message”, “Recipient” and “DateTimeQueue”.


Add “http://localhost/sms360/v.1.1”

BEFORE AFTER
Localhost in HPC-8300 can access the PHP files on “http://localhost/sms360/v.1.1”

MODIFICATION in PHPRunner

  1. Open “..\output\connections\ConnectionManager.php”
  2. Go to the line “$data[“ODBCString”]” and change the value to:
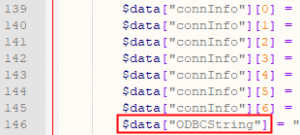
    • “Provider=Microsoft.ACE.OLEDB.12.0;Data Source=C:\\Users\\mobitek1\\Desktop\\SMS360 v. 1.1\\SMSEngineVBNET.mdb;Persist Security Info=False;”;
    • “Data Source” is where the “SMSEngineVBNET.mdb” located.
    • Each directory must be separated by double backslash “\\”.
  3. Copy all files inside “output” folder to “C:\wamp64\www\sms360\v.1.1”


v. 1.1 2024-01-03 Beta Testing Completed

TEST OBJECTIVE: Can v.1.1 work with “SMSEngineVBNET.mdb”?

TESTING METHODOLOGY TEST RESULT
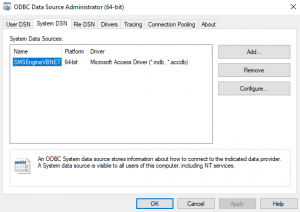
  1. Add “SMSEngineVBNET.mdb” in ODBC 64-bit
  2. Connect v.1.1 to “SMSEngineVBNET.mdb”
  3. Change the connection string for “$data[“ODBCString”]” in line 146 of “ConnectionManager.php” to:
    "Provider=Microsoft.ACE.OLEDB.12.0;Data Source=C:\\Users\\mobitek1\\Desktop\\SMS360 v. 1.1\\SMSEngineVBNET.mdb;Persist Security Info=False;";


TEST OBJECTIVE: Can v.1.1 run in localhost of HPC-8300 (http://localhost/sms360/v.1.1) ?

TESTING METHODOLOGY TEST RESULT
  1. Copy all files inside “output” folder to “C:\wamp64\www\sms360\v.1.1”
  2. Open “http://localhost/sms360/v.1.1” in browser


PROBLEM

SOLUTION SOLVED?
According to PHPRunner documentation, to use PHPRunner with Access database, we need to use 32-bit version
(source: https://xlinesoft.com/phprunner/docs/connecting_to_ms_access_db.htm)
Not tested
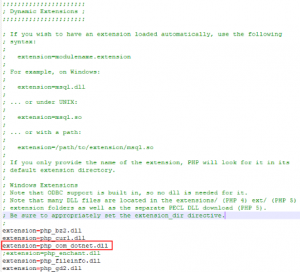
Enable “php_com_dotnet.dll” extension in “php.ini” file
(source: https://xlinesoft.com/phprunner/docs/connecting_to_ms_access_db.htm)

NO
Use ODBC in PHPRunner


refer to

NO. ODBC does not work.

“ADODB.Connection” problem has disappeared but new error thrown

Steps to use ODBC in PHPRunner:

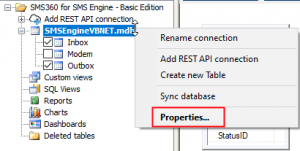
  1. In “Tables” tab, right-click on the database and select “Properties”
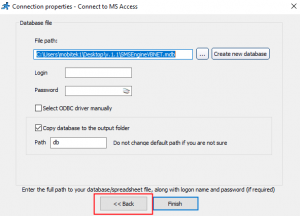
  2. In “Connection properties”, click on “Back” button
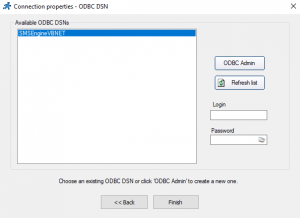
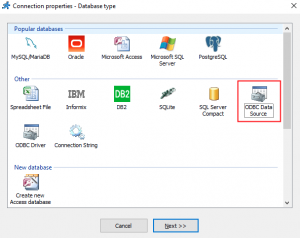
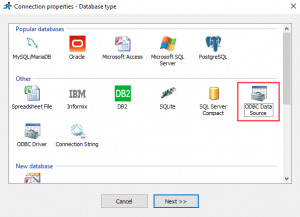
  3. Select “ODBC Data Source”
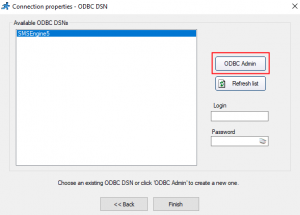
  4. Click “ODBC Admin” button
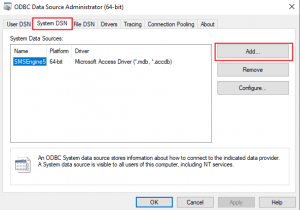
  5. Select “System DSN” and click “Add…” button
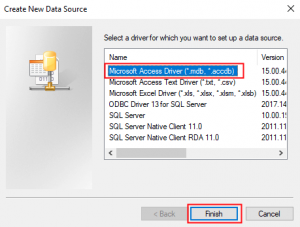
  6. Select “Microsoft Access Driver (*.mdb, *.accdb)”
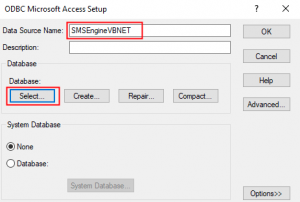
  7. Enter the “Data Source Name” and click “Select…”
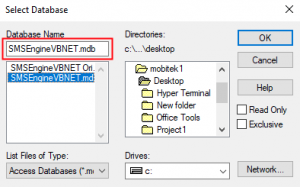
  8. Locate the location of the database
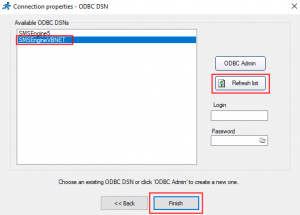
  9. Click “Refresh list” button, select the new “DSN” created and click “Finish”


It seems like PHPRunner still use Microsoft.Jet.OLEDB driver to connect to Access database which only work with 32-bit application as suggested by PHPRunner

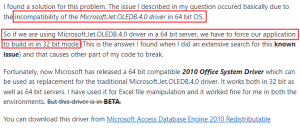
The problem with Microsoft.Jet.OLEDB driver also discussed by others
(source: https://stackoverflow.com/questions/1991643/microsoft-jet-oledb-4-0-provider-is-not-registered-on-the-local-machine)


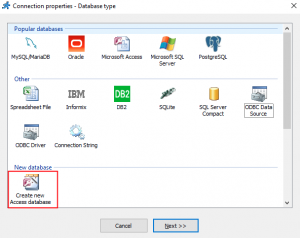
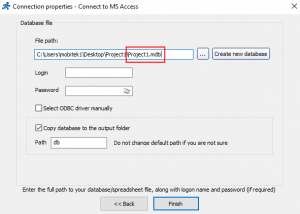
I’ve tried to create a new blank project using MS Access database in PHPRunner and also face the same problem:

  • connection properties
  • error thrown
    “Unrecognized database format ‘C:\Users\mobitek1\Desktop\Project1\output\db\Project1.mdb’. in C:\Users\mobitek1\Desktop\Project1\output\connections\Connection.php on line 626


The solutions to use Microsoft Access database in PHPRunner are:

  • use “Provider=Microsoft.ACE.OLEDB.12.0” in connection string (we don’t have control for this)
  • use “Microsoft Access Database Engine 2010 Redistributable” (not sure how it works)
    https://www.microsoft.com/en-us/download/details.aspx?id=13255
  • use 32-bit version of PHPRunner (as suggested by PHPRunner)
Edit the “ConnectionManager.php” to force it to use “Provider=Microsoft.ACE.OLEDB.12.0” instead of “Provider=Microsoft.Jet.OLEDB.4.0”


 YES

Overwrite “..\output\connections\ConnectionManager.php” in line 146 from:

Provider=Microsoft.Jet.OLEDB.4.0;DSN=SMSEngineVBNET;UID=;PWD=;Driver=C:\\PROGRA~1\\COMMON~1\\MICROS~1\\OFFICE15\\ACEODBC.DLL;DBQ=C:\\Users\\mobitek1\\Desktop\\SMS360 v. 1.1\\SMSEngineVBNET.mdb;DriverId=25;FIL=\”MS Access;\”;SafeTransactions=0″

to

Provider=Microsoft.ACE.OLEDB.12.0;Data Source=C:\\Users\\mobitek1\\Desktop\\Project1\\SMSEngineVBNET.mdb;Persist Security Info=False;


How Does MOBITEK S150 Remotely Open and Close Automatic Gate by SMS

SMS Command

  • To open the gate:
    • send 1234CC to connect the relay
    • send 1234DD to disconnect the relay
  • To close the gate:
    • send 1234CC to connect the relay
    • send 1234DD to disconnect the relay


Steps — Wiring and Configuration

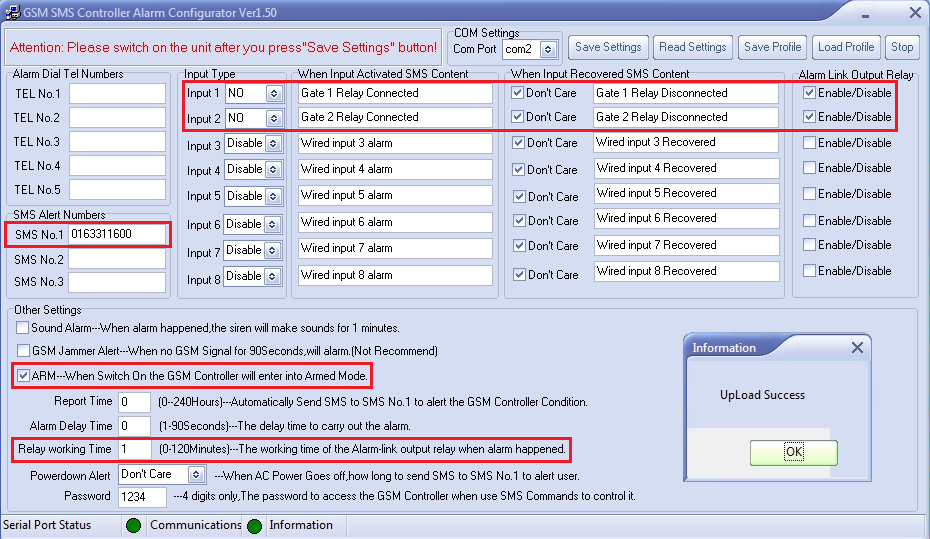
  1. Configure S150 in “S130~S150 PC Configurator Ver1.50”.
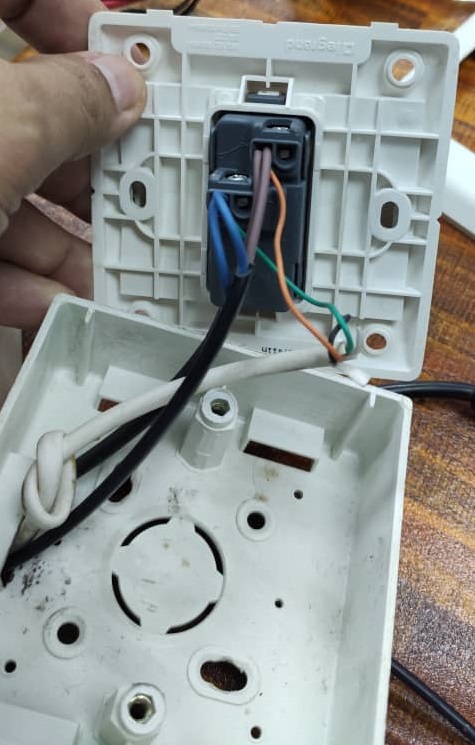
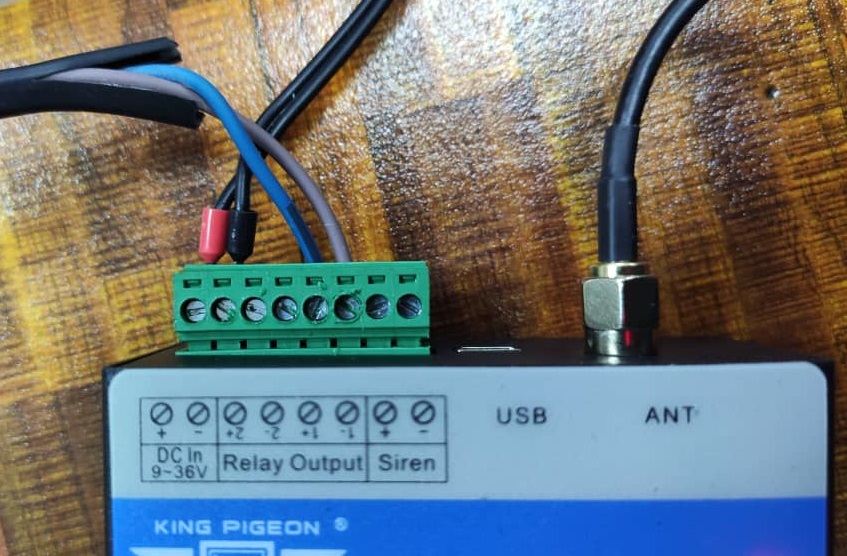
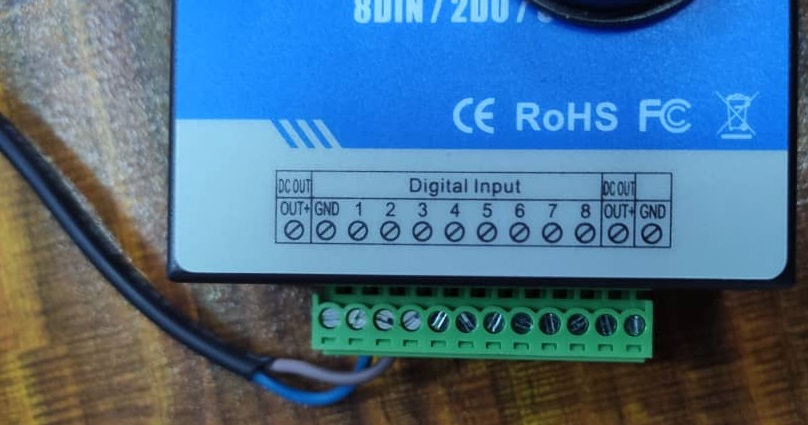
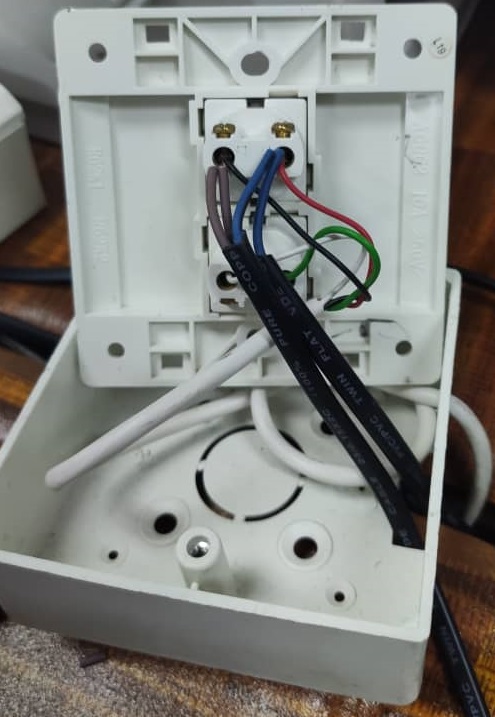
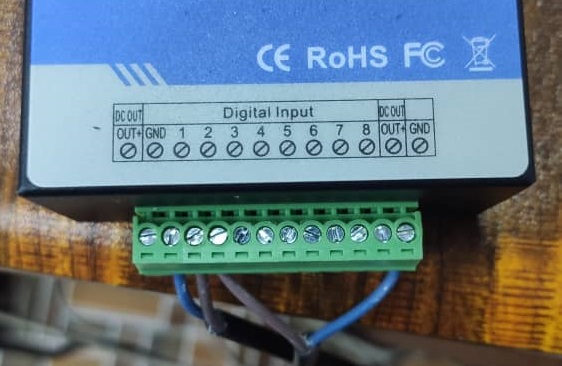
  2. Contractor wire the 1st gate:
    • 1st gate button wiring (open and close gate)
    • Relay Output (1+ & 1-) and;
    • Digital Input (GND & 1).
  3. Contractor wire the 2nd gate:
    • 2nd gate button wiring (both sides gate)
    • Relay Output (2+ & 2-)
    • Digital Input (GND & 2)

PHPRunner Allows Both Image and PDF File to be Uploaded

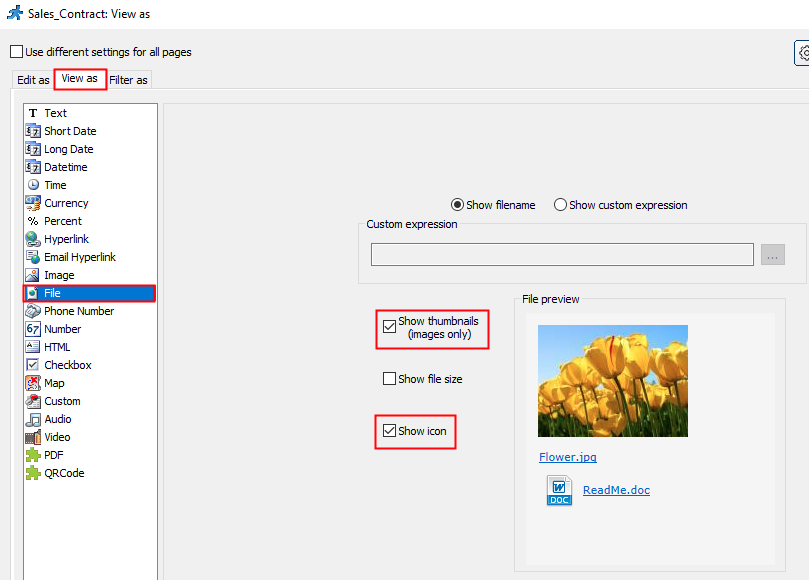
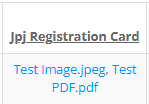
The Preferred Method — “View as File”

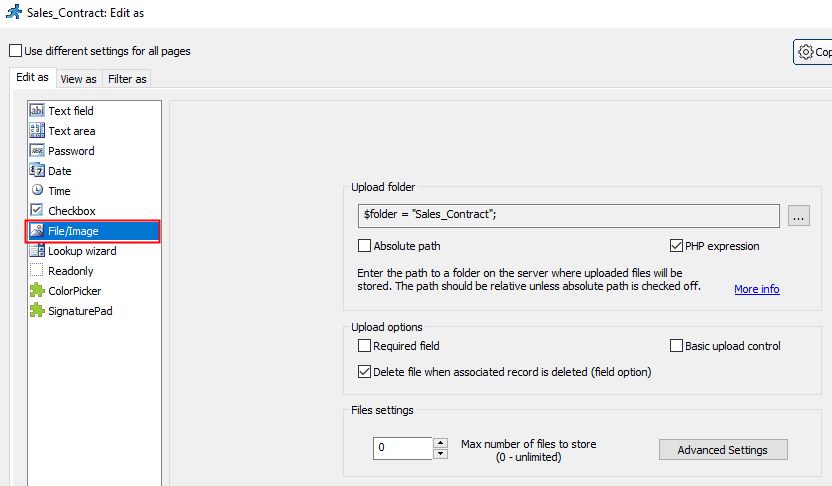
To set the field to allow both image and PDF file to be uploaded, go to “Designer” tab, select the field and click “View As/Edit As” button:

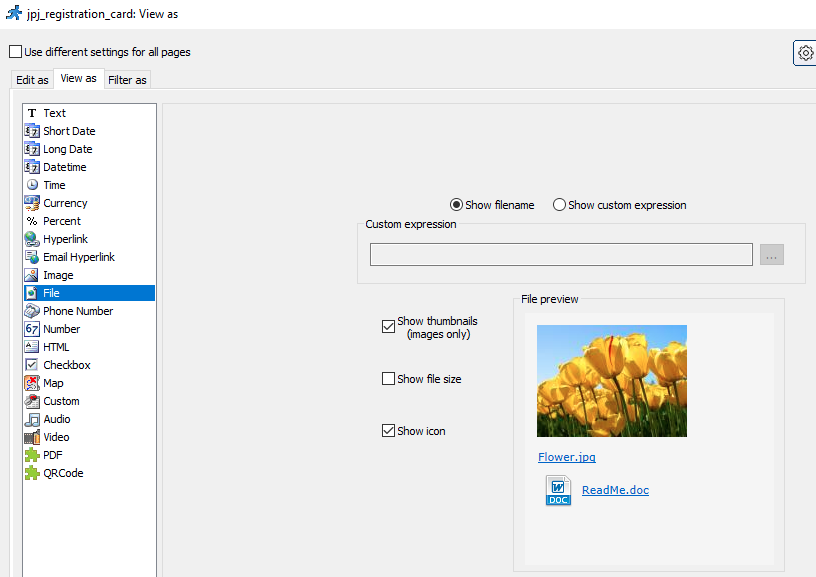
  • In “View as”, set the field as “File”
  • In “Edit as”:-

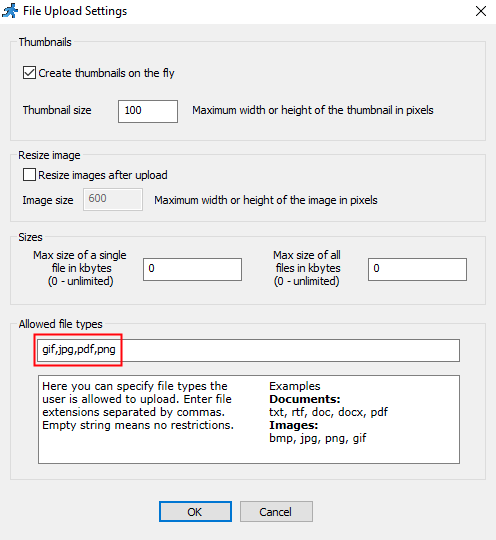
    In “Advanced Settings”, set the “Allowed file types” to accept both image and document format or just leave it empty to allow all file formats:-
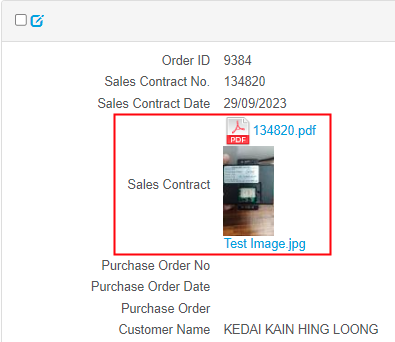
  • The result:-


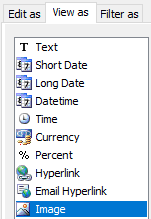
Difference Among “view as image”, “view as file”, “view as PDF”

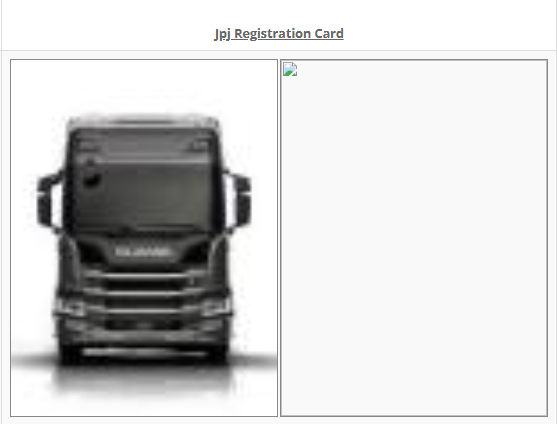
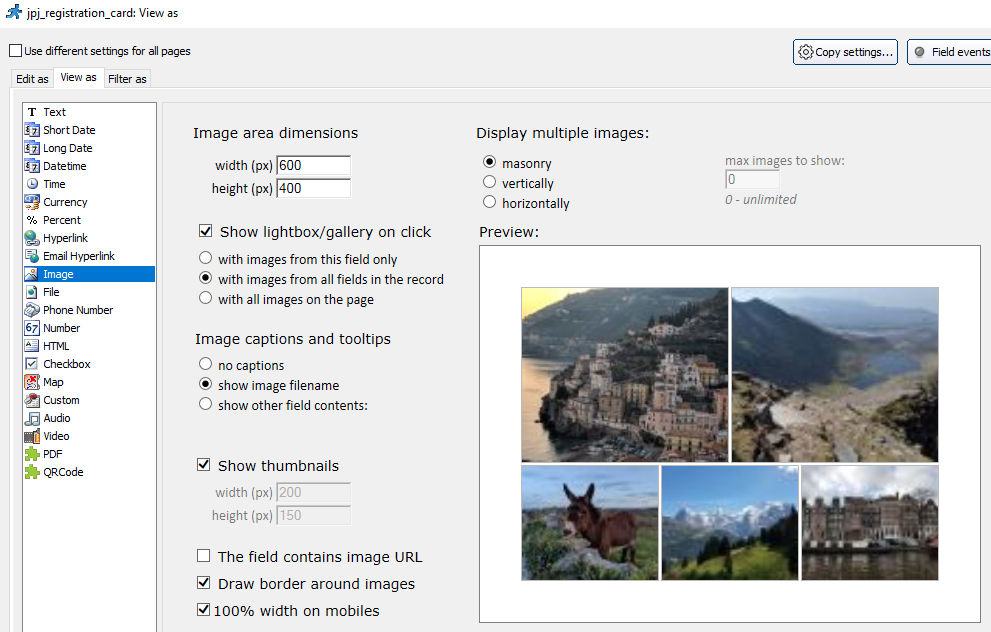
View as “Image”

    • display only image but any document file will have a broken image
    • click on image will open a preview
    • click on document will get below error


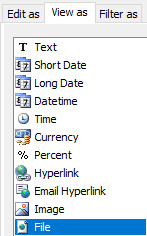
View as “File”

    • display image (as thumbnail) and document (as icon).
    • click on image or document will download it.


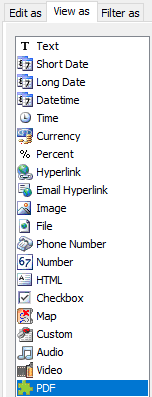
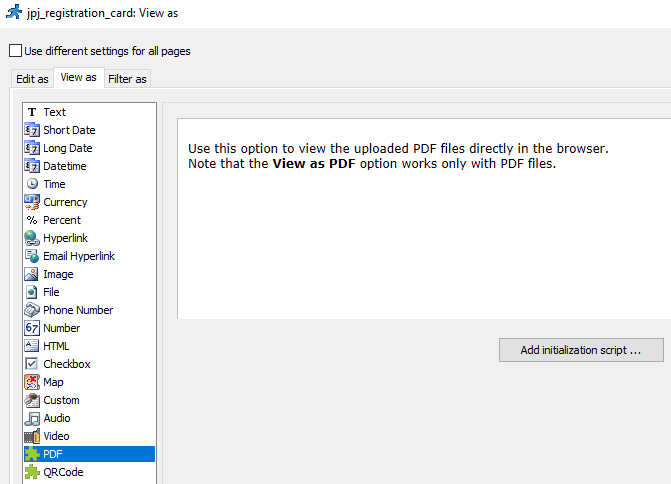
View as “PDF”

    • display both image and document as filename
    • click on image filename will download the image
    • click on document filename will open the document in a new tab for viewing without downloading


Conclusions on Both Image and PDF File Format

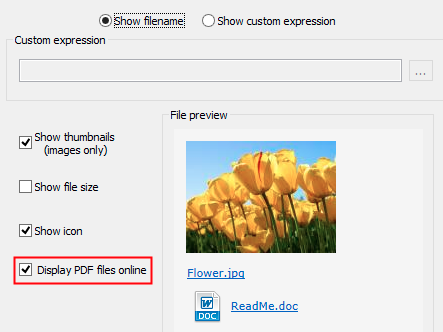
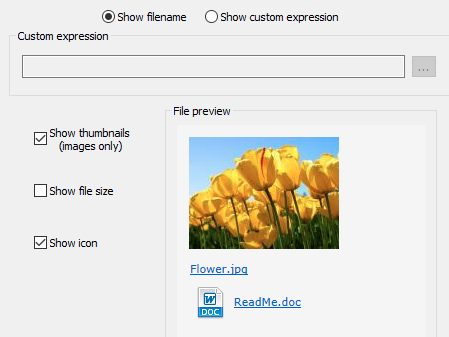
In the documentation (https://xlinesoft.com/phprunner/docs/view_as_settings_file.htm), there is “Display PDF files online” but not in our PHPRunner.

  • documentation
  • our PHPRunner

That’s the only way to view the PDF file uploaded online. But still the image file will be downloaded when clicked.


3 ways to show the uploaded image or file

  1. view as “Image” (only show image. can be viewed when clicked)
  2. view as “File” (show image and file as thumbnail and icon. downloaded when clicked. currently used for “jpj_registration_card” and “insurance”)
  3. view as “PDF (only show pdf, can be viewed)

SMS Engine Basic Edition version 7.4 is Released for MOBITEK Q25

Version 7.4: E-mail notification function was added. Notification is send out on these 2 conditions:

    1. when engine is stopped; and
    2. when any modem is unable to initialize.

Click on “Notification” menu.

MOBITEK® SMS Engine is provided for free with MOBITEK® Q25 4G ModemType M only.

MOBITEK® SMS Engine — Basic Edition is able to work in:

  • Windows XP, Vista, 7, 8, 10 32-bit & 64-bit, 11 64-bit
  • Windows Server 2003, 2008, 2010 R2, 2016, 2019 32-bit & 64-bit.

How It Works?


More Information

How to Solve MOBITEK S150 Rebooting Every 1 Minute

PROBLEM SOLUTION
Find out why S150 keeps rebooting every 1 minute.


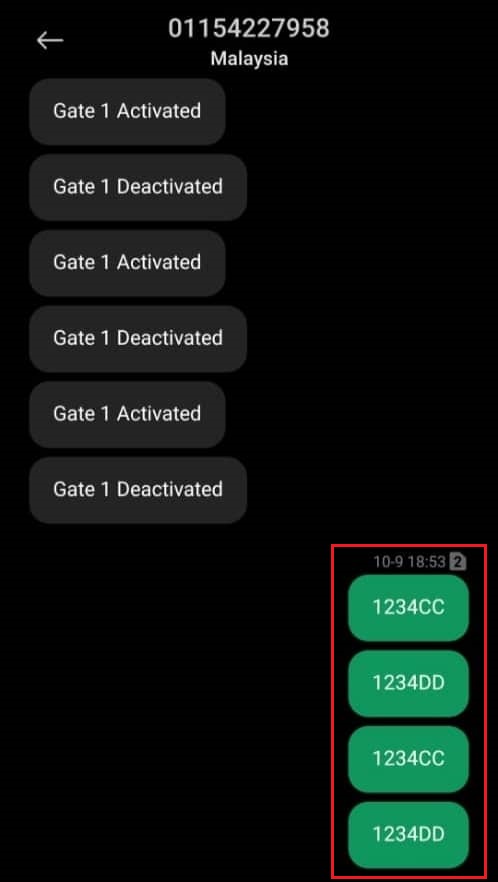
The problem will occur when S150 is unable to reply by SMS to the “1234CC” and “1234DD” commands.

In our case, the cause is SMS quota in the Yoodo SIM card has been exchausted, so S150 is not able to reply via SMS to any command send to it. When it failed to send out SMS, it would self-reboot. This will be repeated for every 1 minute until SMS is successfully send out.

Solution: Keep the credit balance available all the time to avoid the S150 rebooting every 1 minute in order to resend SMS.

How to Use MOBITEK Q25 4G Modem as USB Modem for Internet Access

  1. Firstly, install USB Driver for MOBITEK Q25.
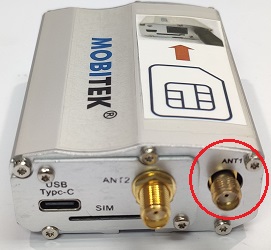
  2. Connect antenna to MOBITEK Q25. Use one antenna and connect it to “ANT1” is enough.
  3. Insert SIM card into the SIM card slot of MOBITEK Q25. Make sure the SIM card used has a subscription to internet.
  4. Connect MOBITEK Q25 4G Modem via the USB port.
  5. Open Device Manager and check for COM Port of MOBITEK Q25 4G Modem. The installation of USB Driver of MOBITEK Q25 is successfull if the COM Port of MOBITEK Q25 4G Modem appear in Device Manager. For this example, the COM Port is “COM2”.
  6. Go to the Windows tray located in Windows taskbar.
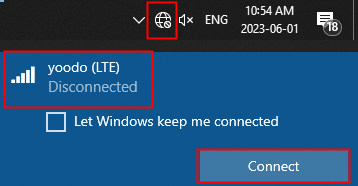
    • if the PC/laptop is not connected to any network, the icon will be a “globe” icon. Click on the “globe” icon.
    • if the PC/laptop has an active connection, the icon will be a “PC with USB” icon or “network bar” icon. Click on either one.

  7. The TELCO of the SIM card in MOBITEK Q25 4G Modem will popup in the panel. For this example, it is “yoodo (LTE)”. Click “Connect” to connect to the TELCO network.
  8. If it successfully connected, the “network bar” icon will be shown in the Windows tray.
  9. To test the connection, open any browser and enter “www.mobitek.my“. The connection is successful if the page can load without error.
  10. Finally, Windows PC is able to connect to the internet.

For more information about MOBITEK Q25 Modem, visit :-

MOBITEK® Q25 4G Modem for SMS, E-Mail, MQTT & GNSS


Introducing MOBITEK WhatsApp Notification Service — Receive WhatsApp Messages Sent from Any of Your System

This service allows you to receive WhatsApp messages sent from any systems.

Here is how it works:-

  • You will be added into a WhatsApp group call “info@mobitek.my”.
  • You can add anyone from your team into this group.
  • Your system will direct e-mail notification to info@mobitek.my.
  • Everyone in the group will receive WhatsApp notification sent by your system.

Note: this service does not support sending images and file attachments via WhatsApp.

Please contact us for a demonstration.

How to Disable Snipping Tool in Windows 11

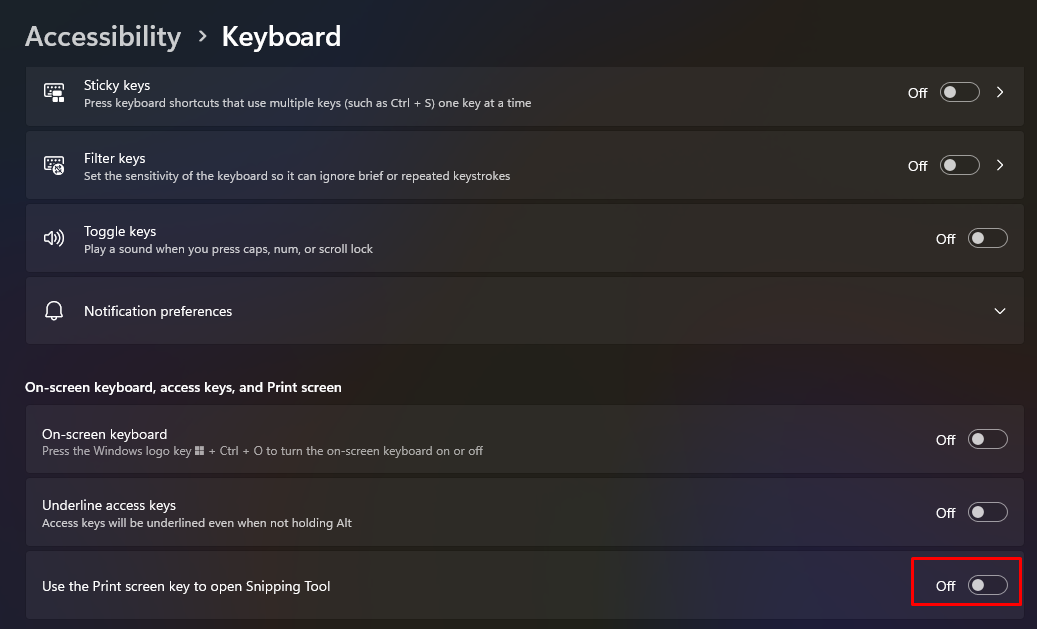
These methods will not disable the Snipping Tool. The “PrtSc” button cannot be overwritten and will always call Snipping Tool:-

  1. changing the registry (https://thegeekpage.com/disable-snipping-tool/)
  2. uninstalling in App (https://thegeekpage.com/disable-snipping-tool/)
  3. disable the serivce (https://answers.microsoft.com/en-us/windows/forum/all/disable-snipping-tool/0eccf6ca-013c-4ff5-8ac0-613db83bfffc)

Solution is to turn off “Use the Print screen key to open Snipping Tool”.


How To Restrict a Device Using MAC Filter

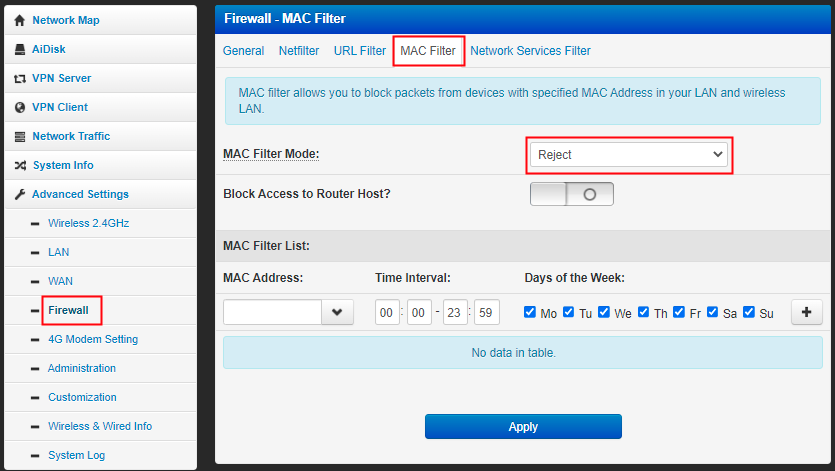
  1. Go to “Firewall” -> “MAC Filter”. In “MAC Filter Mode” section, select “Reject”:-
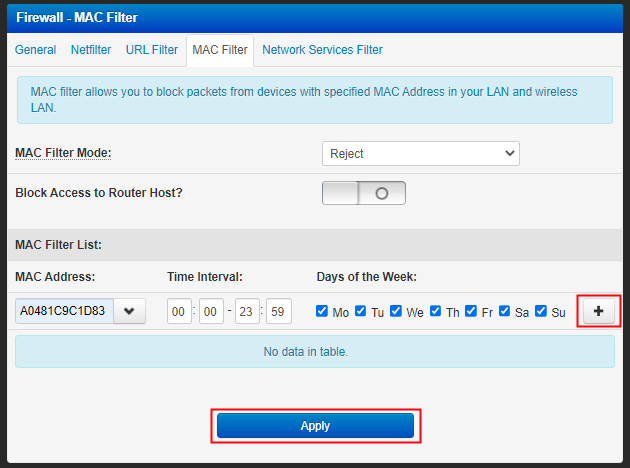
  2. Under “MAC Filter List”:-
    • if the device is connected to the router, select the device from the dropdown list of “MAC Address”.
    • if the device is not connected to the router, type the MAC address of the device in “MAC Address” section.
  3. Click “+” button then click “Apply” button.