Category Archives: Support

How to Solve the Problem of Epic Games Launcher Unable to Start

Problem:  after upgrading NVIDA driver from v. 445.87 to v. 456.38, Epic Games Laucher cannot be opened or started, it keeps opening then close, mouse could be blinking.


Solution:  right click on the Epic Games Launcher -> Run with graphics processor -> Integrated graphics


Other Solutions:-

  1. Epic Games Launcher displays incorrectly or appears blank
  2. Epic Games Launcher Not Working? Here Are 4 Solutions


How to Solve “ERROR [HYT00][Microsoft][ODBC SQL Server Driver]Query timeout expired”

PROBLEM: ERROR [HYT00][Microsoft][ODBC SQL Server Driver]Query timeout expired

POSSIBLE CAUSE: Database too large, too many records in tables

SOLUTION: Create an index for “outbox” table:-

  1. Stop the SMS Engine service of MobiGATE
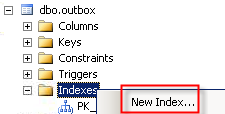
  2. Using SQL Management Studio, go to “indexes” of “dbo.outbox”, right-clickm select “New Index…”
  3. For “index name”, enter “To solve query timeout”
  4. Select “Nonclustered”
  5. Click “Add” to add 2 columns “datetime_queued” and “sent_status” (refer to red boxes below):
  6. Click “OK” button and a new index will be created:
  7. Start the SMS Engine service of MobiGATE
  8. Observe in log if this eror message still appear “ERROR [HYT00][Microsoft][ODBC SQL Server Driver]Query timeout expired
  9. If it appears again, please fill-in the table below:
    QUESTIONS ANSWERS (provide screen shot if available) REMARK
    Date of index created (as shown above)
    Take a screen capture of the SQL Management Studio showing:

    1. the new index
    2. the columns in the new index
    Date of the error message “ERROR [HYT00][Microsoft][ODBC SQL Server Driver]Query timeout expired” first appear
    Total number of records in “outbox” table when the error first appears
    Please send us:

    • the log file of the date when the error appear
    • “config.xml” file

How to Write a SQL Statement that Sums All Records of Different Items in Each Group as “Total Balance”

Problem: In “Stock Card” table, it records the stock movement, “In” and “Out”  of each item (ITEM ID).  There are different items that belongs to same group (GROUP).  And there are many groups (GROUP).


STOCK CARD TABLE
GROUP ITEM ID IN OUT
EKONOR EKONOR-1 20
EKONOR EKONOR-1 10
EKONOR EKONOR-2 40
EKONOR EKONOR-2 10
EKONOR EKONOR-2 20
SAGA SAGA-1 10
SAGA SAGA-1 5
SAGA SAGA-1 5
SAGA SAGA-2 10
SAGA SAGA-2 10
SAGA SAGA-2 20

How to get the sum (TOTAL BALANCE) of each group as below?

GROUP TOTAL RECORDS TOTAL BALANCE
EKONOR 5 20
SAGA 6 10


Solution: using this SQL statement

SELECT `Group`,
(SELECT COUNT(Stock_Description.`Group`) FROM Stock_Description WHERE Stock_Description.`Group` = sd.`Group`) As `TOTAL RECORDS`,
(SELECT SUM(COALESCE(a.`IN`,0) – COALESCE(a.`OUT`,0)) FROM Stock_Card a WHERE a.Item_ID LIKE CONCAT(sd.`Group, ‘%’) AND a.Balance IS NOT NULL) AS `TOTAL BALANCE` FROM Stock_Description sd GROUP BY `Group`;


SELECT SUM(COALESCE(a.`IN`,0) – COALESCE(a.`OUT`,0)) FROM Stock_Card a WHERE a.Item_ID LIKE CONCAT(sd.`Group`, ‘%’) AND a.Balance IS NOT NULL) AS Total_Balance

the above SQL statement will display  a “TOTAL BALANCE” of each “GROUP” by:-

  • summing all “In” records of “EKONOR” minus the sum of all “Out” of EKONOR”
    • (20 + 40) – (10 + 10 + 20)
    • = 20
  • summing all “In” records of “SAGA” minus the sum of all “Out” of  “SAGA”
    • (10 + 5 + 10 + 10) – (5 + 20)
    • = 10


SELECT COUNT(Stock_Description.`Group`) FROM Stock_Description WHERE Stock_Description.`Group` = sd.`Group`) As `TOTAL RECORDS`

the above SQL statement will display  a “TOTAL RECORDS” of each “GROUP” by:-

  • summing all records in “EKONOR” group
  • summing all records in “SAGA” group

Source:-

How to Block Spammer or Hacker Who Always Changed the Sender’s E-Mail Address?

Spammer or hacker will always change the e-mail address to avoid being flag as spam based on the sender’s e-mail address.


Solution: block the SMTP domain of spammer or hacker by using “Global Email Filters” tool in cPanel

  1. Goto “Global Email Filters”
  2. Click “Edit” on “Block E-mail Based on Header”
  3. Click on “+” button to add a new entry
  4. Change to “Any Header” and enter the header information that will be blocked by mail server and will be diverted to spam folder
  5. Finally, click “Save” button

The Location of My.Settings Used by VB.Net Application

Determine whether the application saves the user settings on exit.

The SaveMySettingsOnExit property allows the user to change how the application saves settings, at run time. You can explicitly save setting changes by using the Save method of the My.Settings object.

The changes to this property are not persisted when the application closes. To change the SaveMySettingsOnExit property permanently, you must change the setting in the Project Designer:

To change the setting in the Project Designer
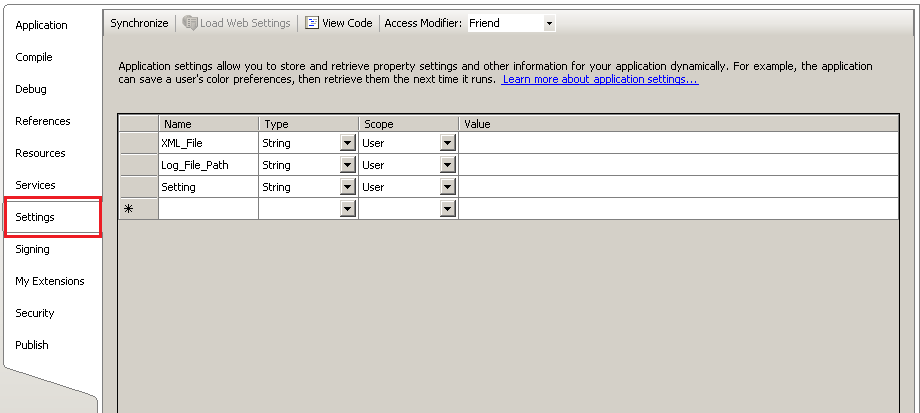
1. Have a project selected in Solution Explorer. Click Properties on the Project menu.
2. Click the Application tab.
3. Select Save My.Settings on Shutdown.

There are two types of application settings, based on scope:

  • Application-scoped settings can be used for information such as a URL for a web service or a database connection string. These values are associated with the application. Therefore, users cannot change them at run time.
  • User-scoped settings can be used for information such as persisting the last position of a form or a font preference. Users can change these values at run time.

The path that store My.Settings config file differ depends upon the scope that has selected and the Visual Studio version. For Microsoft Visual Studio 2008 Version 9.0.30729.4462 QFE, the config is stored in:

C:\Users\<username>\AppData\Local\<companyname>\<appdomainname>_<eid>_<hash>\<version>\user.config

Source:-

Where Does PHPRunner Store the Database Settings?

PHPRunner version 10.x : ConnectionManager.php


protected function _setConnectionsData()
{
// content of this function can be modified on demo account
// variable names $data and $connectionsData are important

$connectionsData = array();

$data = array();
$data["dbType"] = 0;
$data["connId"] = "Tables";
$data["connName"] = "crm2017 at 00.00.00.00";
$data["connStringType"] = "mysql";
$data["connectionString"] = "mysql;00.00.00.00;crm;scale-UP;;crm2017;;1"; //currently unused

$this->_connectionsIdByName["crm2017 at 00.00.00.00"] = "Tables";

$data["connInfo"] = array();
$data["ODBCUID"] = "crm";
$data["ODBCPWD"] = "scale-UP";
$data["leftWrap"] = "`";
$data["rightWrap"] = "`";

$data["DBPath"] = "db"; //currently unused 
$data["useServerMapPath"] = 1; //currently unused

$data["connInfo"][0] = "00.00.00.00";
$data["connInfo"][1] = "crm";
$data["connInfo"][2] = "scale-UP";
$data["connInfo"][3] = "";
$data["connInfo"][4] = "crm2017";
$data["connInfo"][5] = ""; //currently unused
$data["connInfo"][6] = "1"; //currently unused
$data["ODBCString"] = "DRIVER={MySQL ODBC 5.1 Driver};Server=00.00.00.00;Uid=crm;Pwd=scale-UP;Database=crm2017;OPTION=3";
// encription set
$data["EncryptInfo"] = array();
$data["EncryptInfo"]["mode"] = 0;
$data["EncryptInfo"]["alg"] = 128;
$data["EncryptInfo"]["key"] = "";

$connectionsData["Tables"] = $data;
$this->_connectionsData = $connectionsData;
}


Summary Table — MOBITEK Modem in Linux Mint in VM and Linux Mint as Host OS

MODEM Linux Mint in VM Linux Mint in Dell-D630
MOBITEK S80 MOBITEK S80 does not work (no response in CuteCom) in VM-Linux Mint MOBITEK S80 can work in Linux Mint using USB. There are 4 COM ports created in Linux (ttyUSB0, ttyUSB1, ttyUSB2, ttyUSB3), only “ttyUSB3” is used for the AT command.
MOBITEK Q24 MOBITEK Q24 is working (can send and read SMS) in VM-Linux Mint MOBITEK Q24 also can work in Linux using “ttyUSB0”


How to Assign a short-cut key (hotkey) for a LibreOffice Macro

  1. Open LibreOffice that containing the macro
  2. Click “Tools” -> “Customize…
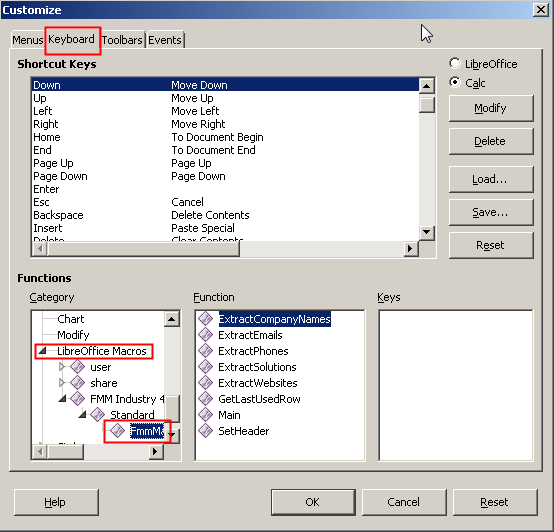
  3. In Customize, Click “Keyboard” tab and scroll down the “Category” section until you find “LibreOffice Macros“. Select the macro.
  4. Select the function that you want to assign the shortcut key in “Function” section and find the available keys in “Shortcut Keys” area. Select the key and click “Modify” button. Click “OK