Category Archives: Support

How to Automatically Fill-In “Laporan Harian COVID-19”

Note: the report as been moved from http://survey.dosh.gov.my/laporanhariancovid19/ to https://notification.miti.gov.my, we have revised the script to automatically filled in the new report at this new post …

Quick Guide

  1. Install AutoHotkey (AHK).
  2. Select the script “DOSH v. 1.0-demo.ahk”.
  3. Run the script by double clicking on “DOSH v. 1.0-demo.ahk” file.
  4. Go to “Laporan Harian COVID-19”  at http://survey.dosh.gov.my/laporanhariancovid19/
  5. Run the hotkey according to its page number. For example:
    • on page 1, press <CTRL> then <1>, all fields on that page will be automatically filled;
    • on page 2, press <CTRL> then <2>, all fields on that page will be automatically filled;
    • on page 5 (last page), press <CTRL> then <5>, all fields on that page will be automatically filled;
  6. Finally, manually click “Hantar” to submit the report. Refer to video below for a demonstration …

Continue reading

How to Configure TLS 1.2 in Windows Server

  1. Open Windows PowerShell and copy below command into it
    # Create Keys for TLS 1.2 if not exist
    
    new-item -path "HKLM:\SYSTEM\CurrentControlSet\Control\SecurityProviders\SCHANNEL\Protocols" -Name "TLS 1.2"
    
    new-item -path "HKLM:\SYSTEM\CurrentControlSet\Control\SecurityProviders\SCHANNEL\Protocols\TLS 1.2" -Name "Server"
    
    new-item -path "HKLM:\SYSTEM\CurrentControlSet\Control\SecurityProviders\SCHANNEL\Protocols\TLS 1.2" -Name "Client"
    
    new-itemproperty -path "HKLM:\SYSTEM\CurrentControlSet\Control\SecurityProviders\SCHANNEL\Protocols\TLS 1.2\Client" -Name "Enabled" -Value 1
    
    new-itemproperty -path "HKLM:\SYSTEM\CurrentControlSet\Control\SecurityProviders\SCHANNEL\Protocols\TLS 1.2\Client" -Name "DisabledByDefault" -Value 0
    
    new-itemproperty -path "HKLM:\SYSTEM\CurrentControlSet\Control\SecurityProviders\SCHANNEL\Protocols\TLS 1.2\Server" -Name "Enabled" -Value 1
    
    new-itemproperty -path "HKLM:\SYSTEM\CurrentControlSet\Control\SecurityProviders\SCHANNEL\Protocols\TLS 1.2\Server" -Name "DisabledByDefault" -Value 0
  2. Reboot server
  3. To check whether TLS 1.2 is configured, open Registry Editor and go to this path:
    HKEY_LOCAL_MACHINE\SYSTEM\CurrentControlSet\Control\SecurityProviders\SCHANNEL\Protocols

    in this picture, it shows that Windows has “SSL 2.0” and “TLS 1.2” security protocol installed.

(OBSOLETE) Control Panel for MobiGATE SMS Engine — Enterprise Edition version 2.6 is Released

List of  Fixes in Version 2.6

  • Engine cannot start because service is still stopping (after “Stop” button is clicked). CP shows “Stopped” but in fact service is showing “Stopping”;
  • Engine cannot stop because service is still starting (after “Start” button is clicked). CP shows “Started” bt in fact service is showing “Starting”;
  • “Modem Status” is tab “Modem 9 to 16” is not showing colours, it is showing “5” or “0” instead. Happens in MS SQL Server only (does not happen in MySQL);
  • Error message when connecting the “modem.state” table – “Location: CheckModemStatusVersion2_MSSQL Error message: Login failed. The login is from an untrusted domain and cannot be used with Windows authentication”;
  • Error message when connecting the “modem.state” table – “Location: CheckModemStatusVersion2_MSSQL Error message: Login failed. The login is from an untrusted domain and cannot be used with Integrated authentication”;
  • Conversion from string “” to type ‘Double’ is not valid. Caused by null or empty value in “Modem_State.Status”;
  • After stop monitoring, modem ID 9 to 16 still showing modem status.By right, there should be no colour status and should be all grey colour;
  • Set the application to run as administrator automatically.


Download

Existing customers of MobiGATE with valid warranty period or with valid annual support programme could download version 2.6 from here … (https://www.mobitek.my/download/MOBITEK%20MOBIGATE/Setup%20–%20Control%20Panel%20v.%202.6.zip)


More Information


How to Solve mp4 Video File Cannot be Playbacked in a Web Broswer

Problem: mp4 video, “vcom-showing-connected-then-disconnected.mp4”,  in https://mobitek-system.com/blog/2017/11/vcom-showing-connected-then-disconnected/ cannot be playbacked.


Cause: encoding used is not supported by web browser even though the “vcom-showing-connected-then-disconnected.mp4” video can be played in Windows Media Player.


Suggestions: for HTML5 in general, the optimized video encoding would be H.264 for .MP4 or WEBM for .webm (refer to https://help.encoding.com/knowledge-base/article/html5-video-format-conversion-support/)


2 Solutions:

  1. use VLC to convert, refer to the guide in http://www.pavtube.com/vlc-convert-avi-to-mp4.html; or
  2. use https://video.online-convert.com/convert-to-mp4  to convert “vcom-showing-connected-then-disconnected.mp4” using “H.264” codec

After conversion, the video can be playbacked in web browser.

Comparison Between Role of db_owner with Roles of db_datareader & db_datawriter in MS SQL Server

  1. db_owner role should only be given to the administrator who responsible for the database because this role can DROP the database
  2. db_datareader and db_datawriter is the minimum access that should be given to normal user to do the basic SELECT, UPDATE, INSERT and DELETE operation to the database
db_owner
db_datareader
db_datawriter
  1. Can perform all configuration and maintenance activities on the database, and can also drop the database in SQL Server
  2. Normal users should not be a member of this role.
  3. Some applications might require their user account to be a member of this role.
  1. Members of the db_datareader fixed database role can read all data from  all user tables.
  2. The db_datareader role gives implicit access to SELECT against all tables and views in a database.
  1. Members of the db_datawriter fixed database role can add, delete, or change data in all user tables.
  2. The db_datawriter role gives implicit access to INSERT, UPDATE, and DELETE against all tables and views in a database.

Source:

  1. https://docs.microsoft.com/en-us/sql/relational-databases/security/authentication-access/database-level-roles?view=sql-server-ver15
  2. https://www.mssqltips.com/sqlservertip/1900/understanding-sql-server-fixed-database-roles/

How to Configure MS SQL Server Express to Use Windows Authentication

  1. Create an user account on the computer that act as a server, the username and password must used exactly like the account used in client computer
  2. In SQL Server Management Studio:
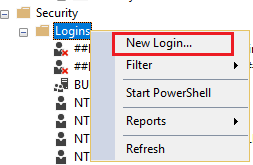
    • Expand “Security” -> expand “Logins” -> “New Login
    • Click “General” -> select “Windows authentication” -> click “Search”
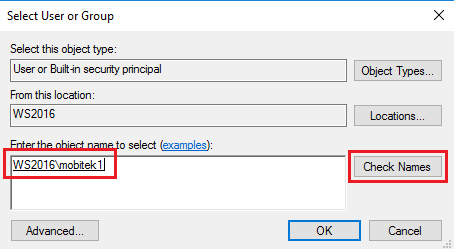
    • Type the account name that has been created on server computer, click “Check Names
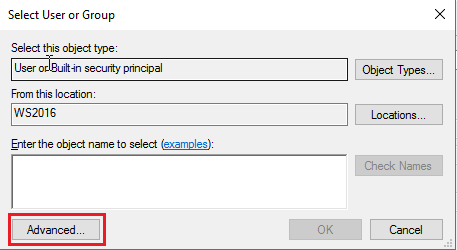
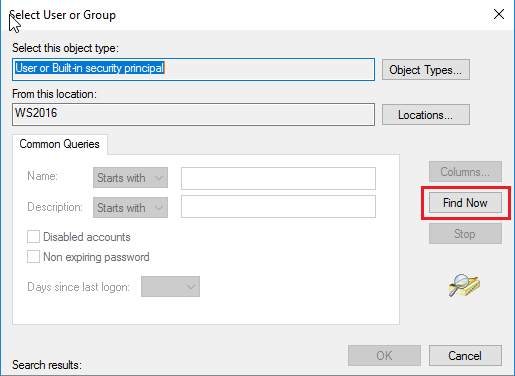
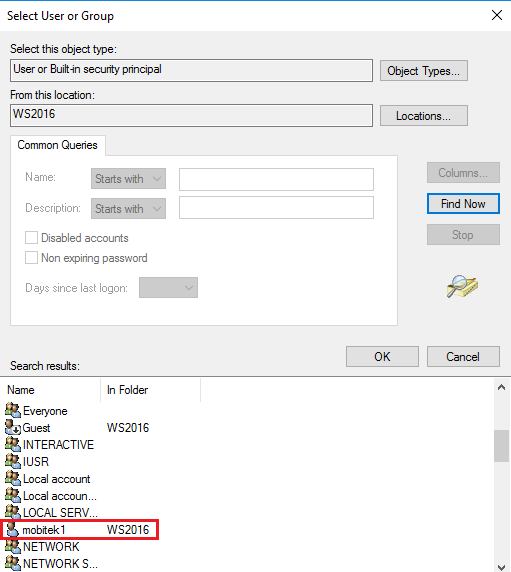
    • Alternatively you can do this step by clicking “Advanced” button -> “Find Now” -> find the account name in the search results -> click “OK

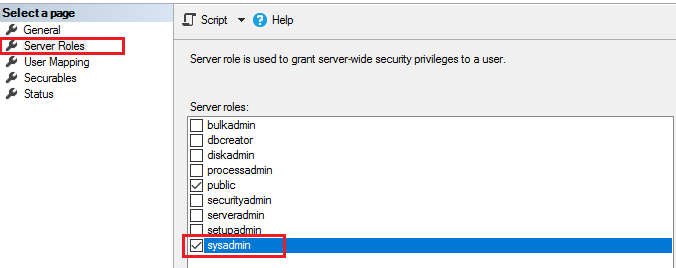
    • Click “Server Roles” -> check for sysadmin
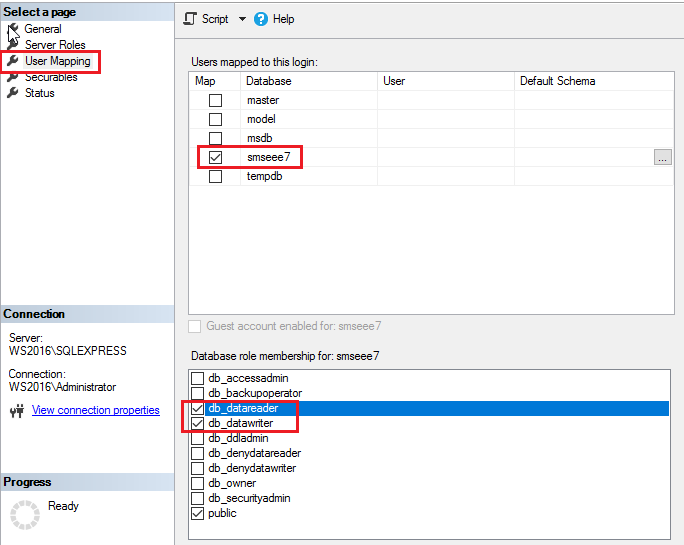
    • Click “User Mapping” -> choose database -> check for db_datareader and db_datawriter

Note: You do not need to enter the password as SQL Server will ask Windows to validate the user password. (source: https://www.virtual-dba.com/differences-windows-sql-server-authentication/)

How to View the Log of MS SQL Server Express to Check for Login Status

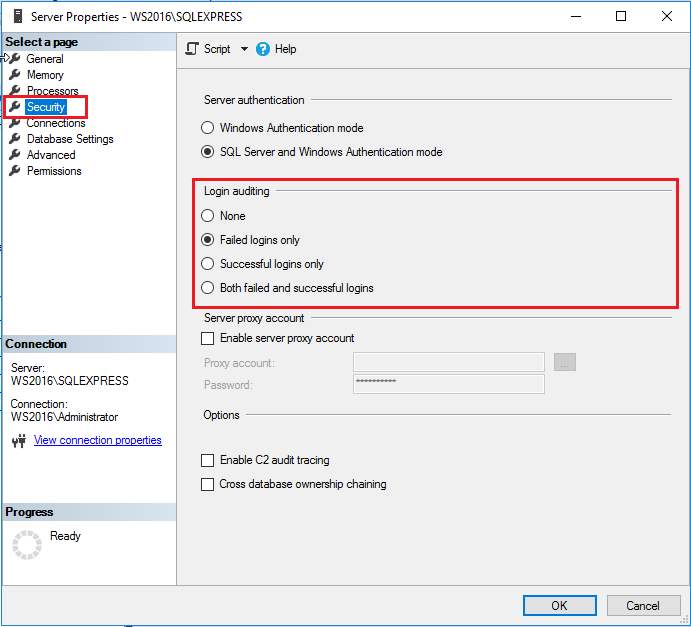
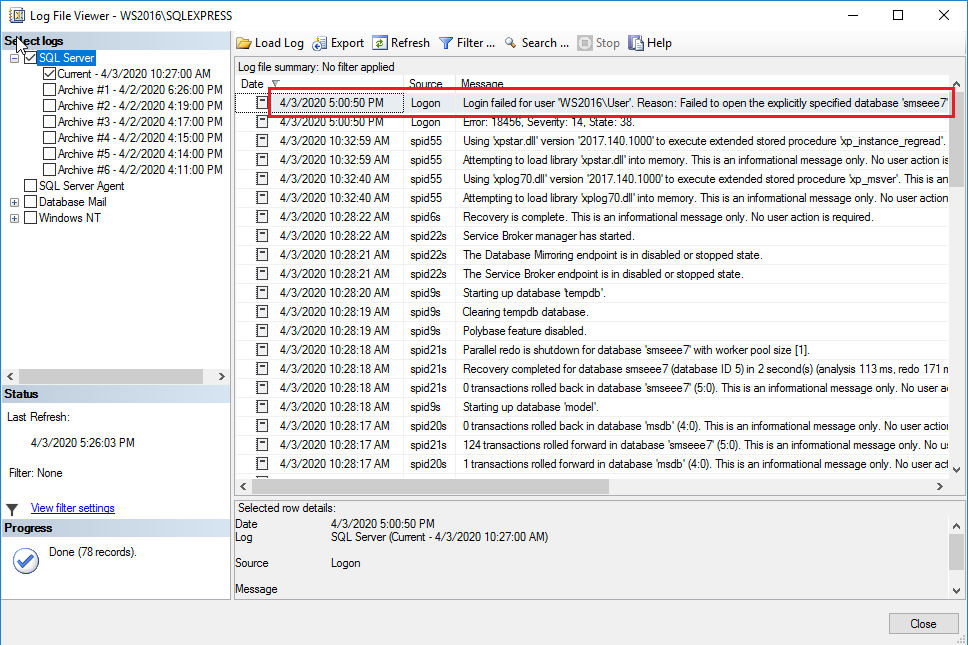
  1. You can choose what type of login activity that you want the SQL Server to log. By default, SQL Server will log the “Failed logins only” activity only. To choose the login activity, right-click at your “Server <instance name>” -> “Properties”. In Server Properties, click “Security” and choose the activity in Login auditing area:
    • None
    • Failed logins only
    • Successful logins only
    • Both failed and successful logins
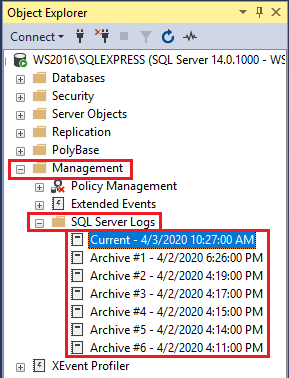
  2. To view the MS SQL Server log files, expand “Management” -> expand “SQL Server Logs“, click any log date that you want to view:
  3. All the login activities can be viewed in the Log file summary area:

How to Configure Windows Server and MS SQL Server Express to Allow Control Panel of MobiGATE to Remotely Connect

SETTING WHAT ERROR WILL APPEAR IF THE SETTING IS NOT DONE
Windows Firewall: allow “SQL Server Windows NT – 64 Bit”

If firewall is not opened for SQL Sever then this error will appear:

A network-related or instance-specific error occurred while establishing a connection to SQL Server. The server was not found or was not accessible. Verify that the instance name is correct and that SQL Server is configured to allow remote connections. (provider: Named Pipes Provider, error:40 – Could not open a connection to SQL Server)

SQL Server Configuration Manager:

  1. Enable Named Pipes and TCP/IP:
    – Go to SQL Server Network Configuration -> Protocols for <instance name> -> right click on Named Pipes and TCP/IP -> choose Enable
  2. Set port 1433 in TCP/IP Properties:
    – Go to SQL Server Network Configuration -> Protocols for <instance name> -> right-click on TCP/IP -> choose Properties
    – in IP Addresses tab -> scroll until the end until find IPAII -> set TCP Dynamic Ports to empty and TCP Port to 1433
If “Named Pipes” and “TCP/IP” are not enabled in MS SQL Server then this error will appear:

“A network-related or instance-specific error occurred while establishing a connection to SQL Server. The server was not found or was not accessible. Verify that the instance name is correct and that SQL Server is configured to allow remote connections. (provider: Named Pipes Provider, error:40 – Could not open a connection to SQL Server) ”

If the SQL Server is using instance e.g. “./SQLEXPRESS”:

  1. In Windows Firewall, open port number 1434:
  2. In SQL Server Configuration Manager: Start “SQL Server Browser” in “SQL Server Configuration Manager”:
If TCP/UDP Port no. 1434 is not opened, then this error will appear:

“A network-related or instance-specific error occurred while establishing a connection to SQL Server. The server was not found or was not accessible. Verify that the instance name is correct and that SQL Server is configured to allow remote connections. (provider: SQL Network Interfaces, error: 26 – Error Locating Server/Instance Specified) ”

Remote connection must be enabled to connect to databases remotely. Connect to SQL Server Instance in SSMS. Right click on SQL Server instance name in SSMS and choose Properties. You will get Server properties window. Click on Connections from left side pane and tick the check box on Allow remote connections to this server option from right side pane.

MORE INFORMATION