Category Archives: SMS Modem

MOBITEK Q24, MOBITEK S80

How to Reset or Reboot MOBITEK S80 Modem on an Interval

  1. The reset command “AT+WRST” can be issued in either hyper terminal or QCOM.
  2. When MOBITEK S80 modem is reset/reboot:-
    • the state of QCOM as follows:-
      • “Close Port” button turn to “Open Port”
      • “Send Command” and “Run” buttons are greyed out
      • No command can be send out
    • the state of Red LED status as follows:-
      • stop blinking
      • turn off
      • turn on
      • blinking
      • all the above completed in less than 10 seconds
    • SMS Engine — Enterprise Edition is able to re-initialize the modem


TEST RESULT

TEST OBJECTIVE TESTING METHODOLOGY TEST RESULT
Can MOBITEK S80 support schedule reboot? E.g. reboot on 1 p.m. every day? Not applicable
Can MOBITEK S80 reboot every 3 minutes? AT+WRST?

+WRST: 0

OK
AT+WRST=1,”000:03″

OK
AT+WRST?

+WRST: 1,”000:03″,”000:03″

OK

The reset is set to start at “15:46”. By right the port will disconnect at:

  • 15:49
  • 15:52
  • 15:55

The state of QCOM when the modem disconnect:

  • “Close Port” button turn to “Open Port”
  • “Send Command” and “Run” buttons are greyed out
  • No command can be send out

At “15:49” the port closed (below s.c. is taken around 1 minute late).

Open the port again at “15:51”. At “15:52” the port closed (below s.c. is taken around 1 minute late).

Can SMS Engine — Ent. Ed. re-initialise MOBITEK S80 Modem after modem is reset?
  1. Stop the service/engine
  2. Use hyper terminal instead of QCOM ( because during remote support, you will use hyper terminal)
  3. Set the modem to reset every 3 or 5 minutes (AT+WRST=1,”000:03″)
  4. Start the service/enigne
  5. Check the log file, it should show that “GSM modem not connected” every 3 minutes then follow by “Modem ID 1 initialized”.

Not sure how frequent the engine will check for the modem’s connection. The reset duration happen in less than 10 seconds. Probably it missed the checking:

  • between 17:10 – 17:19
    • status missing at 17:13
    • status missing at 17:16
  • between 17:19 – 17:28
    • status missing at 17:22
    • status missing at 17:25

The last 3 “initialized” status show the disconnect interval are 3 minutes.

When modem is reset, what is the status of LED?
  1. Open Hyper Terminal, enter AT+WRST=1,”000:03″ command
  2. Start the engine
  3. Monitor LED status
Red LED status when the modem reset (less than 10 seconds):

  • stop blinking
  • turn off
  • turn on
  • blinking


AT+WRST

AT+WRST only has the <MODE>,<DELAY>,<REMAINTIME>:

Issued: AT+WRST=1,"000:03"

Response: +WRST: 1,"000:03","000:03"

  • 1 = enable reset
  • “000:03” = reset every 3 minutes interval
  • “000:03” = countdown for the next reset (3 minutes). this countdown is still active even the port is disconnected.

Means:

  • AT+WRST is not able to do schedule reboot as we can’t specify the schedule time for the reset
  • AT+WRST is able to reset at any interval, i.e.: every 3 minutes
  • need to connect to the port again after every reset
  • the reset setting is always saved in the module even after every reconnection unless “AT+WRST=0” is issued

How to Solve “BadImageFormatException”

Applies to: SMS API v. 9.2 in Visual Studio Community 2019 and Windows Server 2019 64-bit

Problem: when SMS API v9.2 sample program in run in debug mode, Visual Studio Community 2019 always give this error :-

Inner Exception 1:

BadImageFormatException: Could not load file or assembly ‘Interop.MobitekSMSAPI9, Version=1.0.0.0, Culture=neutral, PublicKeyToken=null’ or one of its dependencies.

This assembly is built by a runtime newer than the currently loaded runtime and cannot be loaded.

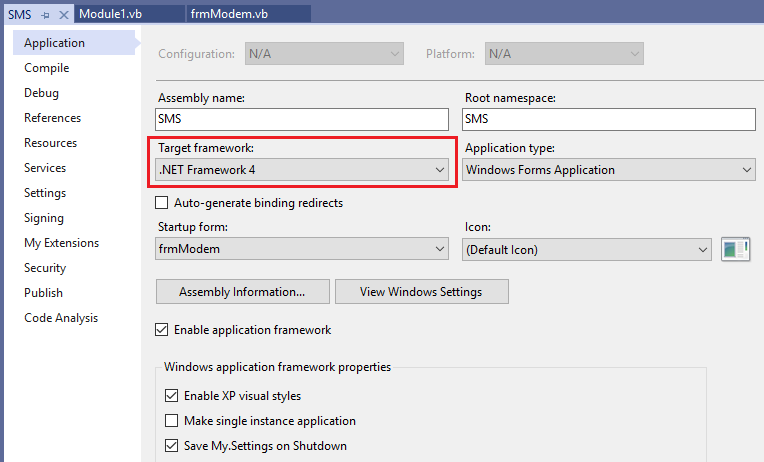
Solution: change the “Target Framework” of the project to “.NET Framework 4” with these steps:-

  1. Migrate the project “SMS API v. 9.2” to open in Visual Studio 2019.
  2. Open the project. Go to the project “Properties”. In “Application” tab, change the “Target framework” to “.NET Framework 4”.
  3. You will get below warning after changing the “Target framework”. Just click “Yes”.
  4. Close and reopen the project.
  5. Click “Start” button to start debugging the project. Please allow some times for the project to be built.
  6. After the project has completely built, try to click all menus and buttons to see if the problem occur again.

Does Shutting Down 3G Network Affect the Functionality of MOBITK Q24 and MOBITEK S80 SMS Modem (GSM Modem)

Question: Malaysia TELCO phasing out 3G soon, may we know if MOBITEK S80 (3G) and MOBITEK Q24 (2G) SMS Modem will be affected (not able to send out SMS)?


Answer no. 1: please refer to https://www.malaysianwireless.com/2020/09/malaysia-3g-shut-down-maxis-celcom-2g-voice-volte

“Malaysia is among a limited countries around the world that have decided to shut down its 3G networks while maintaining 2G.

“As a safety net, 2G network will still be maintained to ensure customers are able to make calls and SMS seamlessly, whenever 4G is inaccessible,”


Answer no. 2: please refer to https://soyacincau.com/2021/11/24/digi-3g-shutdown-schedule-states-december-2021/

Digi CTO Kesavan Sivabalan said: “Our priority remains in ensuring high availability and consistency of our 4G network services, and to do so effectively, it is necessary that we retire the 3G network, freeing up crucial spectrum and resources that would now be channelled towards increasing capacity of the 4G network to support higher usage.”  Users with 3G devices can still stay connected to 2G after the 3G shutdown. While 2G is sufficient for basic voice calls and SMS, it is barely usable for internet services in this day and age.

Therefore, as long as 2G network is maintained, MOBITEK S80 (3G) and MOBITEK Q24 (2G) SMS Modem can still send and receive SMS.

COM Port Number of MOBITEK E20 Modem Will Change If USB Port is Changed

Conclusion: COM Port number will change if MOBITEK E20 4G Modem connects to different USB port.

TEST OBJECTIVE TESTING METHODOLOGY TEST RESULT
To test if the COM port number of MOBITEK E20 4G Modem will change if USB port is changed.
  1. Connect MOBITEK E20 4G Modem to all 4 USB ports in Dell-E6410.
  2. For each USB port connected, check the Device Manager to see whether the COM port is change or not.
  1. USB port right bottom -> COM19
  2. USB port right top -> COM27
  3. USB port left bottom -> COM47
  4. USB port left top -> COM43

“Device driver software was not successfully installed” Warning Message

Applies to: MOBITEK S80 Modem

The warning “Device driver software was not successfully installed” can be ignored as long as there are 4 COM ports appeared when you plug in MOBITEK S80 Modem with PC.


The 4 COM ports are:-

  • Sierra Wireless AT Command Port (UMTS)
  • Sierra Wireless CNS Port (UMTS)
  • Sierra Wireless DM Port (UMTS)
  • Sierra Wireless NMEA Port (UMTS)

Comparison Between MOBITEK S80 SMS Modem in VMWare and VirtualBox

  VMware VirtualBox
Installing USB Driver (USBDriverInstaller_SL80XX_V11.5.0.0.exe) Easy to install without the needs of other pre-installation software.
  • Require installation of “Extension Pack in VirtualBox”
  • Require configuration in “USB Settings”

(source: https://www.wintips.org/how-to-setup-usb-on-virtualbox-guest-oracle/)

MOBITEK S80 appearance in Device Manager Can detect the MOBITEK S80 after USB Driver installed without COM port disappearing It cannot detect MOBITEK S80 Modem vis USB port, refer to

The work around is to use serial port in VirtualBox by linking/mapping USB port (host) to serial port (VM), refer to https://mobitek-system.com/blog/2017/11/how-to-set-up-mobitek-s80-modem-in-virtualbox/

Hyper Terminal test Able to run Hyper Terminal test on connected MOBITEK S80 MOBITEK S80 Modem will not response in hyper terminal if connected via USB port in virtual machine, refer to https://mobitek-system.com/blog/2020/06/fail-to-get-mobitek-s80-to-work-in-usb-port-in-virtualbox/

How to Set-Up VMWare and MOBITEK S80 Modem in VMWare

Install VMWare Workstation 16 Player

  1. Go to https://www.vmware.com/products/workstation-player/workstation-player-evaluation.html. Download Workstation 16.0 Player for Windows.
  2. Run the installer file “VMware-player-16.0.0-16894299.exe” in your default download folder. If prompted click “Yes” to allow the installer to run.
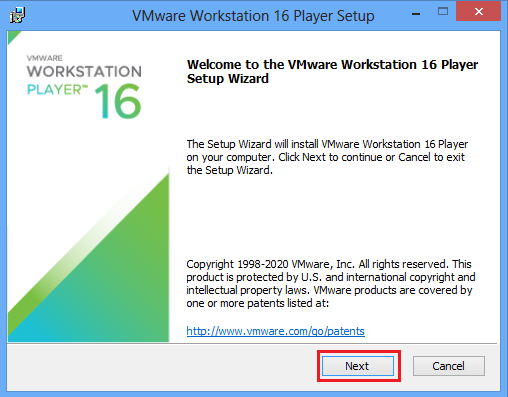
  3. Click “Next” to set up the program.
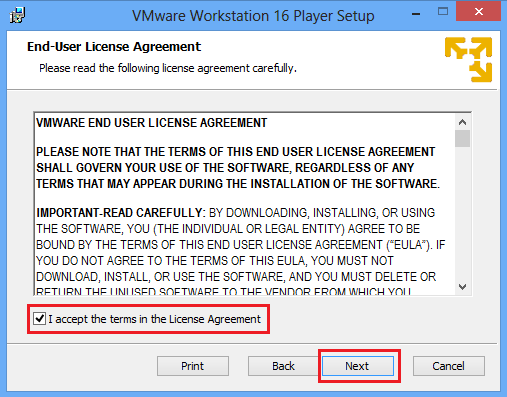
  4. Check “I accept the terms in the License Agreement” checkbox, then click “Next”.
  5. Set the preferred installation destination. You may leave the default selected features option in the checkbox or choose to install all features, click “Next”.
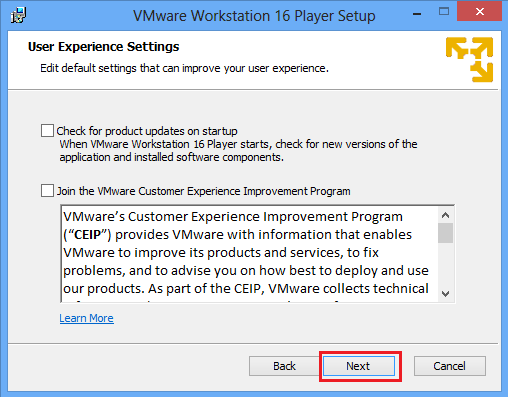
  6. Leave the checkbox as default, click “Next”.
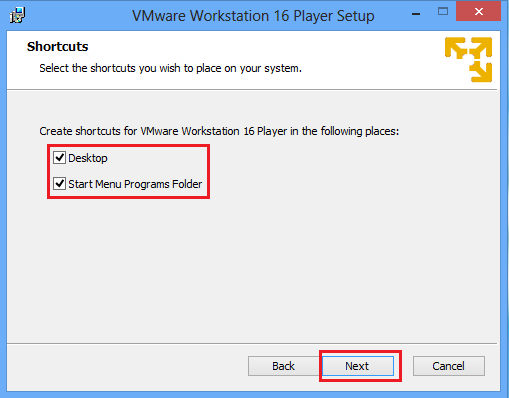
  7. Select the location of the shortcut that you want to place, click “Next”.
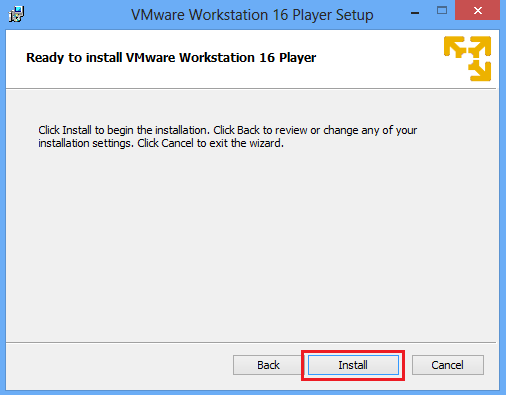
  8. Click “Install”.
  9. After the installation has completed, click “Finish”.


Create a New Virtual Machine Running Windows 10

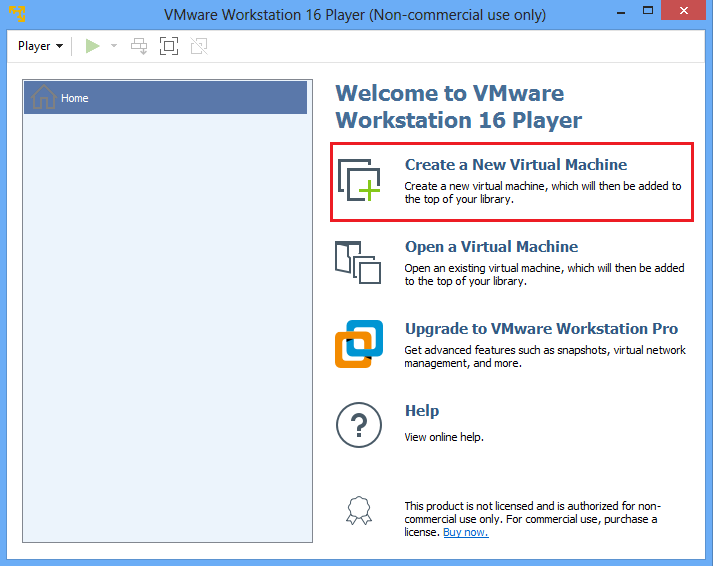
The steps to create a new virtual machine (VM) in VMware Workstation 16:
      1. Launch VMware Workstation.
      2. Select “Create a New Virtual Machine”.
      3. Select the guest operating system (OS), then click “Next”. The OS can be installed using:
        • Installer disc (CD/DVD)
        • Installer disc image file (ISO)
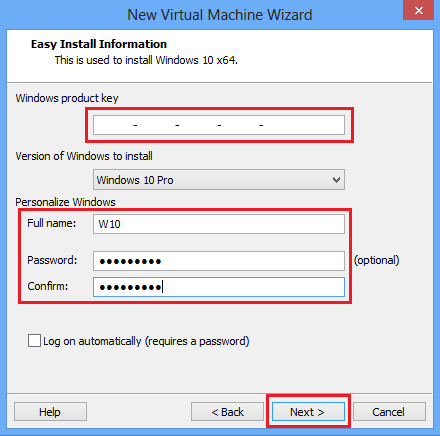
      4. Enter the product key. Create username and password (optional). Click “Next”.
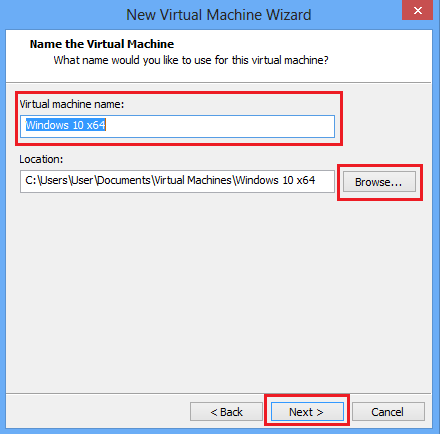
      5. Enter a VM name and specify the location to be saved. Click “Next”.
      6. Specify the disk size. Select between:
        • Store virtual disk as a single file, or
        • Split virtual disk into multiple files
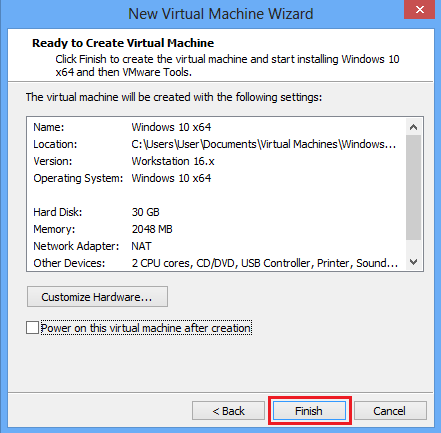
      7. Click “Finish” to create the virtual machine and start the installation.
      8. When the VM is powered on, the VMware Tools installation starts. The VM may need to be restarted once the Tools installation completes.


VMware Workstation 16 Player Settings

  1. Launch VMware Workstation.
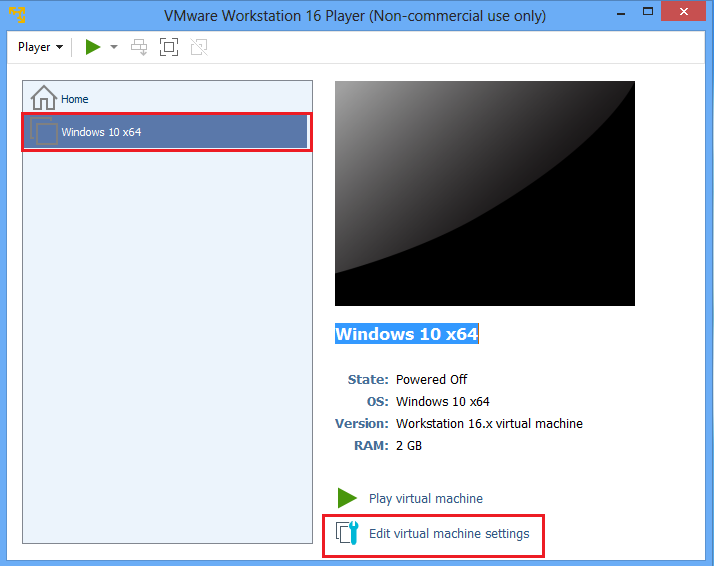
  2. Click on the VM to configure, then click “Edit virtual machine settings”.
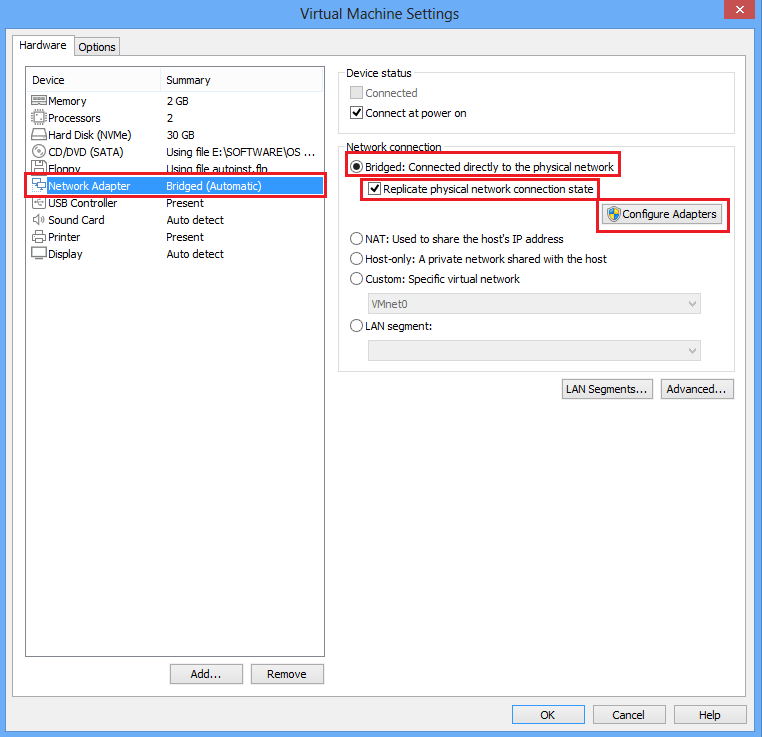
  3. In “Hardware” tab, click on “Network Adapter”. Under “Network connection”, select “Bridged: Connected directly to the physical network”. If VMWare in running on a laptop, check the “Replicate physical network connection state” checkbox. This option causes the IP address to be renewed when move from one wired or wireless network to another.
  4. Click on “Configure Adapters”.
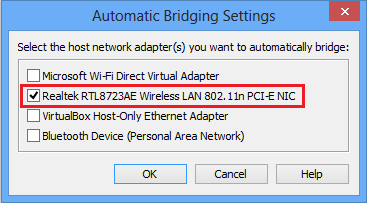
  5. In “Automatic Bridging Settings”, uncheck all adapters except the network adapter that is currently used (in this example, it is “Realtek”). Go to “Control Panel -> “Network and Internet” -> “Network Connections” to check.


Set-Up MOBITEK S80 Modem in VMWare

  1. Install USB driver “USBDriverInstaller_SL80XX_V11.5.0.0.exe” in VMware.
  2. Plug in MOBITEK S80 SMS Modem to the host. When the below dialog prompted, select “Connect to a virtual machine”.
  3. Check Device Manager whether the COM port appears or not.
  4. In Hyper Terminal, test the MOBITEK S80 SMS Modem.

How to Solve USR-TCP Cannot Detect MOBITEK S80 Modem on LAN

  1. Use “Advance IP Scanner”

    to scan for a free IP address on LAN. The free IP address will be assigned to MOBITEK S80 Modem later.
  2. Disconnect MOBITEK S80 Modem from LAN.
  3. Directly connect MOBITEK S80 Modem with laptop/PC through LAN port/cable.
  4. Run “USR-TCP”,

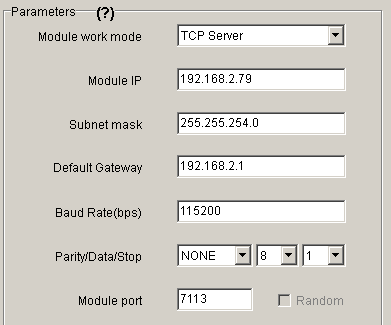
    Assign a new IP address that does not belong to any device in “Advanced IP Scanner” (step 1) to the MOBITEK S80 Modem . As well as configure the “Default Gateway”, “Subnet Mask”, etc.
  5. Disconnect MOBITEK S80 Modem from laptop/PC.
  6. Re-connect MOBITEK S80 Modem to LAN through router/switch.
  7. Run “USR-TCP” to detect MOBITEK S80 Modem.
  8. If  “USR-TCP” still cannot detect MOBITEK S80 Modem  then use web browser, enter the IP address of MOBITEK S80 Modem into the address bar. If a web administration page is displayed then the connection is successfully established.

    Web Administration Page of MOBITEK S80 Modem

  9. Use “USR-VCOM”

    to add a COM port that links the COM port with the IP address of S80.
  10. Use “Hyper Terminal”, connect via COM port, run “hyper terminal test”. If test is passed then S80 is working on the LAN.

UCanAccess Driver Locks MS Access Database of SMS Engine — Basic Edition

Problem: SMS stuck in the “oubox” table and cannot be send out by SMS Engine — Basic Edition v. 5 and SMS Engine — Basic Edition v. 6.

Solution: Java application should use ODBC instead of UCanAccess to connect to “SMSEngine5.mdb” (version 5) or “SMSEngineVBNET.mdb” (version 6). Somehow, UCanAccess locks the records inserted into “outbox” table, preventing SMS Engine from retrieving those records and preventing SMS being send out.


TROUBLE SHOOTING #1: JDBC:UCanAccess
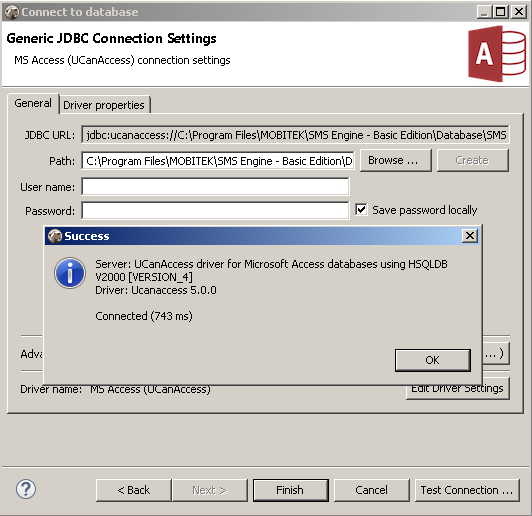
  • DB Tool: DBeaver
  • Driver: UCanAccess
    UCanAccess-01
  • JDBC URL: jdbc:ucanaccess://C:\Program Files\MOBITEK\SMS Engine – Basic Edition\Database\SMSEngine5.mdb
  • Result:
    • All records inserted into “SMSEngine5.mdb” using DBeaver were stuck in “Outbox” table even after the DBeaver has been closed.
      UCanAccess-02
    • All SMS are stuck in “Outbox” table (SentStatus = P) after the SMS Engine has been restarted.
    • After restarting the SMS Engine a few times, all SMS finally can send out.


TROUBLE SHOOTING #2: JDBC:ODBC

  • DB Tool: DBeaver
  • Driver: ODBC
    UCanAccess-03
  • JDBC URL: jdbc:odbc:SMSEngine5
  • Result:
    • All SMS inserted into “SMSEngine5.mdb” can be send out without any problem while DBeaver is still running.
      UCanAccess-04
    • Note: the delivery status depends on the TELCO response — may be late or no status at all.