v. 1.2 2025-08-18 Kaizen Completed for PunchCard.phpr
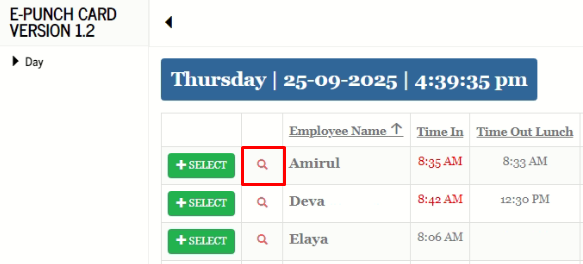
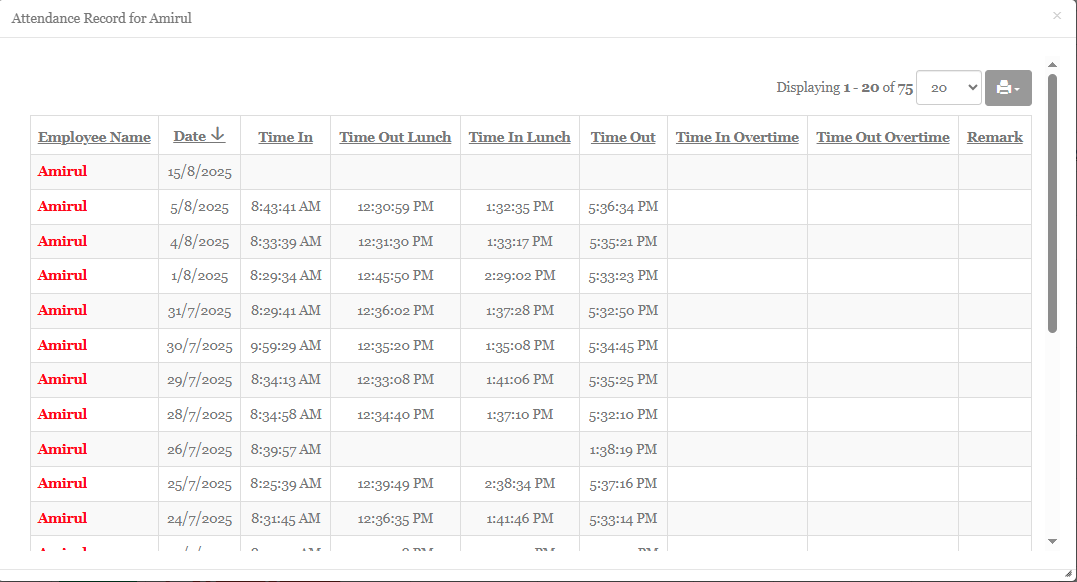
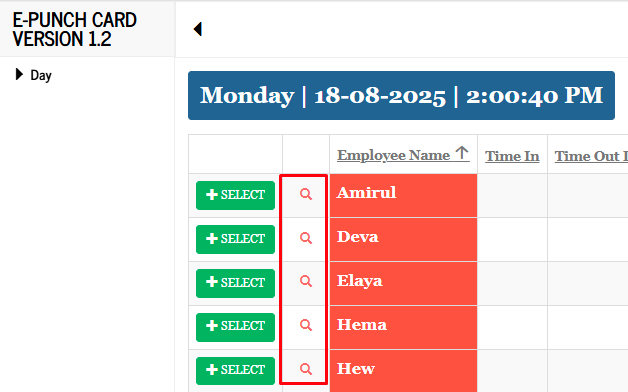
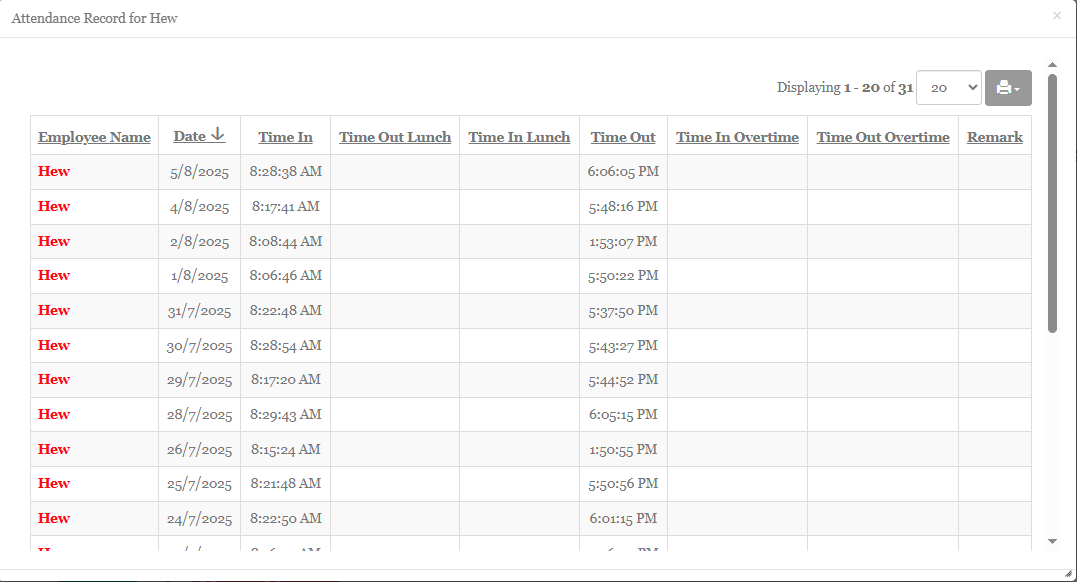
Add the attendance list page to display all attendance record by “employee_name”
| BEFORE | AFTER |
 |
 |
MODIFICATION in PHPRunner or cPanel or PHPMyAdmin
- Go to “Tables” tab and enable “attendance”.

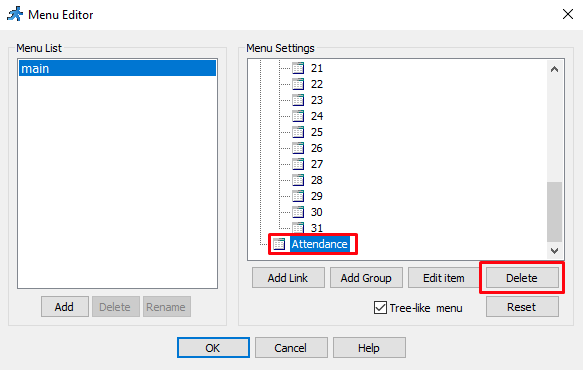
- Delete “Attendance” in the “Menu editor”.

- Go to “Query” tab, select “attendance” in Table list, click on “SQL” tab and paste below query:-
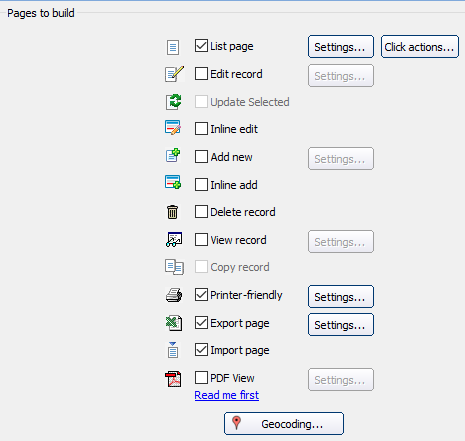
SELECT record_id, `date`, time_in, time_out_lunch, time_in_lunch, time_out, time_in_overtime, time_out_overtime, remark, employee_id FROM attendance ORDER BY `date` DESC - Go to “Pages” tab, select “attendance” in Tables list and set as below:-
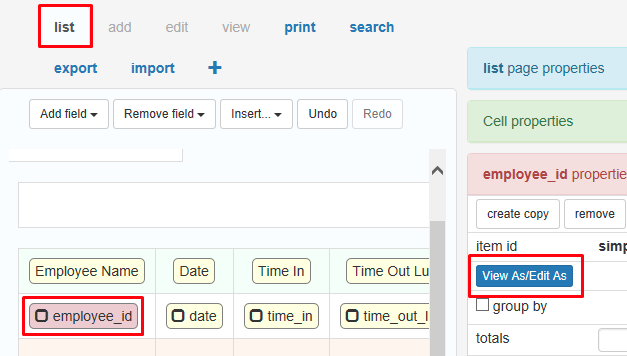
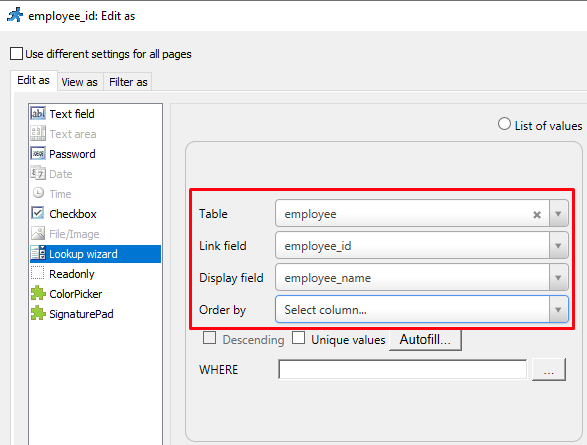
- Go to “Designer” tab, select “attendance” in Tables list, click on “list” tab, click “employee_id” field, click “View As/Edit As” and edit as below:-
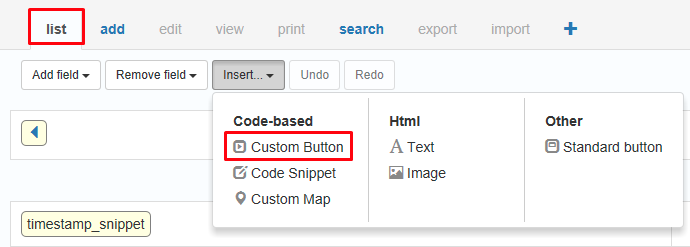
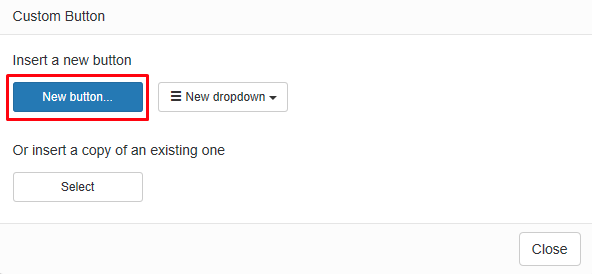
- Select “punchcard” in Tables list, click on “list” tab and insert a new “Custom Button”. Name it as “View_Attendance”.
- Paste below code in “Client Before” tab:-
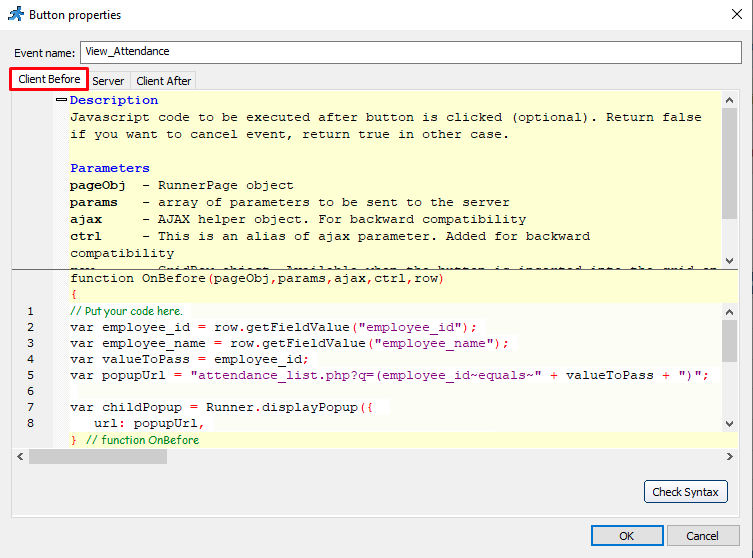
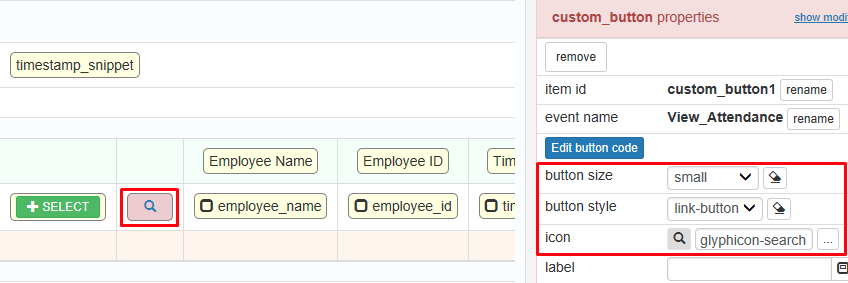
var employee_id = row.getFieldValue("employee_id"); var employee_name = row.getFieldValue("employee_name"); var valueToPass = employee_id; var popupUrl = "attendance_list.php?q=(employee_id~equals~" + valueToPass + ")"; var childPopup = Runner.displayPopup({ url: popupUrl, header: "Attendance Record for " + employee_name, width: 1200, height: 650, afterCreate: function(childPopup) { window.parent.popup.close(); } }); return false; - Click on “View Attendance” and edit its properties like below:-
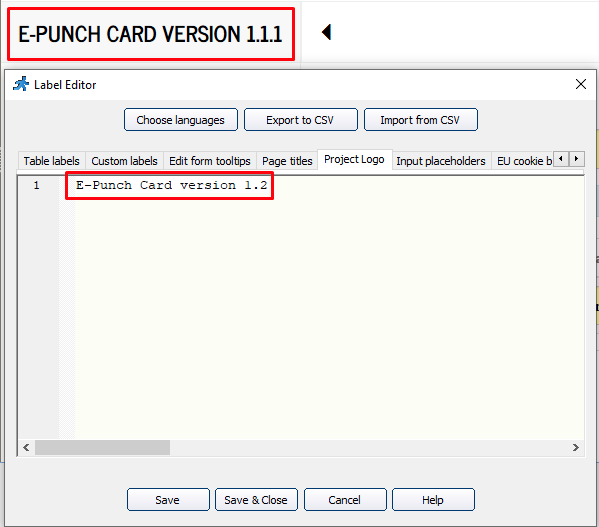
- Go to “Editor” tab, double-click on the logo and rename it to version “1.2”.
Display only active employee in “E-Punch Card”
MODIFICATION in PHPRunner or cPanel or PHPMyAdmin
- Go to “Query” tab, select “punchcard” in Tables list, click on “SQL” tab and paste below query:-
SELECT
    e.employee_id,
    e.employee_name,
    (SELECT time_in FROM attendance WHERE employee_id = e.employee_id AND `date` = CURDATE()) AS time_in,
    (SELECT time_out_lunch FROM attendance WHERE employee_id = e.employee_id AND `date` = CURDATE()) AS time_out_lunch,
    (SELECT time_in_lunch FROM attendance WHERE employee_id = e.employee_id AND `date` = CURDATE()) AS time_in_lunch,
    (SELECT time_out FROM attendance WHERE employee_id = e.employee_id AND `date` = CURDATE()) AS time_out,
    (SELECT time_in_overtime FROM attendance WHERE employee_id = e.employee_id AND `date` = CURDATE()) AS time_in_overtime,
    (SELECT time_out_overtime FROM attendance WHERE employee_id = e.employee_id AND `date` = CURDATE()) AS time_out_overtime,
    (SELECT `remark` FROM attendance WHERE employee_id = e.employee_id AND `date` = CURDATE()) AS `remark`
FROM employee e
WHERE e.active = 1
ORDER BY e.employee_name ASC
v. 1.2 2025-08-18 Beta Testing Complete for PunchCard.phpr
TEST OBJECTIVE: Can user view their attendance record by their own name?
| TESTING METHODOLOGY | TEST RESULT |
|
|
v. 1.1 2025-06-10 Kaizen Completed for PunchCard.phpr
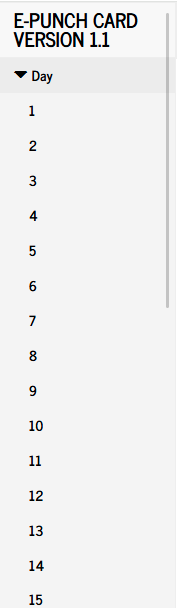
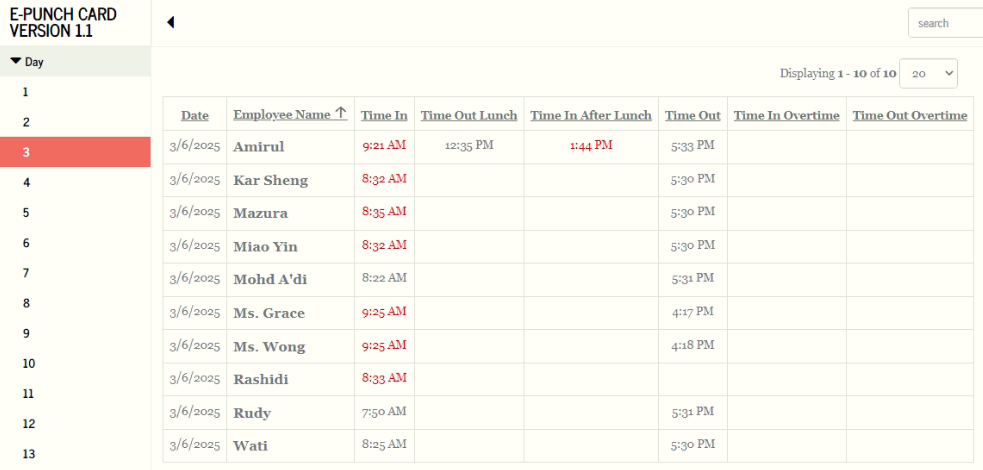
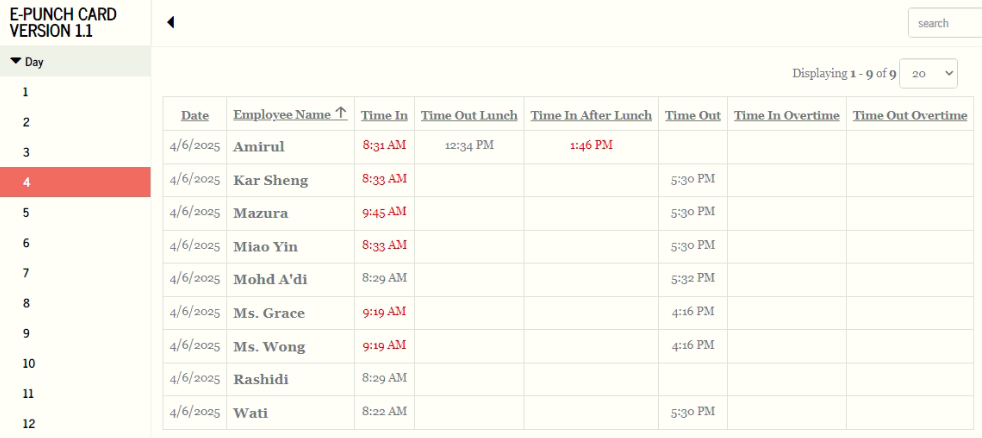
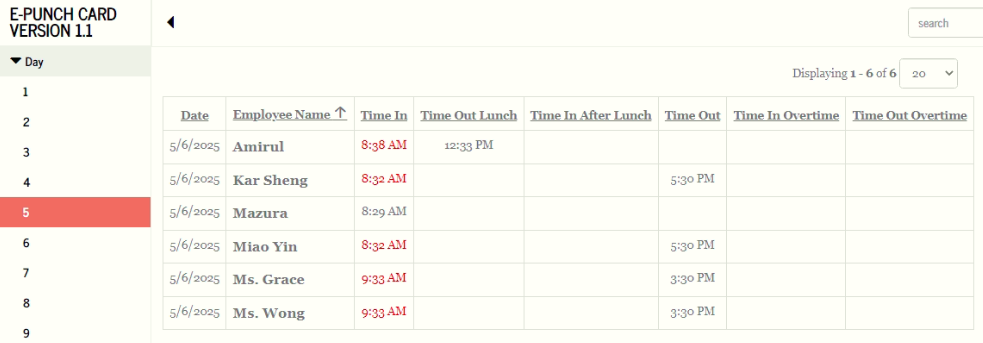
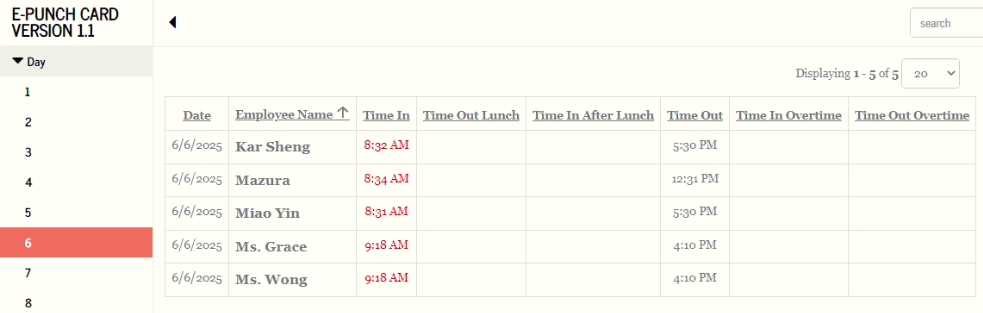
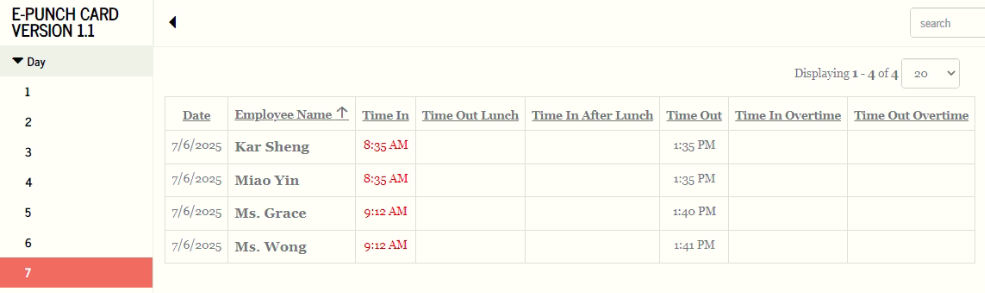
To add tabs 1 to 31 in http://hpc-6305/punchcard/punchcard_list.php?orderby=aemployee_name in order to view the date of attendance
The “Select” button will only work when the date is on today. On other dates, the button will be disabled.
| BEFORE | AFTER |
| http://hpc-6305/ams/attendance_list.php |
|
MODIFICATION in PHPRunner or cPanel or PHPMyAdmin
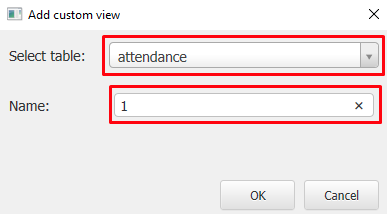
- Go to “Tables” tab and click “Create custom View”. Name the custom view as “1”.
- Go to “Query” tab and add below query:-
SELECT e.employee_name, a.`date`, a.time_in, a.time_out_lunch, a.time_in_lunch, a.time_out, a.time_in_overtime, a.time_out_overtime FROM attendance AS a LEFT OUTER JOIN employee AS e ON a.employee_id = e.employee_id WHERE (YEAR(a.`date`) = YEAR(CURRENT_DATE()) && MONTH(a.`date`) = MONTH(CURRENT_DATE()) && DAY(a.`date`) = "01") ORDER BY e.employee_name - Go to “Pages” tab and check only “List page”.
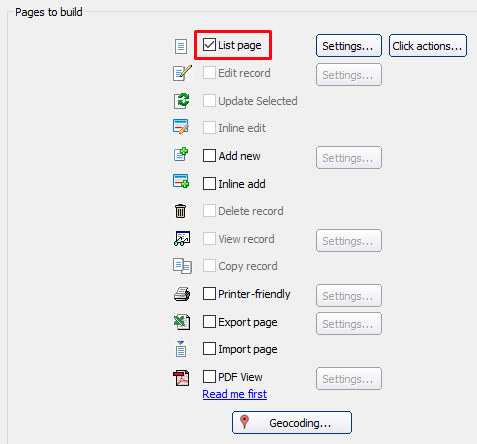
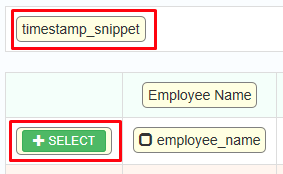
- Go to “Designer” tab and remove “timestamp_snippet” and “SELECT” button.
- Go to “Events” tab and click “Erase event code” in “Before display” and “JavaScript OnLoad event”.

- Create another 30 custom views and change the custom view’s name and the query in the red text below accordingly:-
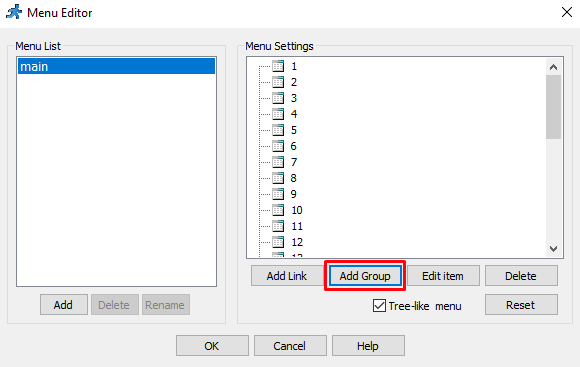
SELECT e.employee_name, a.`date`, a.time_in, a.time_out_lunch, a.time_in_lunch, a.time_out, a.time_in_overtime, a.time_out_overtime FROM attendance AS a LEFT OUTER JOIN employee AS e ON a.employee_id = e.employee_id WHERE (YEAR(a.`date`) = YEAR(CURRENT_DATE()) && MONTH(a.`date`) = MONTH(CURRENT_DATE()) && DAY(a.`date`) = "01") ORDER BY e.employee_name - Go to “Tables” tab and click “Menu editor” button.

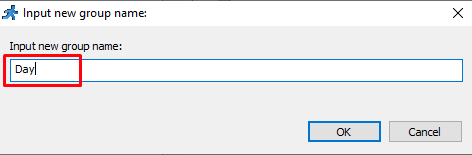
- Add a new group called “Day”.
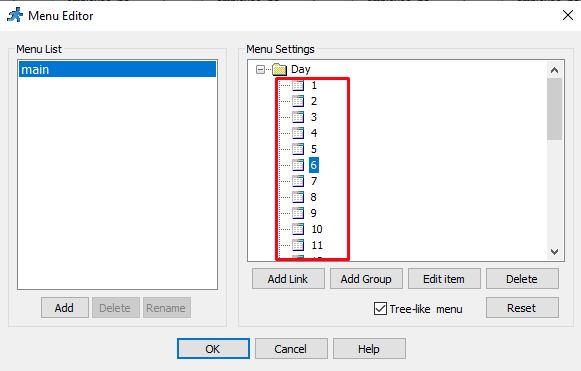
- Move all 31 custom views inside “Day” group.
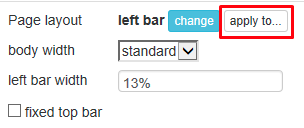
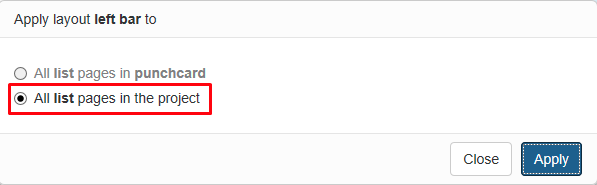
- Go to “Designer” tab, select “punchcard” in Tables list and set the page layout as below:-

- Click “apply to…” button and select “All list pages in the project”.
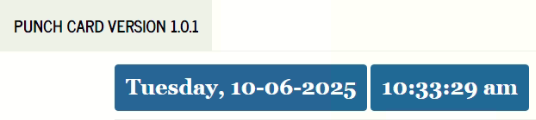
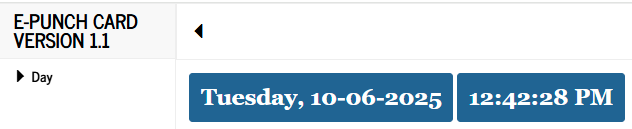
To rename “PUNCH CARD VERSION 1.0.1” to “E-Punch Card version 1.1”
| BEFORE | AFTER |
 |
 |
MODIFICATION in PHPRunner or cPanel or PHPMyAdmin
- Go to “Editor” tab, double-click on “PUNCH CARD VERSION 1.0.1” and rename it to “E-Punch Card version 1.1”.
Note: Due to the theme setting, the name of the logo will be all uppercase.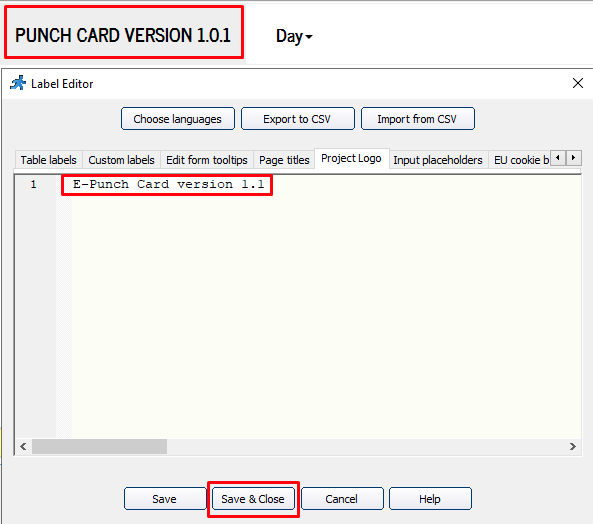
v. 1.1 2025-06-10 Beta Testing Completed for PunchCard.phpr
TEST OBJECTIVE: Do all 31 custom views only shows the attendance list without “SELECT” button?
| TESTING METHODOLOGY | TEST RESULT |
|
|

v. 1.0 2025-02-25 Kaizen Completed for PunchCard.phpr
Create a separate project for punch card
| BEFORE | AFTER |
 |
MODIFICATION in PHPRunner or cPanel or PHPMyAdmin
- Create a new project and name it as “PunchCard”.
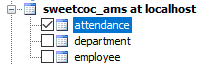
- Enable only “attendance” table in “Tables” tab.
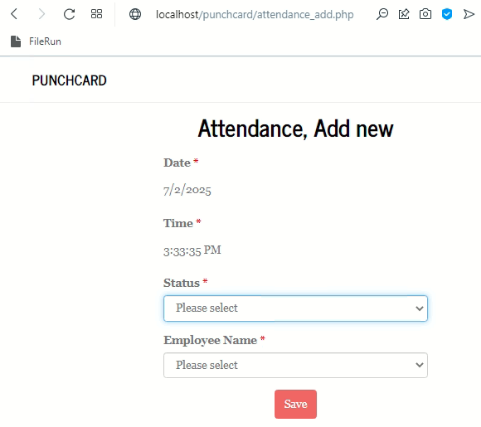
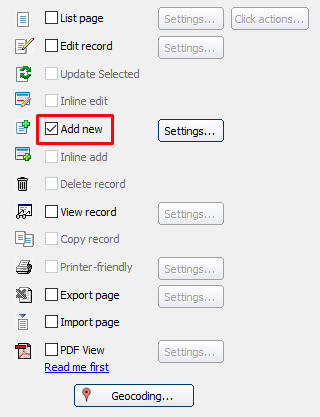
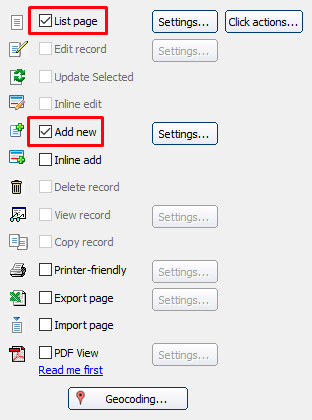
- Go to “Pages” tab and enable only “Add new” page.
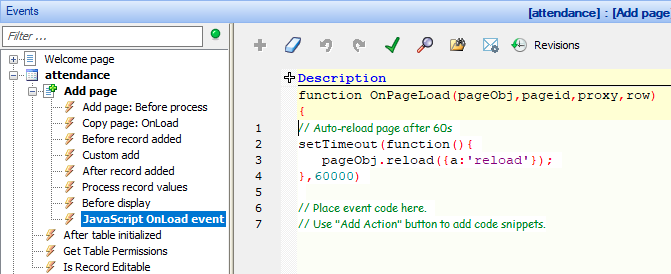
- Go to “Events” tab -> “attendance” -> “Add page” -> “JavaScript OnLoad event” and paste below code:-
Add a Dashboard
- Add a dashboard (main page), showing list of employee with their time in and out in grid view.
- Each employee can click on his name on the list and will load the “attendance_add.php” web page to punch card.
- After employee click on “Save” button”, the web page will return to the grid view and showing the latest time in or time out.
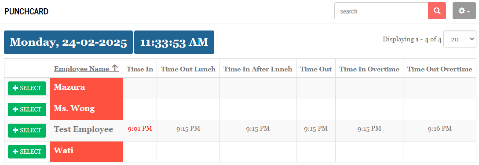
| EMPLOYEE NAME | MORNING IN | MORNING OUT | AFTERNOON IN | AFTERNOON OUT | EVEINING IN | EVEINING OUT |
| Wati | 08:32:00 | 12:35:00 | 14:00:00 | |||
| Mazura | 08:31:00 | 12:31:00 | 14:02:00 | |||
| Ms. Wong | 08:30:00 | 12:30:00 |
| BEFORE | AFTER |
 |
MODIFICATION in PHPRunner or cPanel or PHPMyAdmin
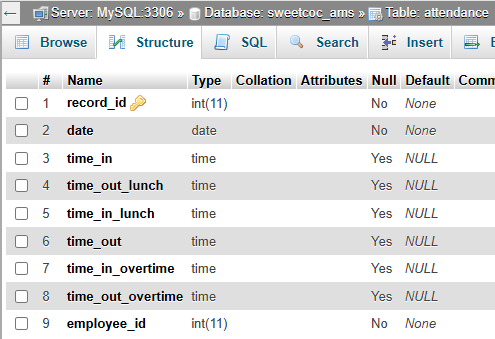
- Modify “attendance” table in phpMyAdmin as below:-
- Go to “Tables” tab and create a new custom view for “punchcard”.

- Go to “Query” tab and paste below query:-
SELECT e.employee_id, e.employee_name, (SELECT time_in FROM attendance WHERE employee_id = e.employee_id AND `date` = CURDATE()) AS time_in, (SELECT time_out_lunch FROM attendance WHERE employee_id = e.employee_id AND `date` = CURDATE()) AS time_out_lunch, (SELECT time_in_lunch FROM attendance WHERE employee_id = e.employee_id AND `date` = CURDATE()) AS time_in_lunch, (SELECT time_out FROM attendance WHERE employee_id = e.employee_id AND `date` = CURDATE()) AS time_out, (SELECT time_in_overtime FROM attendance WHERE employee_id = e.employee_id AND `date` = CURDATE()) AS time_in_overtime, (SELECT time_out_overtime FROM attendance WHERE employee_id = e.employee_id AND `date` = CURDATE()) AS time_out_overtime FROM employee e ORDER BY e.employee_name ASC - Go to “Pages” tab and enable only “List page” and “Add new” page.
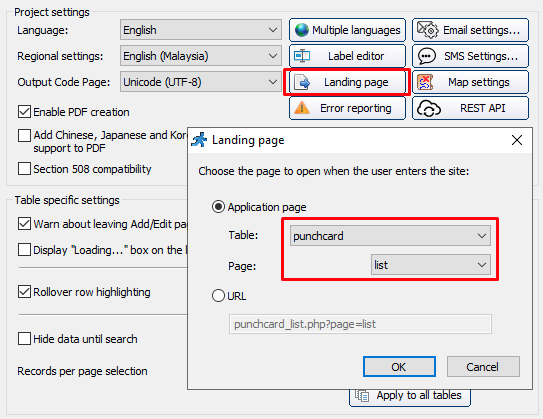
- Go to “Misc” tab and set the landing page to punchcard’s “list” page.
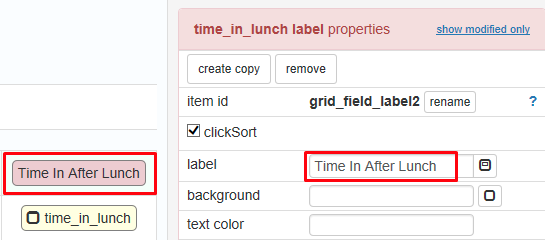
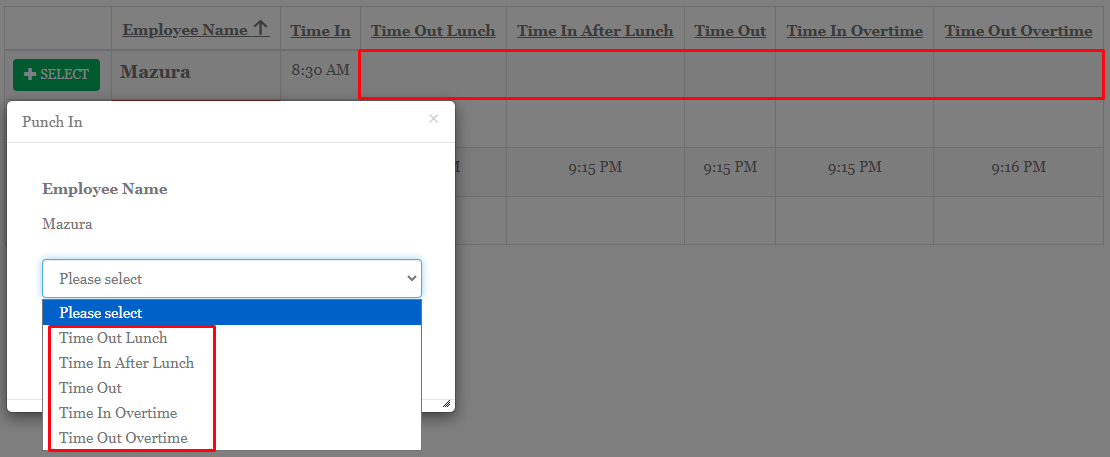
- Rename “Time In Lunch” field to “Time In After Lunch”.
- Add custom button “Punch”.
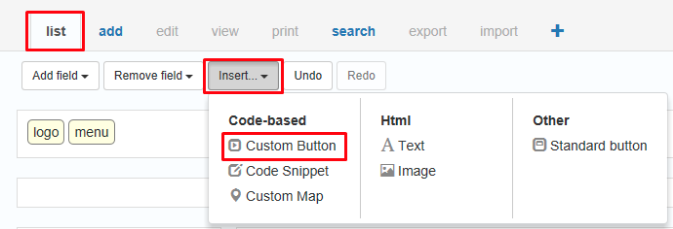
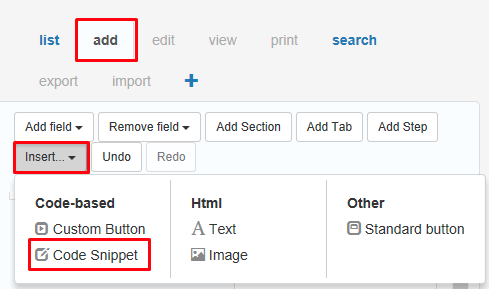
- go to “Designer” tab, select “list” tab, click “Insert…” dropdown and select “Custom Button” and name it as “SELECT”.
- change the tri-part events for the “Select” button as below:-
- Client Before
params["employee_id"] = row.getFieldValue("employee_id");
 params["employee_name"] = row.getFieldValue("employee_name");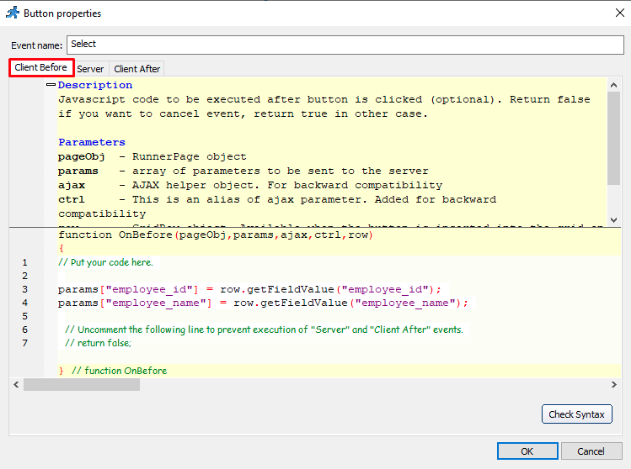
- Server
$_SESSION["employee_id"] = $params["employee_id"];
$_SESSION["employee_name"] = $params["employee_name"];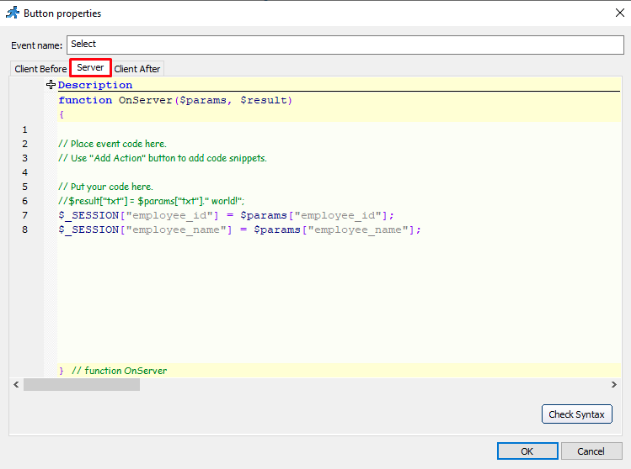
- Client After
var popup = Runner.displayPopup({
      url: Runner.pages.getUrl("punchcard","add"),
      width: 450,
      height: 315,
      header: 'Punch In'
});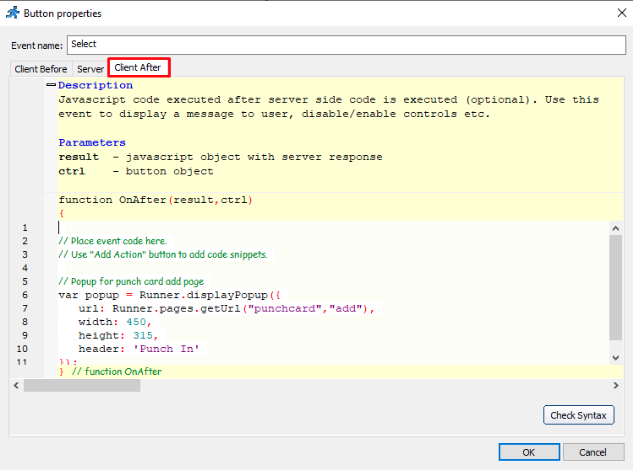
- Client Before
- Go to “Events” tab:-
- click on “Add page” -> After record added” and paste below code:
$pageObject->setProxyValue('saved', true);
echo "<!doctype html>";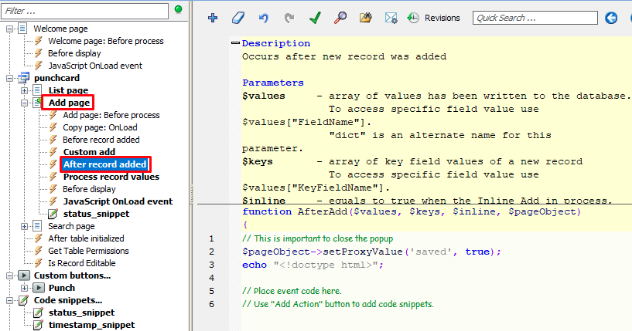
- click on “Add page” -> JavaScript OnLoad event” and paste below code:
if((proxy['saved'])) {
     // close popup
     window.parent.close();
     // refresh list page
     window.parent.location.reload();
}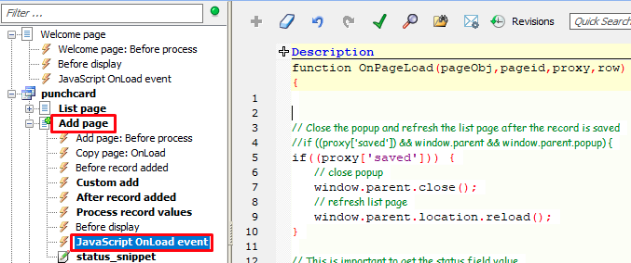
- click on “Add page” -> After record added” and paste below code:
- go to “Designer” tab, select “list” tab, click “Insert…” dropdown and select “Custom Button” and name it as “SELECT”.
- Display date and time in “list” page.
- go to “Designer” tab and insert a new “Code Snippet”, name it as “timestamp_snippet” and paste below code:
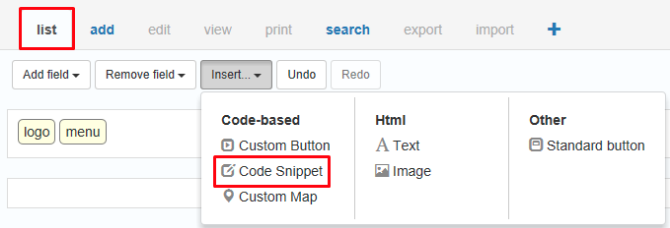
echo "<div><span class='btn btn-info' style='font-size:25px; font-weight:bold; cursor:default !important;'>".date('l, d-m-Y')."</span>".
" <span class='timestamp btn btn-info' style='font-size:25px; font-weight:bold; cursor:default !important;'>".date('h:i:s a')."</span></div>";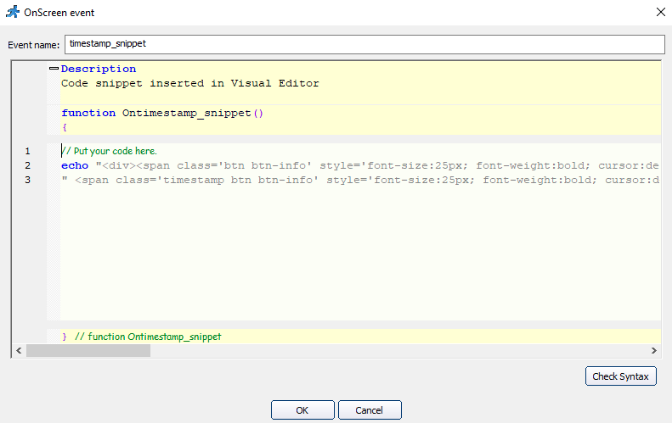
- go to “Events” tab -> “List page” -> “JavaScript OnLoad event” and paste below code:
setInterval(clock, 1000);
function clock() {
     var clockDiv = document.querySelector(".timestamp");
     var date = new Date();
     var tick = date.toLocaleTimeString();
     clockDiv.textContent = tick;
}
- go to “Designer” tab and insert a new “Code Snippet”, name it as “timestamp_snippet” and paste below code:
- Add “Status” dropdown.
- go to “Designer” tab -> “Add” tab, add a new “Code Snippet” name “status_snippet” and paste below code:
$str= "<select id='status' name='status' style='width:380px; display:inline-block;' class='form-control'>".
"<option value=\"\">Please select</option>";

$strSQL = "SELECT * FROM attendance WHERE employee_id=".$_SESSION["employee_id"]. " AND `date`=CURDATE()";
$rs = db_query($strSQL);

if (!mysqli_num_rows($rs)) {
     $str.="<option value='time_in'>Time In</option>";
     $str.="<option value='time_out_lunch'>Time Out Lunch</option>";
     $str.="<option value='time_in_lunch'>Time In After Lunch</option>";
     $str.="<option value='time_out'>Time Out</option>";
     $str.="<option value='time_in_overtime'>Time In Overtime</option>";
     $str.="<option value='time_out_overtime'>Time Out Overtime</option>";
} else {
     while ($data = db_fetch_array($rs)) {
          if ($data["time_in"] == "")
               $str.="<option value='time_in'>Time In</option>";
          if ($data["time_out_lunch"] == "")
               $str.="<option value='time_out_lunch'>Time Out Lunch</option>";
          if ($data["time_in_lunch"] == "")
               $str.="<option value='time_in_lunch'>Time In After Lunch</option>";
          if ($data["time_out"] == "")
               $str.="<option value='time_out'>Time Out</option>";
          if ($data["time_in_overtime"] == "")
               $str.="<option value='time_in_overtime'>Time In Overtime</option>";
          if ($data["time_out_overtime"] == "")
               $str.="<option value='time_out_overtime'>Time Out Overtime</option>";
     }
}

$str.="</select>";
echo $str;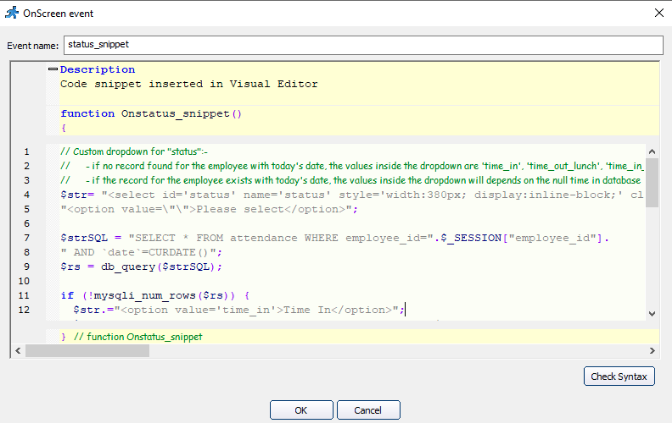
- go to “Events” tab -> “Add page” -> “JavaScript OnLoad event” and paste below code:
this.on('beforeSave', function(formObj, fieldControlsArr, pageObj) {
     var val = $("#status").val();
     formObj.baseParams['status'] = val;
});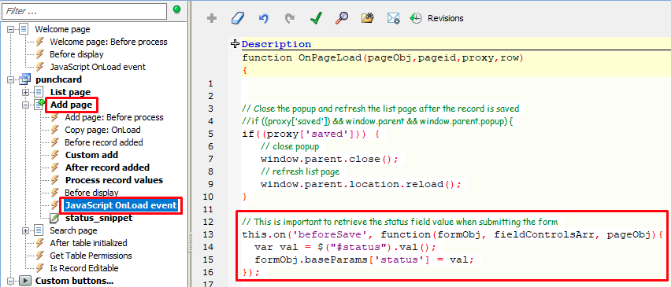
- go to “Designer” tab -> “Add” tab, add a new “Code Snippet” name “status_snippet” and paste below code:
- Display “Employee Name” in “Add” page.
- go to “Events” tab -> “Add page” -> “Process record values” and paste below code:
$values['employee_name'] = $_SESSION["employee_name"];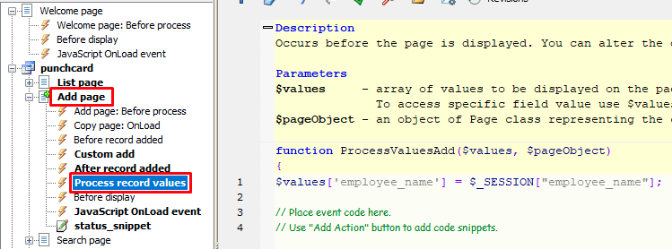
- go to “Events” tab -> “Add page” -> “Process record values” and paste below code:
- Create a “Custom add”.
- go to “Events” tab -> “Add page” -> “Custom add” and paste below code:
$attSQL = DB::Query("SELECT * FROM attendance WHERE `date` = CURDATE() AND employee_id = " . $_SESSION["employee_id"]);
$data = $attSQL->fetchAssoc();
$status = strtolower($_POST["status"]);

// If user already add a record, update the record
if ($data) {
     $update = array();
     $update[$status] = strftime("%H:%M:%S");
     DB::Update("attendance", $update, "record_id=" . $data["record_id"]);
// Else insert a new record
} else {
     $data = array();
     $data["date"] = strftime("%Y-%m-%d");
     $data[$status] = strftime("%H:%M:%S");
     $data["employee_id"] =
     $_SESSION["employee_id"];
     DB::Insert("attendance", $data);
}

// Place event code here.
// Use "Add Action" button to add code snippets.

return false;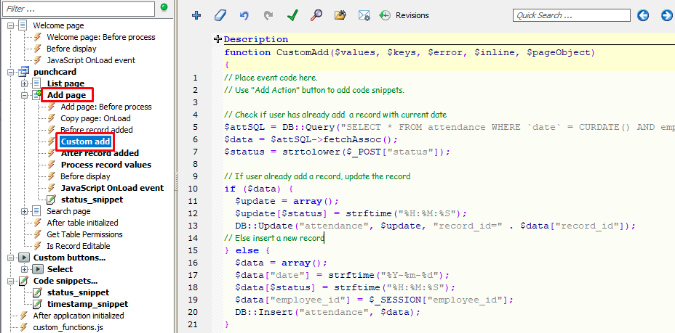
- go to “Events” tab -> “Add page” -> “Custom add” and paste below code:
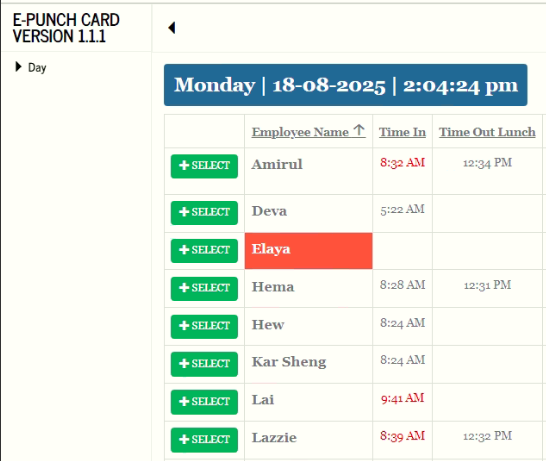
- Add highlight for absentees and late punch.
- go to “Events” tab -> “List page” -> “List page: After record processed” and paste below code:
if ($data["time_in"] == "" && $data["time_in_lunch"] == "")
     $record["employee_name_css"] = 'background:#fc4f37;color:#ffffff;';

if($data['time_in'] > "08:30:59")
     $record["time_in_css"] = 'color:red;';

if($data['time_in_lunch'] > "13:30:59")
     $record["time_in_lunch_css"] = 'color:red;';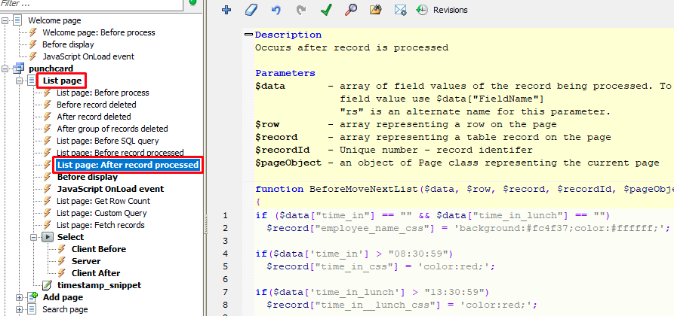
- go to “Events” tab -> “List page” -> “List page: After record processed” and paste below code:
v. 1.0 2025-02-25 Beta Testing Completed
TEST OBJECTIVE: Does the “Status” dropdown only shows the status with empty time?
| TESTING METHODOLOGY | TEST RESULT |
|
 |