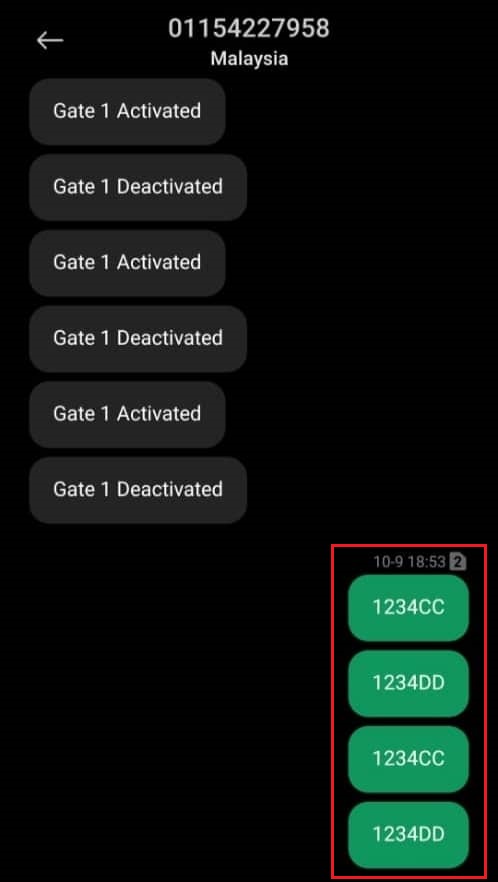
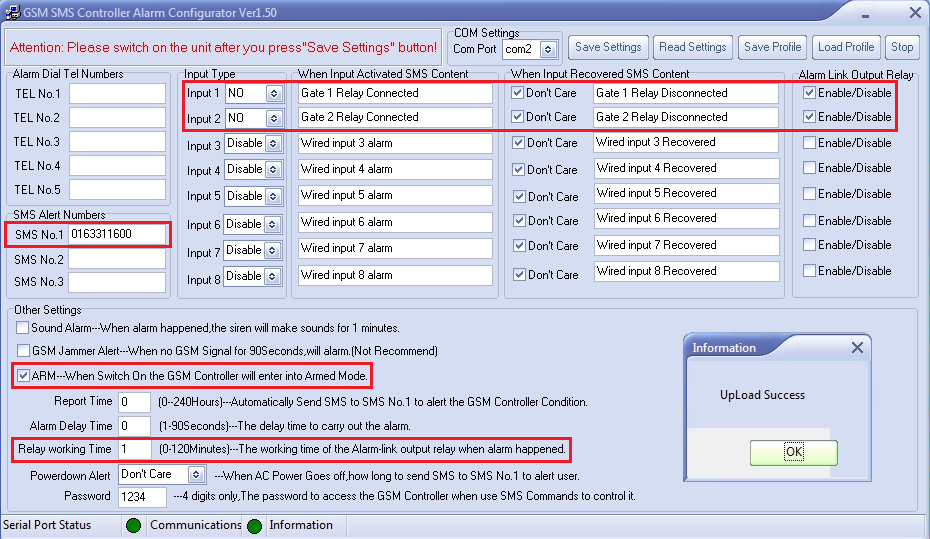
Category Archives: Support

How Does MOBITEK S150 Remotely Open and Close Automatic Gate by SMS

SMS Command

  • To open the gate:
    • send 1234CC to connect the relay
    • send 1234DD to disconnect the relay
  • To close the gate:
    • send 1234CC to connect the relay
    • send 1234DD to disconnect the relay


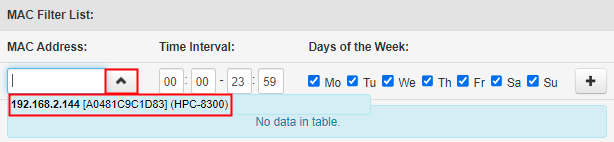
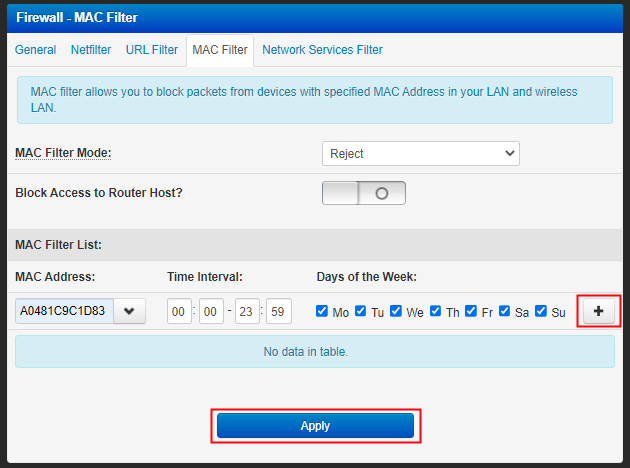
Steps — Wiring and Configuration

  1. Configure S150 in “S130~S150 PC Configurator Ver1.50”.
  2. Contractor wire the 1st gate:
    • 1st gate button wiring (open and close gate)
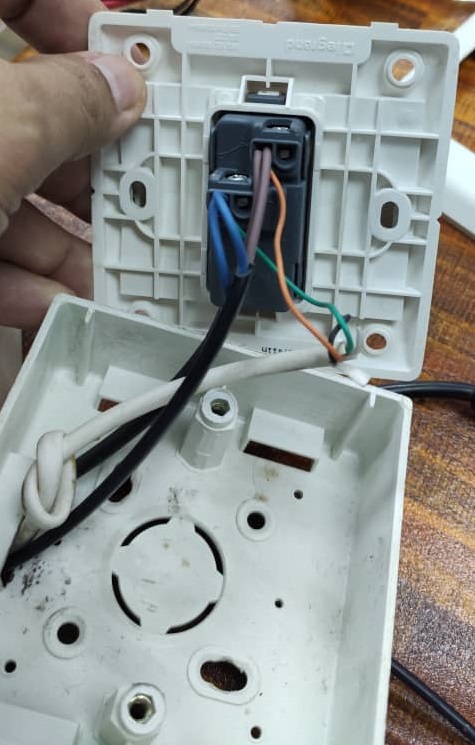
    • Relay Output (1+ & 1-) and;
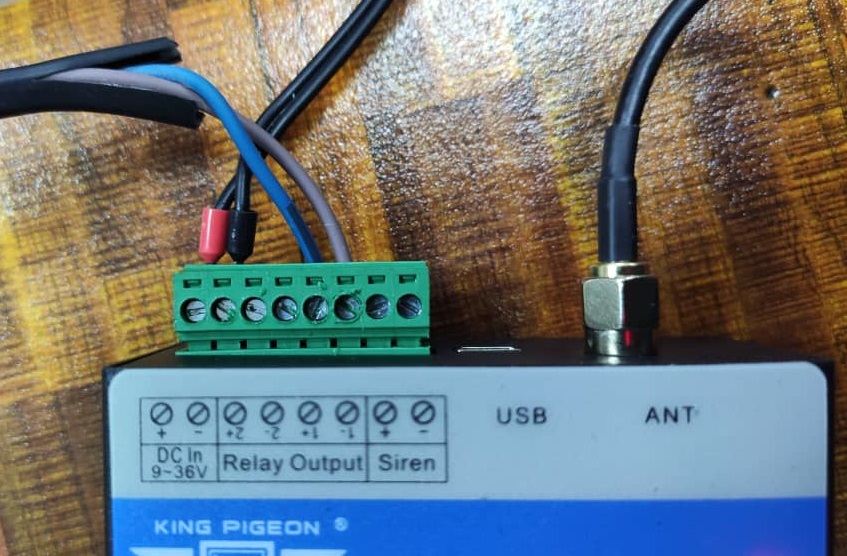
    • Digital Input (GND & 1).
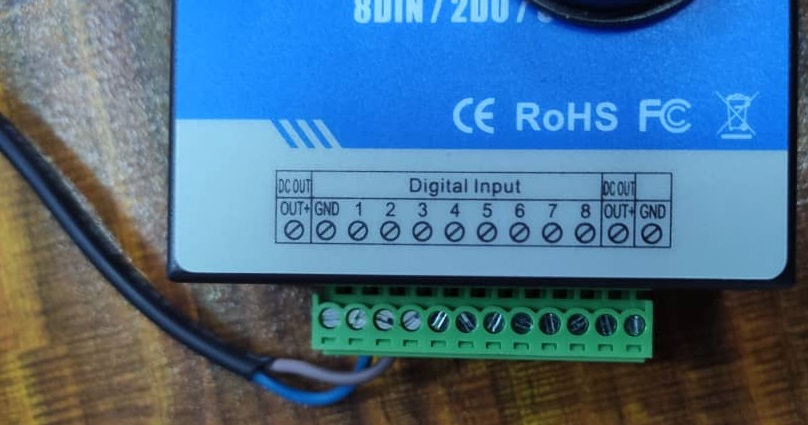
  3. Contractor wire the 2nd gate:
    • 2nd gate button wiring (both sides gate)
    • Relay Output (2+ & 2-)
    • Digital Input (GND & 2)

PHPRunner Allows Both Image and PDF File to be Uploaded

The Preferred Method — “View as File”

To set the field to allow both image and PDF file to be uploaded, go to “Designer” tab, select the field and click “View As/Edit As” button:

  • In “View as”, set the field as “File”
  • In “Edit as”:-

    In “Advanced Settings”, set the “Allowed file types” to accept both image and document format or just leave it empty to allow all file formats:-
  • The result:-


Difference Among “view as image”, “view as file”, “view as PDF”

View as “Image”

    • display only image but any document file will have a broken image
    • click on image will open a preview
    • click on document will get below error


View as “File”

    • display image (as thumbnail) and document (as icon).
    • click on image or document will download it.


View as “PDF”

    • display both image and document as filename
    • click on image filename will download the image
    • click on document filename will open the document in a new tab for viewing without downloading


Conclusions on Both Image and PDF File Format

In the documentation (https://xlinesoft.com/phprunner/docs/view_as_settings_file.htm), there is “Display PDF files online” but not in our PHPRunner.

  • documentation
  • our PHPRunner

That’s the only way to view the PDF file uploaded online. But still the image file will be downloaded when clicked.


3 ways to show the uploaded image or file

  1. view as “Image” (only show image. can be viewed when clicked)
  2. view as “File” (show image and file as thumbnail and icon. downloaded when clicked. currently used for “jpj_registration_card” and “insurance”)
  3. view as “PDF (only show pdf, can be viewed)

How to Solve MOBITEK S150 Rebooting Every 1 Minute

PROBLEM SOLUTION
Find out why S150 keeps rebooting every 1 minute.


The problem will occur when S150 is unable to reply by SMS to the “1234CC” and “1234DD” commands.

In our case, the cause is SMS quota in the Yoodo SIM card has been exchausted, so S150 is not able to reply via SMS to any command send to it. When it failed to send out SMS, it would self-reboot. This will be repeated for every 1 minute until SMS is successfully send out.

Solution: Keep the credit balance available all the time to avoid the S150 rebooting every 1 minute in order to resend SMS.

How to Disable Snipping Tool in Windows 11

These methods will not disable the Snipping Tool. The “PrtSc” button cannot be overwritten and will always call Snipping Tool:-

  1. changing the registry (https://thegeekpage.com/disable-snipping-tool/)
  2. uninstalling in App (https://thegeekpage.com/disable-snipping-tool/)
  3. disable the serivce (https://answers.microsoft.com/en-us/windows/forum/all/disable-snipping-tool/0eccf6ca-013c-4ff5-8ac0-613db83bfffc)

Solution is to turn off “Use the Print screen key to open Snipping Tool”.


How To Restrict a Device Using MAC Filter

  1. Go to “Firewall” -> “MAC Filter”. In “MAC Filter Mode” section, select “Reject”:-
  2. Under “MAC Filter List”:-
    • if the device is connected to the router, select the device from the dropdown list of “MAC Address”.
    • if the device is not connected to the router, type the MAC address of the device in “MAC Address” section.
  3. Click “+” button then click “Apply” button.

How to Restrict Unintended Incoming Access Using SPI Firewall

MOBITEK EC20 4G router use SPI (Stateful Packet Inspection) Firewall for providing network security.

Go to “Firewall” -> “General”. In “Enable Firewall?” section, click on the button to turn on the firewall:-

Click “Apply”.

How does SPI Firewall work?

“… monitors active connections and checks whether incoming data packets correspond to these connections.
it then decides whether to grant or deny permission for them to pass the firewall.”
source: https://veepn.com/blog/what-is-spi-firewall/

How to Restrict Access Based on MAC Address

MOBITEK EC20 4G router can restrict device (client) based on MAC address but not IP address.

  • The intended device (client) must be connected to MOBITEK EC20 4G router first so that it can appear in the client list of MOBITEK EC20.
  • To check the client list, go to “Network Map” -> click “Client Status” -> check the IP address in “Client List”. Click “Refresh” if the IP address is not in the “Client List”:-
  • To block the device, simply click the “cross icon” that belong to the IP address in the “Client List”:-
  • You will get below popup message. Click “OK”:-
  • The device is now in “Blocked Client List”. Click “Apply” to apply the changes made:-
  • To unblock the device, just click the “add icon” that belong to the IP address in the “Blocked Client List”:-

How to Verify the Type of Mobile Network Connection

  • The default connection for MOBITEK EC20 router is 4G network. It will try to connect to 3G and 2G if the 4G network is unavailable:-
  • MOBITEK EC20 can be configure to use different type of mobile network:-
  • The preferred network that MOBITEK EC20 will connect to can be configured, here it 4G (LTE) preferred over 3G (UMTS), and preferred over 2G (GSM) :-
  • The “4G signal” below indicates that the MOBITEK EC20 router is connected to 4G network with 5 bars to determine the signal strength.
  • Alternatively, you can check which network MOBITEK EC20 router currently connected to, go to “Administration” -> click on “Console” tab, type “atcmd at+qnwinfo” (all small letters):-

    • first parameter is for “access technology selected”
      • for 4G, it can be:
        • FDD LTE
        • TDD LTE
      • for 3G, it can be:
        • TDSCDMA
        • HSPA+
        • HSUPA
        • HSDPA
        • WCDMA
      • for 2G, it can be:
        • EDGE
        • GPRS
        • GSM
    • the second parameter, “50219”, is the network operator (TELCO) (you can ignore this)
    • the third parameter is, “LTE Band 1”, the type of frequency/band selected (you can ignore this)
    • the forth parameter, 375,  is for “Channel ID” (you can ignore this)


How To Solve The Problem With Quectel USB NMEA Port Missing

When connecting MOBITEK Q25 using USB cable, “Quectel USB NMEA Port” is missing and the Device Manager keeps refreshing. When connecting “Quectel USB AT Port” to Hyper Terminal (in below example COM2), the modem is not responding to any AT commands.

MOBITEK Q25 should have 3 ports:

  • Quectel USB AT Port
  • Quectel USB DM Port
  • Quectel USB NMEA Port

Steps to restore “Quectel USB NMEA Port”:

  1. Open Hyper Terminal or QCOM.
  2. Connect using the other “Quectel USB AT Port”. In this example “COM31”.
  3. Use AT+QCFG=”usbnet” to configure the network card type interface.
  4. Type below commands into Hyper Terminal or QCOM.
    • AT
    • AT+QCFG=”usbnet”,0
    • AT+CFUN=1,1
  5. Open Device Manager, “Quectel USB NMEA Port” should appear now.
  6. Connect “Quectel USB AT Port (COM19)” to Hyper Terminal. The port should respond to any AT commands send to it.