Category Archives: Change Log

Change Log of Purchase Requisition System (PRS)

System Requirements

  1. phpMyAdmin version: 5.2.2
  2. PHP version: 7.2
  3. MySQL version: 5.7.26
  4. PHPRunner version: 10.4
  5. Hard Disk Space: 20 MB


Database Structure

TABLE COLUMN
purchase_requisition
uggroups
ugmembers
ugrights
users


Live URL

https://prs.sweetco.com.my


v. 1.0 2026-04-22 Modification Completed

Replace “Rich Text Box” for “Item Description” field with “Text Box with multiple rows”

BEFORE AFTER


Rename “vendor” column to “vendor_details” and replace “Rich Text Box” for “Vendor Details” field with “Text Box with multiple rows”

BEFORE AFTER


Rename columns and labels

  • rename “vendor_url” column to “vendor_link”
  • rename “Vendor Link” label to “Vendo’s Link”
  • rename “Vendor Email” label to “Vendor’s Email”
  • rename “Item Purpose” label to “Item is Used For”
BEFORE AFTER
 

  • vendor_url
  • vendor_email
  • item_purpose


Add “Show/hide fields”

BEFORE AFTER


Add users to Purchase Requisition System

BEFORE AFTER


v. 1.0 2025-02-19 Modification Completed

Move “Supplier” field after “Unit Price” in edit page

BEFORE AFTER


Modify the columns of “purchase_requisition” table

BEFORE AFTER
Table Structure

  1. purchase_requisition_id – int
  2. issued_date – date
  3. company_name – varchar (100)
  4. requested_by – varchar (50)
  5. item_description – longtext
  6. item_photo – mediumtext
  7. quantity_requested – int
  8. quantity_in_stock – int
  9. unit_price – double(9,2)
  10. supplier – longtext
  11. item_purpose – varchar (255)
  12. expected_arrival_date – date
  13. delivery_order_photo – mediumtext
  14. received_item_photo – mediumtext
  15. received_item_date – date
  16. issued_by – varchar(255)
  17. approved_by – varchar(255)
Table Structure

  1. purchase_requisition_id – int
  2. issued_date – date
  3. company_name – varchar (100)
  4. requested_by – varchar (50)
  5. item_description – longtext
  6. item_photo – mediumtext
  7. quantity_requested – int
  8. unit_price – double(9,2)
  9. quantity_in_stock – int
  10. vendor – longtext
  11. vendor_email – varchar(255)
  12. vendor_url – varchar(255)
  13. item_purpose – varchar (255)
  14. expected_arrival_date – date
  15. received_item_date – date
  16. received_item_photo – mediumtext
  17. delivery_order_photo – mediumtext
  18. issued_by – varchar(255)
  19. approved_by – varchar(255)

  • vendor_email
  • vendor_url


Rearrange the sequence of grid as per the sequence of columns in “purchase_requisition” table

BEFORE AFTER


Rearrange the sequence of labels and text box in edit view as per the sequence of columns in “purchase_requisition” table

BEFORE AFTER


Rearrange the sequence of rows in the form to follow the sequence of columns in “purchase_requisition” table

BEFORE AFTER


v. 1.0 2025-01-15 Modification Completed

Revise the form

  • remove the “Supplier” at top right of table and move it to the table by adding a row after “Unit Price”.
  • rename the label as “Name and Contact Details of Supplier”, set the format of text (data entry) box to “Basic Rich Text Editor” so that user can enter name, address, contact number, link in allow multiple lines.
BEFORE AFTER


v. 1.0 2025-01-02 Kaizen Completed

Create “sweetcoc_prs” database and assign “sweetcoc_phpMyBackupPro2024” and “sweetcoc_phprunner” users to the database

BEFORE AFTER

MODIFICATION in PHPRunner or cPanel or PHPMyAdmin

  1. Go to cPanel -> “Databases” -> “Manage My Databases”.
  2. Under “Create New Database”, create “sweetcoc_prs”.
  3. Under “Add User To Database”, add “sweetcoc_phpMyBackupPro2024” and “sweetcoc_phprunner” to “sweetcoc_prs” database.


Create “purchase_requisition” table in “sweetcoc_prs” database

BEFORE AFTER

MODIFICATION in PHPRunner or cPanel or PHPMyAdmin

  1. Go to cPanel -> “Databases” -> “phpMyAdmin.
  2. Create “purchase_requisition” table.
  3. Add below columns:-
    Name Type
    purchase_requisition_id int(11)
    company_name varchar(100)
    requested_by varchar(50)
    item_description longtext
    item_photo mediumtext
    quantity_requested int(11)
    quantity_in_stock int(11)
    unit_price double(9,2)
    supplier_name varchar(255)
    item_purpose varchar(255)
    expected_arrival_date date
    delivery_order_photo mediumtext
    received_item_photo mediumtext
    received_item_date date
    issued_by varchar(255)
    approved_by varchar(255)


Create “prs.sweetco.com.my” domain

BEFORE AFTER

MODIFICATION in PHPRunner or cPanel or PHPMyAdmin

  1. Go to cPanel -> “Domains” -> “Domains”.
  2. Add “prs.sweetco.com.my”.


Set PHP version of “Purchase Requisition System” to “PHP 7.2”

BEFORE AFTER

MODIFICATION in PHPRunner or cPanel or PHPMyAdmin

  1. Go to cPanel -> “Software” -> “MultiPHP Manager”.
  2. Check “prs.sweetco.com.my” and change the PHP Version to “PHP 7.2 (ea-php72)”.


Create “Purchase Requisition System” project in PRPRunner

MODIFICATION in PHPRunner or cPanel or PHPMyAdmin

  1. Go to PHPRunner and create a new project PRS.
  2. Set the database for PRS.


Re-arrange the “view” page of PRS

BEFORE AFTER


MODIFICATION in PHPRunner or cPanel or PHPMyAdmin

  1. Go to “Designer” tab and click “view” tab.
  2. Re-arrange all fields like below:


Add “Send Email” function

BEFORE AFTER

MODIFICATION in PHPRunner or cPanel or PHPMyAdmin

  1. Go to “Misc” tab and click “Email Settings…”
  2. Set as below:
  3. Go to “Designer” tab, click on “list” page, click on “Insert…” dropdown and click “Custom Button”.
  4. Click “New Button…”
  5. Name the new button as “Send_Email”. In “Client Before tab, place below code:
    var pdfParams = {},
      selectedRecords = pageObj.getSelectedRecords();
     
    if( selectedRecords.length == 0 )
      return false;
     
    params.recordCount = selectedRecords.length;
    params.filenames = [];
     
    var createOnePdf = function( idx ) {
      ajax.addPDF( 'pdf'+idx, pdfParams[idx], function() {
        delete pdfParams[idx];
        if( Object.keys( pdfParams ).length == 0 ) {
            showDialog();
         }
      });
    }
     
    var showDialog = function() {
     ctrl.dialog( {
      title: 'Email ' + params.recordCount + ' PDF files',
      fields: [
         {
            name: 'Email',
            value: 'factory@sweetco.com.my'
         },
         {
            name: 'Subject',
            value: 'Purchase Requisition No.: '
         },
         {
            name: 'Body',
            value: 'This email is generated by Runner-created application',
            type: 'textarea'
         },
         ]
      });
    }
     
    selectedRecords.forEach( function( ajaxRow, idx ) {
      pdfParams[ idx ] = {
         pageType: 'view',
         keys: ajaxRow.getKeys()
      };
      params.filenames.push( 'Purchase_Requisition#'+ajaxRow.getKeys()+'.pdf' )
      createOnePdf( idx );
     
    });
     
    return false;

  6. In “Server” tab, place below code:
    $attachments = array();
    for( $i=0; $i< $params["recordCount"]; ++$i ) {
      $attachments[] = array(
        "path" => $button->saveTempFile( $params["pdf" . $i] ),
        "name" => $params["filenames"][$i]
      );
    }
    $mail = array();
    $mail["to"] = $params["Email"];
    $mail["subject"] = $params["Subject"];
    $mail["body"] = $params["Body"];
    $mail["attachments"] = $attachments;
     
    $ret = runner_mail( $mail );
     
    if( $ret["mailed"] )
    {
      $result["success"] = true;
    }
    else
    {
      $result["message"] = $ret["message"];
        $result["success"] = false;
    }

  7. In “Client After” tab, paste below code:
    if( result.success ) {
        alert("Your email has been sent!");
    } else {
        alert("Error sending " + result.message);
    }

  8. Place the “Send Email” button at the same row as “Add new” button.


Add “Print” and “Save PDF” functions

BEFORE AFTER

MODIFICATION in PHPRunner or cPanel or PHPMyAdmin

  1. Go to “Designer” tab, select “view” tab, click on “Insert…” dropdown and click “Custom Buttom”.
  2. Click “New button…”.
  3. For:-
    • “Print” button
      • “Client Before” tab
        window.print();
         // Uncomment the following line to prevent execution of "Server" and "Client After" events.
        return false;

    • “Save PDF” button
      • “Server” tab
        $record = $button->getCurrentRecord();
        $result["ID"] = $record["purchase_requisition_id"];

      • “Client After” tab
        var params = {
            table: 'purchase_requisition',
            page: 'view',
            pageType: 'view',
            keys: [result["ID"]],
            scale: 120
        }
        
        Runner.PDF.download(params, 'Purchase Requisition no. ' + result["ID"] + '.pdf');

  4. Re-arrange “Print” and “Save PDF” buttons at the bottom.

Edit “Item Photo”, “Delivery Order Photo” and “Received Item Photo” to allow multiple image upload

BEFORE AFTER
  • Item Photo
  • Delivery Order Photo
  • Received Item Photo

MODIFICATION in PHPRunner or cPanel or PHPMyAdmin

  1. Go to “Designer” tab
  2. Set as below:-
    • item_photo
    • delivery_order_photo
    • received_item_photo


Add database security to PRS

BEFORE AFTER

MODIFICATION in PHPRunner or cPanel or PHPMyAdmin

  1. Go to “Security” tab, select “Database” and create a new table for “users”.
  2. Add a new user.
  3. Set user group permission.
  4. Add “Big-Boss” to <Admin> group.
  5. Encrypt password.
  6. Set JWT secret key: “YaaBF0qi8Wy7X9Wns2Ci”.


Change the title of the project to “Purchase Requisition System v.1.0”

BEFORE AFTER

MODIFICATION in PHPRunner or cPanel or PHPMyAdmin

  1. Go to “Editor” tab, double-click on “PRS” logo.
  2. Rename it to “Purchase Requisition System v.1.0”.


v. 1.0 2025-01-02 Beta Testing Completed

TEST OBJECTIVE: Can PRS add another user?

TESTING METHODOLGY TEST RESULT
  1. Log in to PRS using:-
    • Username = Big-Boss
    • Password = 2024$BF#Taufiq
  2. Go to “Admin Area”.
  3. Click on “Add/Edit users” -> “Add new”.
  4. Add:-
    • Username = Sweetco-Public
    • Password = #2023Sweetco


TEST OBJECTIVE: Can “Item Photo”, “Delivery Order Photo” and “Received Item Photo” fields upload multiple images?

TESTING METHODOLGY TEST RESULT
  1. Add new record in Purchase Requisition.
  2. Go to “Item Photo”, “Delivery Order Photo” and “Received Item Photo” fields and upload more than 1 image to these fields.
  • Item Photo
  • Delivery Order Photo
  • Received Item Photo


TEST OBJECTIVE: Can “Send Email” function email the selected record to any email?

TESTING METHODOLGY TEST RESULT
  1. Select any record in Purchase Requisition.
  2. Click “Send Email” button.
  3. Send to “t1@mobitek.my”


Change Log of SMS360

v. 1.1 2024-01-03 Kaizen Completed

Add “Incoming SMS” tab

BEFORE AFTER
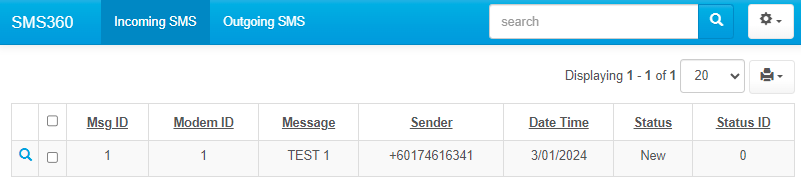
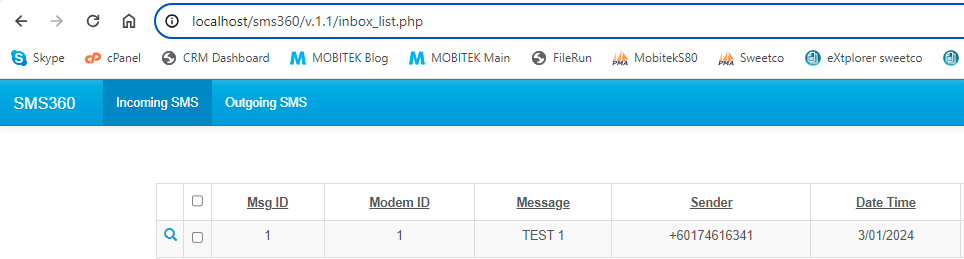
“Incoming SMS” tab that display ‘Inbox” table in grid format.

MODIFICATION in PHPRunner

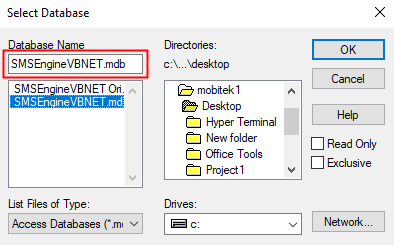
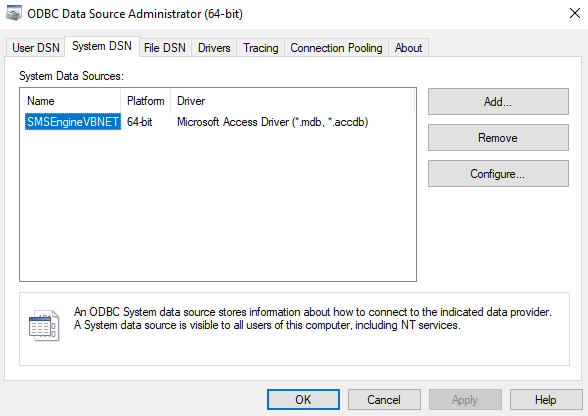
  1. Add new connection to “SMSEngineVBNET.mdb”
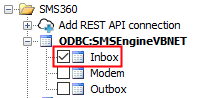
  2. Add “Inbox” table to the project.
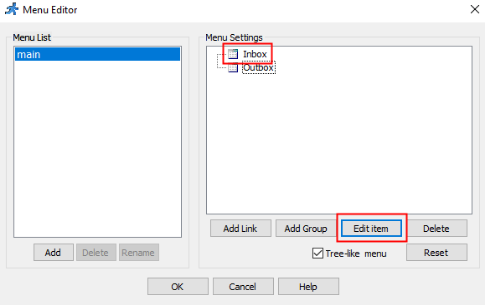
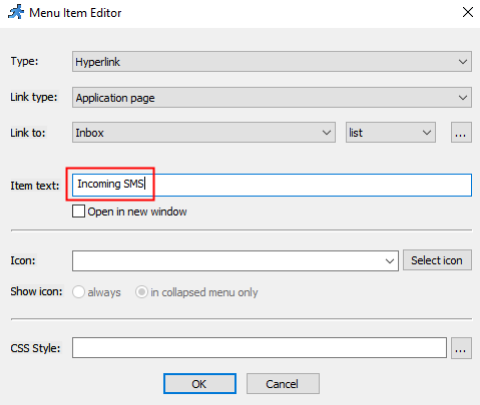
  3. Go to “Menu editor”. In “Menu Settings” section, select “Inbox” -> “Edit item”.
  4. In “Menu Item Editor”, rename the “Item text” to “Incoming SMS”.
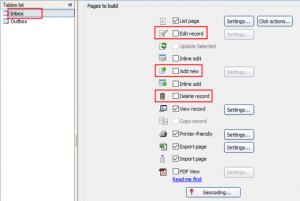
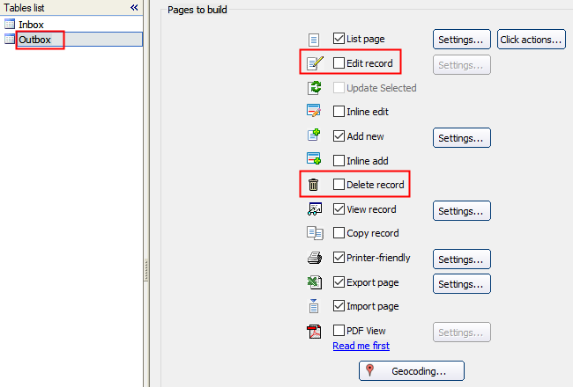
  5. Go to “Pages” tab. In Tables list, select “Inbox”. Uncheck “Edit record”, “Add new” and “Delete record”.
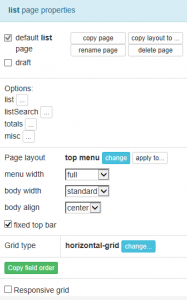
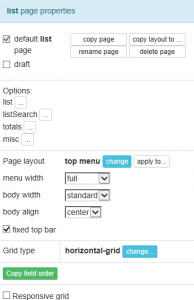
  6. Go to “Designer” tab, select “Inbox” in Tables list, set the page properties as below:


Add “Outgoing SMS” tab

BEFORE AFTER
“Outgoing SMS” tab that display “Outbox” table in grid format.

MODIFICATION in PHPRunner

  1. Add “Outbox” table to the project.
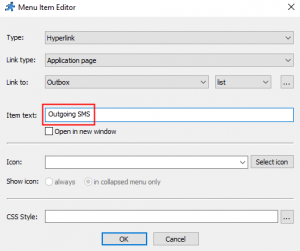
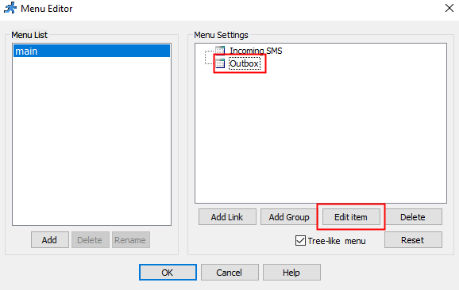
  2. Go to “Menu editor”. In “Menu Settings” section, select “Outbox” -> “Edit item”.
  3. In “Menu Item Editor”, rename the “Item text” to “Outgoing SMS”.
  4. Go to “Pages” tab. In Tables list, select “Outbox”. Uncheck “Edit record” and “Delete record”.
  5. Go to “Designer” tab, select “Outbox” in Tables list, set the “Page layout” as below:


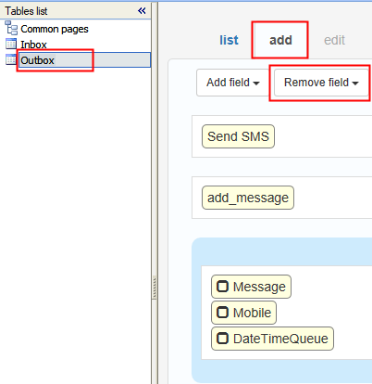
Add button “Send SMS” into “Incoming SMS” tab

BEFORE AFTER
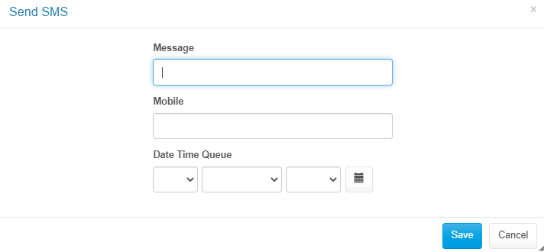
“Outgoing SMS” tab has a button “Send SMS” that insert a new record into “Outbox” table so that a SMS can be send out by SMS Engine — Basic Edition.

MODIFICATION in PHPRunner

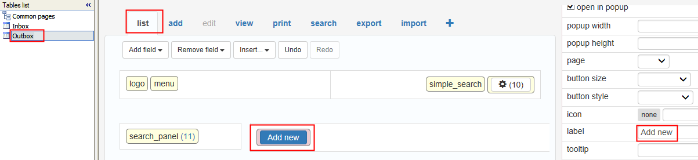
  1. Go to “Designer” tab. Select “Outbox” in Tables list. Click on “list” tab, click “Add new” button. Rename the text in “label” to “Send SMS”.
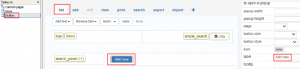
  2. In the same “Designer” tab, select “add” tab. Click “Remove field” dropdown and remove all fields except “Message”, “Recipient” and “DateTimeQueue”.


Add “http://localhost/sms360/v.1.1”

BEFORE AFTER
Localhost in HPC-8300 can access the PHP files on “http://localhost/sms360/v.1.1”

MODIFICATION in PHPRunner

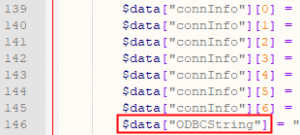
  1. Open “..\output\connections\ConnectionManager.php”
  2. Go to the line “$data[“ODBCString”]” and change the value to:

    • “Provider=Microsoft.ACE.OLEDB.12.0;Data Source=C:\\Users\\mobitek1\\Desktop\\SMS360 v. 1.1\\SMSEngineVBNET.mdb;Persist Security Info=False;”;
    • “Data Source” is where the “SMSEngineVBNET.mdb” located.
    • Each directory must be separated by double backslash “\\”.
  3. Copy all files inside “output” folder to “C:\wamp64\www\sms360\v.1.1”


v. 1.1 2024-01-03 Beta Testing Completed

TEST OBJECTIVE: Can v.1.1 work with “SMSEngineVBNET.mdb”?

TESTING METHODOLOGY TEST RESULT
  1. Add “SMSEngineVBNET.mdb” in ODBC 64-bit
  2. Connect v.1.1 to “SMSEngineVBNET.mdb”
  3. Change the connection string for “$data[“ODBCString”]” in line 146 of “ConnectionManager.php” to:
    "Provider=Microsoft.ACE.OLEDB.12.0;Data Source=C:\\Users\\mobitek1\\Desktop\\SMS360 v. 1.1\\SMSEngineVBNET.mdb;Persist Security Info=False;";


TEST OBJECTIVE: Can v.1.1 run in localhost of HPC-8300 (http://localhost/sms360/v.1.1) ?

TESTING METHODOLOGY TEST RESULT
  1. Copy all files inside “output” folder to “C:\wamp64\www\sms360\v.1.1”
  2. Open “http://localhost/sms360/v.1.1” in browser


PROBLEM

SOLUTION SOLVED?
According to PHPRunner documentation, to use PHPRunner with Access database, we need to use 32-bit version
(source: https://xlinesoft.com/phprunner/docs/connecting_to_ms_access_db.htm)
Not tested
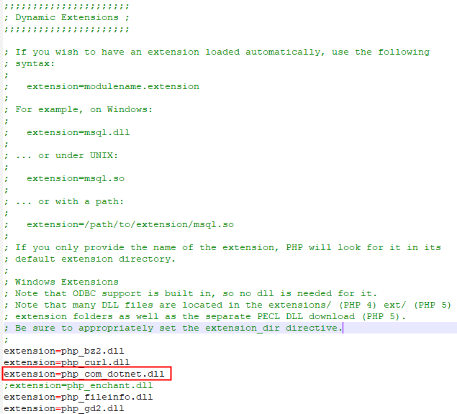
Enable “php_com_dotnet.dll” extension in “php.ini” file
(source: https://xlinesoft.com/phprunner/docs/connecting_to_ms_access_db.htm)
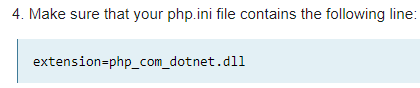
NO
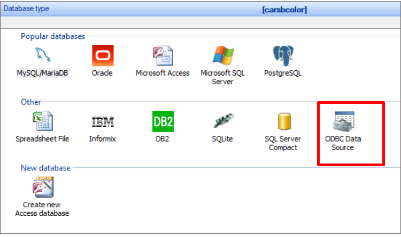
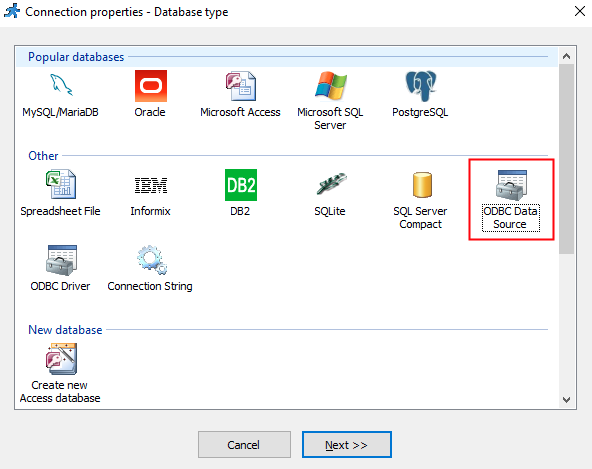
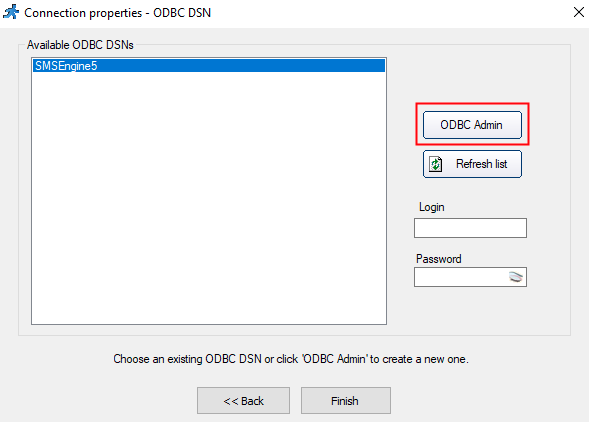
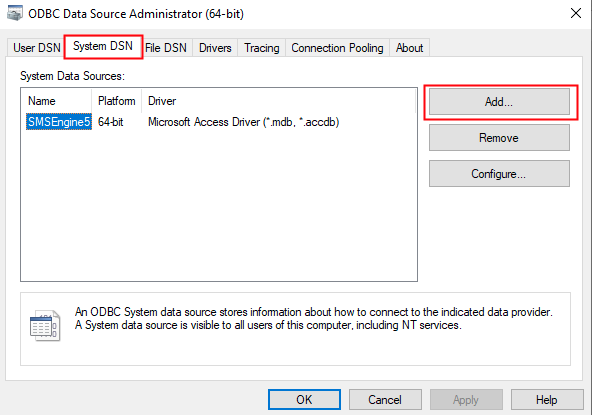
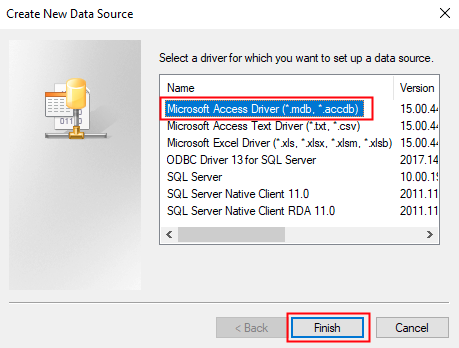
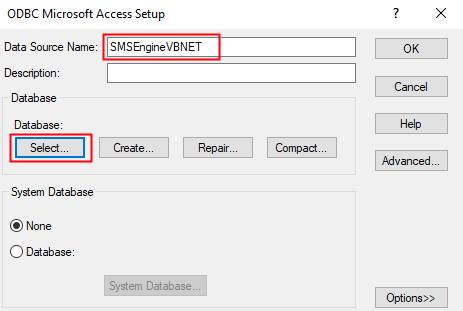
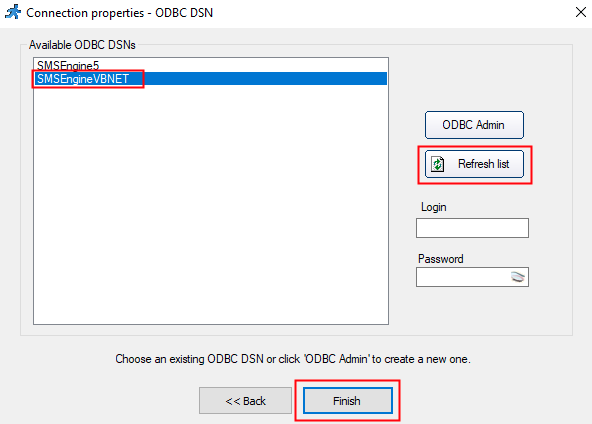
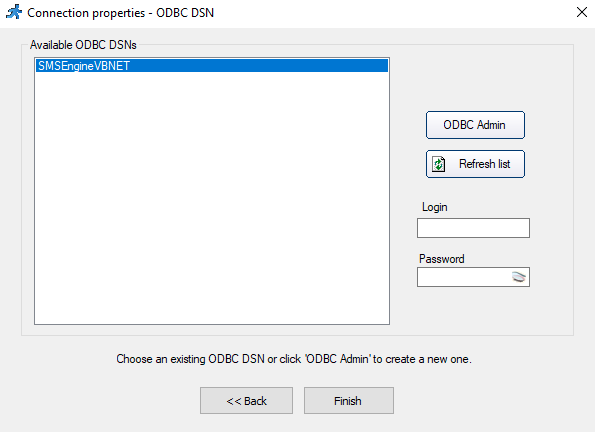
Use ODBC in PHPRunner


refer to

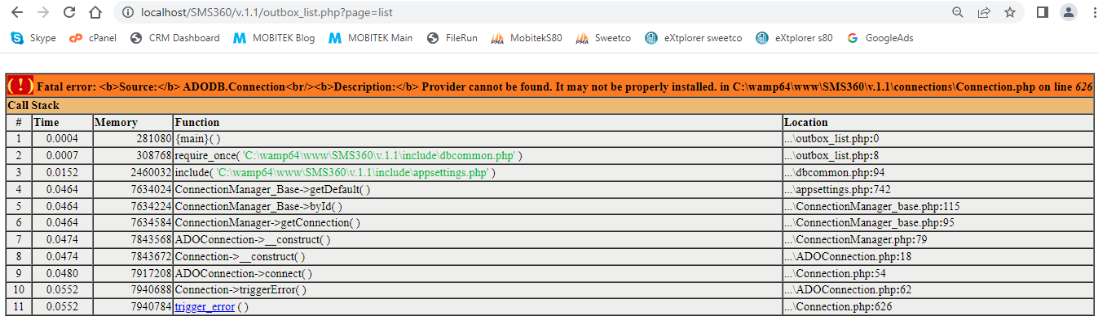
NO. ODBC does not work.

“ADODB.Connection” problem has disappeared but new error thrown

Steps to use ODBC in PHPRunner:

  1. In “Tables” tab, right-click on the database and select “Properties”
  2. In “Connection properties”, click on “Back” button
  3. Select “ODBC Data Source”
  4. Click “ODBC Admin” button
  5. Select “System DSN” and click “Add…” button
  6. Select “Microsoft Access Driver (*.mdb, *.accdb)”
  7. Enter the “Data Source Name” and click “Select…”
  8. Locate the location of the database
  9. Click “Refresh list” button, select the new “DSN” created and click “Finish”


It seems like PHPRunner still use Microsoft.Jet.OLEDB driver to connect to Access database which only work with 32-bit application as suggested by PHPRunner

The problem with Microsoft.Jet.OLEDB driver also discussed by others
(source: https://stackoverflow.com/questions/1991643/microsoft-jet-oledb-4-0-provider-is-not-registered-on-the-local-machine)


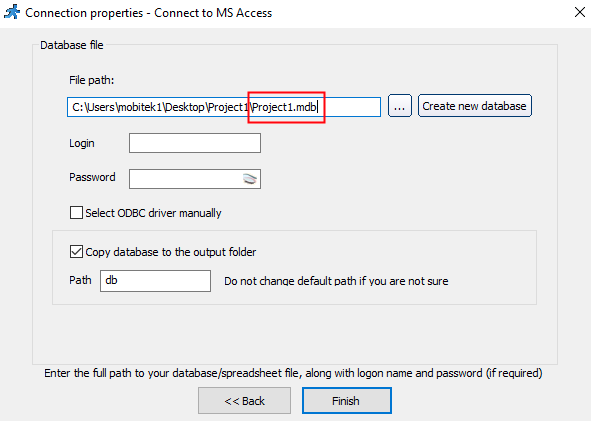
I’ve tried to create a new blank project using MS Access database in PHPRunner and also face the same problem:

  • connection properties
  • error thrown
    “Unrecognized database format ‘C:\Users\mobitek1\Desktop\Project1\output\db\Project1.mdb’. in C:\Users\mobitek1\Desktop\Project1\output\connections\Connection.php on line 626


The solutions to use Microsoft Access database in PHPRunner are:

  • use “Provider=Microsoft.ACE.OLEDB.12.0” in connection string (we don’t have control for this)
  • use “Microsoft Access Database Engine 2010 Redistributable” (not sure how it works)
    https://www.microsoft.com/en-us/download/details.aspx?id=13255
  • use 32-bit version of PHPRunner (as suggested by PHPRunner)
Edit the “ConnectionManager.php” to force it to use “Provider=Microsoft.ACE.OLEDB.12.0” instead of “Provider=Microsoft.Jet.OLEDB.4.0”


 YES

Overwrite “..\output\connections\ConnectionManager.php” in line 146 from:

Provider=Microsoft.Jet.OLEDB.4.0;DSN=SMSEngineVBNET;UID=;PWD=;Driver=C:\\PROGRA~1\\COMMON~1\\MICROS~1\\OFFICE15\\ACEODBC.DLL;DBQ=C:\\Users\\mobitek1\\Desktop\\SMS360 v. 1.1\\SMSEngineVBNET.mdb;DriverId=25;FIL=\”MS Access;\”;SafeTransactions=0″

to

Provider=Microsoft.ACE.OLEDB.12.0;Data Source=C:\\Users\\mobitek1\\Desktop\\Project1\\SMSEngineVBNET.mdb;Persist Security Info=False;