Category Archives: MOBITEK Q25 4G Modem

How to Use MQTT with MOBITEK Q25 4G Modem

MOBITEK Q25 SETTINGS — MOSQUITTO MQTT SERVER

  1. Q25’s Setting:-
    • Remote Host: 175.*.*.* / *.dyndns.*
    • Remote Port: 1883
    • User Name: ***
    • User Password: ***
    • Subscribe Topic: Test
    • Publish Topic: Test
  2. Mosquitto version 2.0.14‘s Settings:-
    • In “C:\Program Files\mosquitto\mosquitto.conf”:
      • find “Listeners” and add
        listener 1883 0.0.0.0
      • find “Security” and add
        allow_anonymous true
    • Stop “Mosquitto Broker” in “Services”
    • Open command prompt as administrator and enter:
      • cd “C:\Program Files\mosquitto”
      • mosquitto -v -c mosquitto.conf
    • Add port forwarding in router:
      • Service Type = TCP
      • External Port = 1883
      • Internal IP = (Public IP of router)
      • Internal Port = 1883
      • Protocol = ALL


AT COMMANDS — MOSQUITTO MQTT SERVER

DESCRIPTION AT COMMAND

Configure Parameters of a TCP/IP Context

AT+QICSGP=<contextID>,<context_type>,<APN>,<username>,<password>, <authentication>

AT+QICSGP=1,1,”yoodo”,””,””,1
OK

Activate a PDP Context

AT+QIACT=<contextID>

AT+QIACT=1
OK

AT+QIACT?
+QIACT: 1,1,1,”10.*.*.*”

Configure receiving mode when data is received from server

AT+QMTCFG=“recv/mode”,<client_idx>,<msg_recv_mode>, <msg_len_enable>

AT+QMTCFG=”recv/mode”,0
+QMTCFG: “recv/mode”,0,0
OK

Open a network for MQTT client

AT+QMTOPEN=<client_idx>,“<host_name>”,<port>

AT+QMTOPEN=0,”175.*.*.*”,1883
OK
+QMTOPEN: 0,0

AT+QMTOPEN?

+QMTOPEN: 0,”175.*.*.*”,1883
OK

Connect a client to MQTT Server

AT+QMTCONN=<client_idx>,“<clientID>”,“<username>”,“<password>”

AT+QMTCONN=0,”Q25″,””,””
OK
+QMTCONN: 0,0,0

AT+QMTCONN?

+QMTCONN: 0,3
OK

Publish messages

AT+QMTPUBEX=<client_idx>,<msgID>,<qos>,<retain>,“<topic>”,<msg_length>

AT+QMTPUBEX=0,0,0,0, “Test”,30
> Q25 publish from Hyper Terminal
OK
+QMTPUBEX: 0,0,0

Subscribe to Topics

AT+QMTSUB=<client_idx>,<msgID>,“<topic1>”,<qos1>[,“<topic2>”,<qos2>…]

AT+QMTSUB=0,1, “Test”,0
OK
+QMTSUB: 0,1,0,0
+QMTRECV: 0,0, “Test”, “Publish from MQTT Explorer in HPC-8300”

Disconnect a client to MQTT Server

AT+QMTDISC=<client_idx>

AT+QMTDISC=0
OK

Close a network for MQTT client

AT+QMTCLOSE=<client_idx>

AT+QMTCLOSE=0
OK

Deactivate a PDP Context

AT+QIDEACT=<contextID>

AT+QIDEACT=1
OK


MOBITEK Q25 SETTINGS — FAVORIOT

  • Remote Host: mqtt.favoriot.com
  • Remote Port: 1883
  • User Name: ***
  • User Password: ***
  • Subscribe Topic: XYoUfrDZ8mzvHNKJAtkLIvVBOw23dGnb/v2/streams/status
  • Publish Topic: XYoUfrDZ8mzvHNKJAtkLIvVBOw23dGnb/v2/streams


AT COMMANDS — FAVORIOT

DESCRIPTION AT COMMAND

Configure Parameters of a TCP/IP Context

AT+QICSGP=<contextID>,<context_type>,<APN>,<username>,<password>, <authentication>

Parameter:

  • <contextID> – Integer type. The context ID. The range is 1-16.
  • <context_type> – Integer type. The protocol type:
    • 1 – IPV4
    • 2 – IPV4V6
  • <APN> – String type. The access point name.
  • <username> – String type. The username.
  • <password> – String type. The password.
  • <authentication> – Integer type. The authentication methods:
    • 0 – NONE
    • 1 – PAP
    • 2 – CHAP
    • 3 – PAP or CHAP
AT+QICSGP=1,1,”yoodo”,””,””,1
OK

Activate a PDP Context

AT+QIACT=<contextID>

AT+QIACT=1

AT+QIACT?
+QIACT: 1,1,1,”10.*.*.*”

Configure receiving mode when data is received from server

AT+QMTCFG=“recv/mode”,<client_idx>,<msg_recv_mode>, <msg_len_enable>

Parameter:

  • <client_idx> – Integer type. MQTT client identifier. The range is 0-5.
  • <msg_recv_mode> – Integer type. Configure the MQTT message receiving mode:
    • 0 – MQTT message received from server will be contained in URC.
    • 1 – MQTT message received from server will not be contained in URC.
  • <msg_len_enable>
    • 0 – Length of MQTT message received from server will not be contained in URC.
    • 1 – Length of MQTT message received from server will be contained in URC.
AT+QMTCFG=“recv/mode”,0,0,1

+QMTCFG: “recv/mode”,0,1

OK

Open a network for MQTT client

AT+QMTOPEN=<client_idx>,“<host_name>”,<port>

Parameter:

  • <client_idx> – Integer type. MQTT client identifier. The range is 0-5.
  • <host_name> – String type. The address of the server. It could be an IP address or a domain name. The maximum size is 100 bytes.
  • <port> – Integer type. The port of the server. The range is 1-65535.
AT+QMTOPEN=0,”mqtt.favoriot.com”,1883
OK
+QMTOPEN: 0,0

AT+QMTOPEN?

+QMTOPEN: 0,”mqtt.favoriot.com”,1883
OK

Connect a client to MQTT Server

AT+QMTCONN=<client_idx>,“<clientID>”,“<username>”,“<password>”

Parameter:

  • <client_idx> – Integer type. MQTT client identifier. The range is 0-5.
  • <clientID> – String type. The client identifier string.
  • <username> – String type. User name of the client. It can be used for authentication.
  • <password> – String type. Password corresponding to the user name of the client. It can be used for authentication.
AT+QMTCONN=0,”Q25″, “***”, “***”
OK
+QMTCONN: 0,0,0

Publish messages

AT+QMTPUBEX=<client_idx>,<msgID>,<qos>,<retain>,“<topic>”,<msg_length>

Parameter:

  • <client_idx> – Integer type. MQTT client identifier. The range is 0-5.
  • <msgID> – Integer type. Message identifier of packet. The range is 0-65535. It will be 0 only
    when <qos>=0.
  • <qos> – Integer type. The QoS level at which the client wants to publish the messages.
    • 0 – At most once
    • 1 – At least once
    • 2 – Exactly once
  • <retain> – Integer type. Whether or not the server will retain the message after it has been
    delivered to the current subscribers.

    • 0 – The server will not retain the message after it has been delivered to the
      current subscribers
    • 1 – The server will retain the message after it has been delivered to the current
      subscribers
  • <topic> – String type. Topic that needs to be published.
  • <msg_length> – Integer type. Length of message to be published.
AT+QMTPUBEX=0,0,0,0, “XYoUfrDZ8mzvHNKJAtkLIvVBOw23dGnb/v2/streams”,30
> Q25 send from Hyper Terminal
OK
+QMTPUBEX: 0,0,0

Subscribe to Topics

AT+QMTSUB=<client_idx>,<msgID>,“<topic1>”,<qos1>[,“<topic2>”,<qos2>…]

Parameter:

  • <client_idx> – Integer type. MQTT client identifier. The range is 0-5.
  • <msgID> – Integer type. Message identifier of packet. The range is 1-65535.
  • <topic> – String type. Topic that the client wants to subscribe to or unsubscribe from.
  • <qos> – Integer type. The QoS level at which the client wants to publish the messages:
    • 0 – At most once
    • 1 – At least once
    • 2 – Exactly once
AT+QMTSUB=0,0, “XYoUfrDZ8mzvHNKJAtkLIvVBOw23dGnb/v2/streams”,0
OK
+QMTSUB: 0,0,0,0
+QMTRECV: 0,0, “XYoUfrDZ8mzvHNKJAtkLIvVBOw23dGnb/v2/streams”,38, “Publish from MQTT Explorer in HPC-8300″

+QMTRECV: 0,0,”XYoUfrDZ8mzvHNKJAtkLIvVBOw23dGnb/v2/streams”,46, “Publish from MQTT Explorer in Taufiq’s desktop”

Close a network for MQTT client

AT+QMTCLOSE=<client_idx>

Parameter:

  • <client_idx> – Integer type. MQTT client identifier. The range is 0-5.
AT+QMTCLOSE=0

OK


How to Change the Baud Rate of MOBITEK Q25 4G Modem

  1. By default, the baud rate for MOBITEK Q25 is “115200”.
  2. To change the baud rate of MOBITEK Q25 to another value and save it as default, MOBITEK Q25 needs to be connected to the PC using serial cable.
  3. Open Hyper Terminal, connect MOBITEK Q25 using “COM1” and set the baud rate to “115200”.
  4. Type “AT” in Hyper Terminal. If the response is “OK” then MOBITEK Q25 is successfully connected. If nothing can be entered in Hyper Terminal , then unplug and replug the serial cable to the serial port of the PC until “OK” is shown.
  5. In this example, the baud rate will be changed to “9600”. To do this, type “AT+IPR=9600;&W” in Hyper Terminal.

  6. At this point, nothing can be typed in Hyper Terminal because the baud rate setting has been changed from “115200” to “9600”.
  7. Disconnect MOBITEK Q25 from Hyper Terminal.
  8. Go to “File” -> “Properties”. In “Properties”, click on “Configure”. In “Port Settings”, change the baud rate to “9600”.
  9. Connect the MOBITEK Q25 to Hyper Terminal again. Enter “AT” and query the baud rate command. The baud rate should be changed to “9600”.

How to Upgrade or Downgrade the Firmware of MOBITEK Q25 4G Modem

Steps

  1. Run “QFlash v5.1”.
  2. Select the COM port number of “Quectel USB DM Port” (must use the USB port because serial port does not have “Quectel USB DM Port”).

  3. Set Baud Rate to 460800.
  4. Load Firmware Files.

  5. Upgrade firmware.

  6. Unplug the USB cable and plug it back. Use “AT+CMGR” or “ATI” to check the firmware version.


Download QFlash version 5.1


QFlash version 5.1 User’s Guide

Loader Loading...
EAD Logo Taking too long?

Reload Reload document
| Open Open in new tab

How to Send MMS Using MOBITEK Q25 Modem

Note:-

  1. The correct AT commands for sending MMS is saved in “X:\Reports by Trainees\Taufiq\A20-T-30-4G Modem (Q25)\MMS\MMS Script.ini”.
  2. The MMS settings (AT+QMMSCFG=”mmsc”, AT+QMMSCFG=”proxy, etc.) cannot be saved using “AT&W”, the settings must be re-set after modem is rebooted.
  3. Must use QCOM instead of Hyper Terminal to upload image file.
  4. When MMS is successfully send, the response is “+QMMSEND: 0,200”


AT COMMANDS FOR MMS

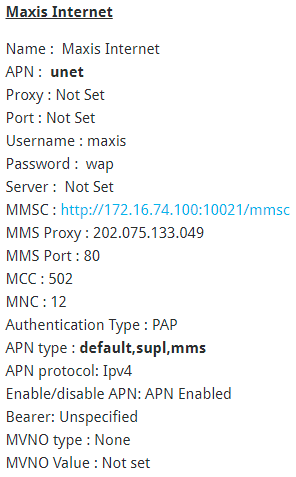
Note: This script is located in “X:\Reports by Trainees\Taufiq\A20-T-30-4G Modem (Q25)\MMS\MMS Script.ini”. It must be executed one-by-one because the delay time is not set. Load the script in QCOM to use it. The MMS Settings used is MAXIS’s MMS Settings:

AT COMMAND DESCRIPTION
AT+CPIN? To enter a password or query whether or not the module requires a password.

If the reply is “+CPIN: READY”, meaning the module is not pending for any password.

AT+QICSGP=1,1,”unet”,”maxis”,”wap”,1 Configure parameters of a TCP/IP context.

AT+QICSGP=<contextID>,<context_type>,<APN>,<username>,<password>,<authentication>

AT+QIACT=1 Activate a PDP context.
AT+QIACT? OPTIONAL.

Return the list of the current activated contexts and their IP addresses:

+QIACT: 1,1,1,”100.66.207.181″

+QIACT: <contextID>,<context_state>,<context_type>,<IP_address>

AT+QMMSCFG=”contextid”,1 Set the PDP context ID.
AT+QMMSCFG=”contextid” OPTIONAL.

Query the PDP context ID.

+QMMSCFG: “contextid”,1

AT+QMMSCFG=”mmsc”,”http://172.16.74.100:10021/mmsc” Configure the URL of MMSC.
AT+QMMSCFG=”mmsc” OPTIONAL.

Query the URL of MMSC.

+QMMSCFG: “mmsc”,”http://172.16.74.100:10021/mmsc”

AT+QMMSCFG=”proxy”,”202.75.133.49″,80 Configure the proxy address and port of MMSC
AT+QMMSCFG=”proxy” OPTIONAL.

Query the proxy address and port of MMSC.

+QMMSCFG: “proxy”,”10.0.0.172″,80

AT+QMMSCFG=”sendparam”,6,2,0,0,2,4 Configure the sending parameters.

AT+QMMSCFG=”sendparam”,<valid>,<pri>,<sendrep>,<readrep>,<visible>,<class>

AT+QMMSCFG=”sendparam” OPTIONAL.

Query the sending parameters.

+QMMSCFG: “sendparam”,6,3,0,0,2,4

AT+QMMSEDIT=1,1,”+60174616341″ Add a phone number as a recipient.
AT+QMMSEDIT=1 OPTIONAL.

Query the recipient phone number.

AT+QMMSEDIT=1,1,”+60174616341″

AT+QMMSEDIT=4,1,”Test MMS” Edit the title of the MMS message.
AT+QMMSEDIT=4 OPTIONAL.

Query the title of the MMS message.

+QMMSEDIT: 4,”ASCII”,”Test MMS”

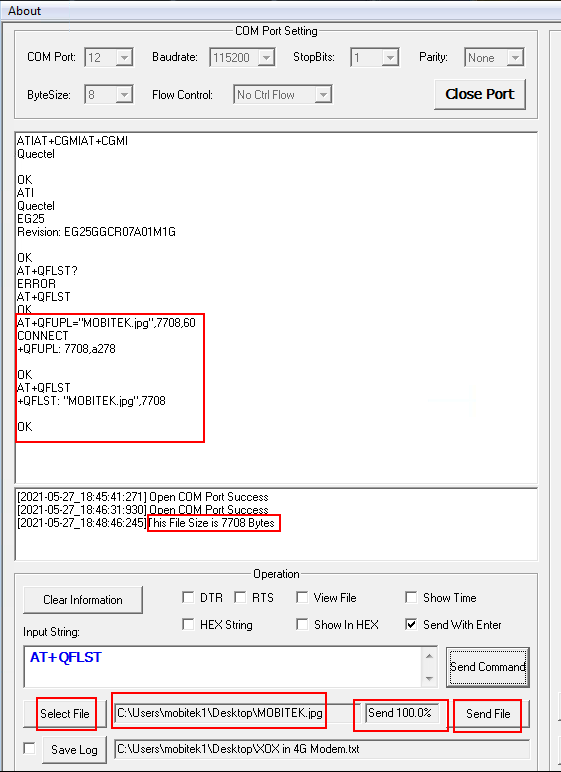
AT+QFUPL=”RAM:MOBITEK.jpg”,58773,60 Upload a file to RAM. The file will be saved as “MOBITEK.jpg” and the maximum size of file is 7708 bytes. 60 indicates timeout value, and 1 indicates ACK mode.

Wait for:

CONNECT

Then select the file to upload and click “Send File”:

The response after the file successfully uploaded:
+QFUPL: 7708,8fd3

AT+QFLST=”RAM:*” OPTIONAL.

Query all files in RAM.

+QFLST: “RAM:MOBITEK.jpg”,7708

AT+QMMSEDIT=5,1,”RAM:MOBITEK.jpg” Add attachments for the MMS message.
AT+QMMSEDIT=5 OPTIONAL.

Query the attachments.

+QMMSEDIT: 5,”RAM:MOBITEK.jpg”

AT+QMMSEND=5000 Send the MMS message.
AT+QFDEL=”RAM:*” Delete the RAM file.

Query all files in RAM.

AT+QFLST=”RAM:*” OPTIONAL.
AT+QMMSEDIT=0 Clear the content of the MMS message.
AT+QMMSEDIT=1 OPTIONAL.

Query the recipient phone number.

AT+QMMSEDIT=4 OPTIONAL.

Query the title of the MMS message.

AT+QMMSEDIT=5 OPTIONAL.

Query the attachments.


How to Install USB Driver of MOBITEK Q25 and Find the COM Port Number

Step 1: DO NOT connect USB cable or connect modem to PC/server.

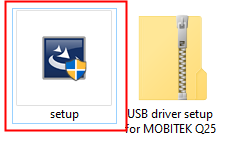
Step 2: Install the USB driver first by extracting the “.zip” file after downloaded and run the “setup.exe”. USB driver can be downloaded from here – Download USB Driver

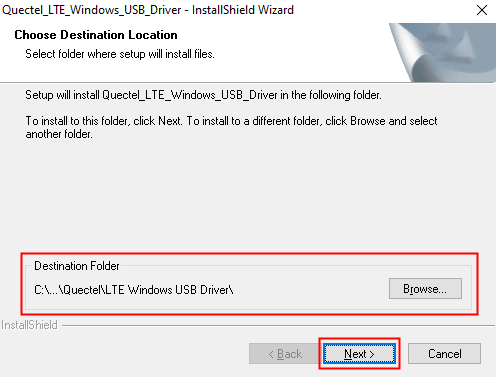
Step 3: Choose the installation folder or path, then click on ‘Next’.

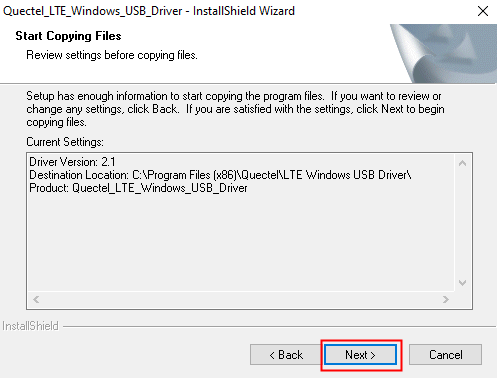
Step 3: Click on ‘next’. Wait until the installation complete.


Step 4: Click on ‘Install’.

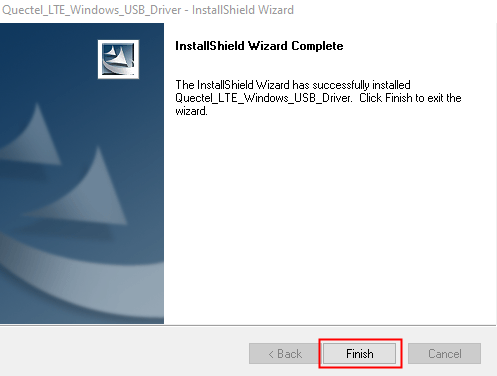
Step 7: Make sure to restart the machine or computer in order to use the installed driver.

Step 8: After computer is restarted, connect the modem to the computer. In device manager, the connected modem is listed as ‘Quectel USB AT Port (UMTS)’. In this example, the modem is connected to COM port number 8.