Author Archives: Taufiq

How to Set-Up VMWare and MOBITEK S80 Modem in VMWare

Install VMWare Workstation 16 Player

  1. Go to https://www.vmware.com/products/workstation-player/workstation-player-evaluation.html. Download Workstation 16.0 Player for Windows.
  2. Run the installer file “VMware-player-16.0.0-16894299.exe” in your default download folder. If prompted click “Yes” to allow the installer to run.
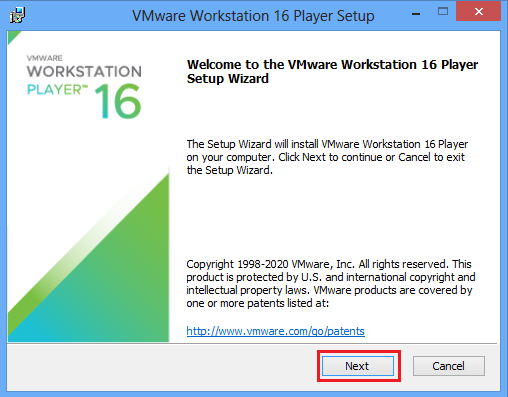
  3. Click “Next” to set up the program.
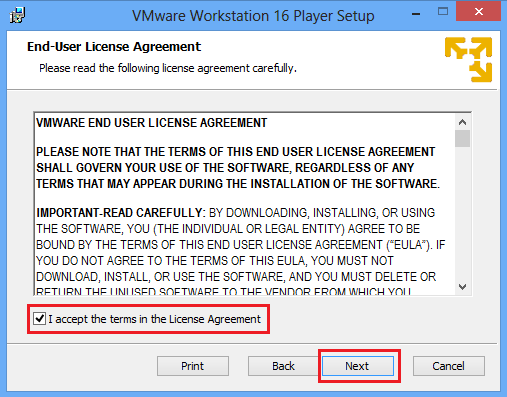
  4. Check “I accept the terms in the License Agreement” checkbox, then click “Next”.
  5. Set the preferred installation destination. You may leave the default selected features option in the checkbox or choose to install all features, click “Next”.
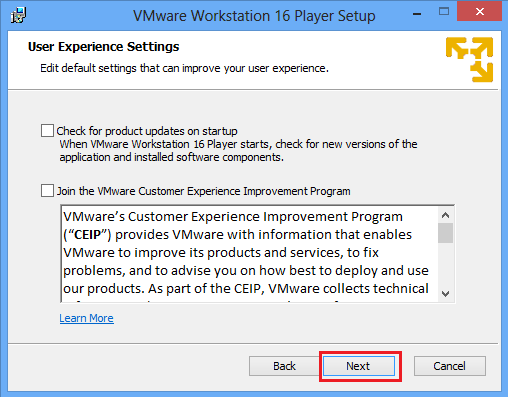
  6. Leave the checkbox as default, click “Next”.
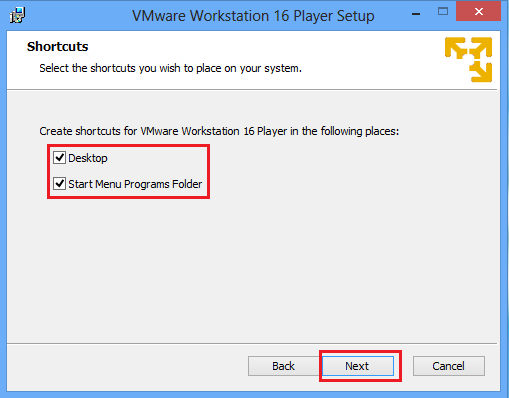
  7. Select the location of the shortcut that you want to place, click “Next”.
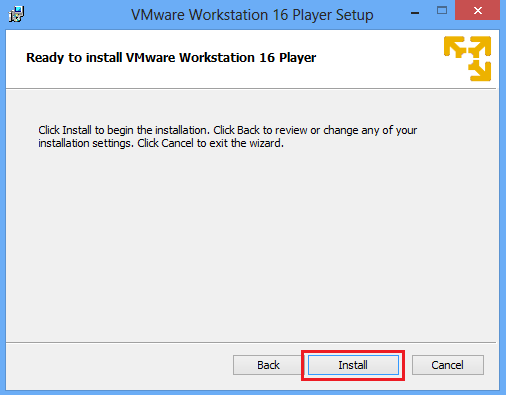
  8. Click “Install”.
  9. After the installation has completed, click “Finish”.


Create a New Virtual Machine Running Windows 10

The steps to create a new virtual machine (VM) in VMware Workstation 16:

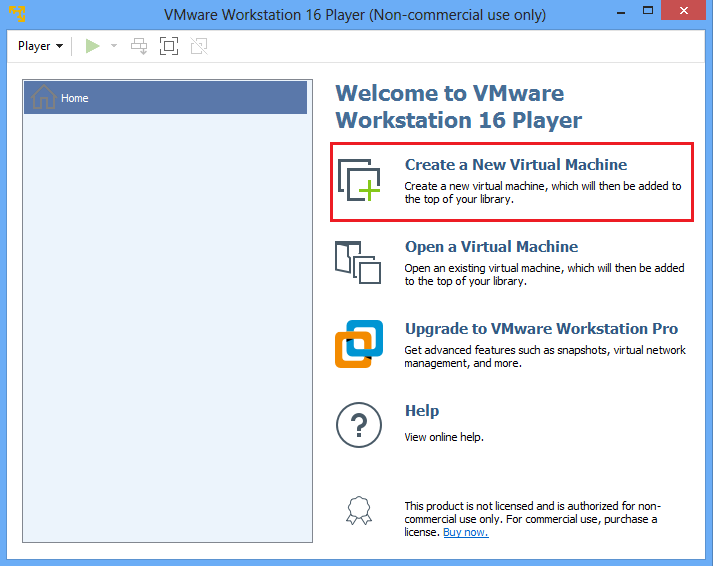
      1. Launch VMware Workstation.
      2. Select “Create a New Virtual Machine”.
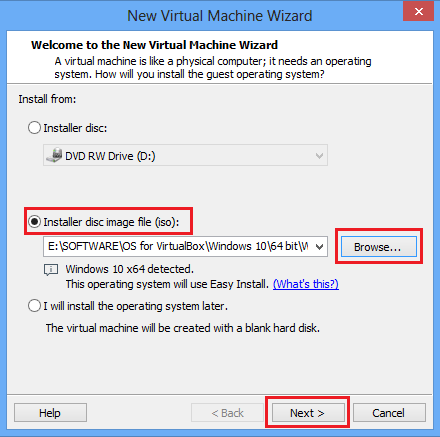
      3. Select the guest operating system (OS), then click “Next”. The OS can be installed using:
        • Installer disc (CD/DVD)
        • Installer disc image file (ISO)
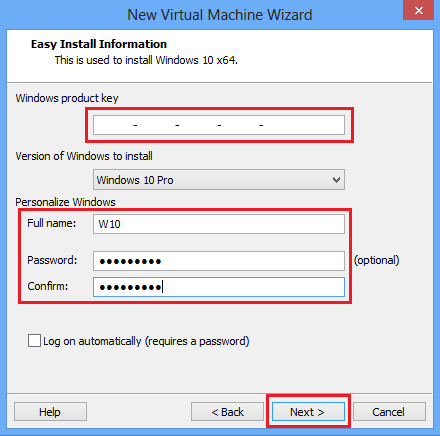
      4. Enter the product key. Create username and password (optional). Click “Next”.
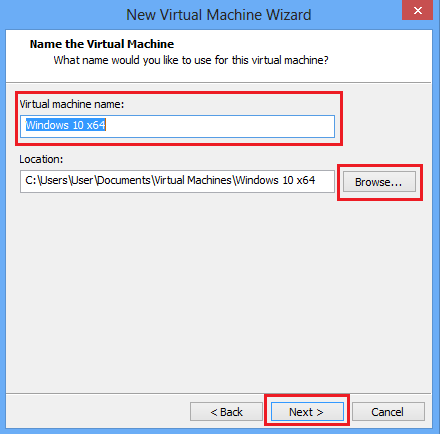
      5. Enter a VM name and specify the location to be saved. Click “Next”.
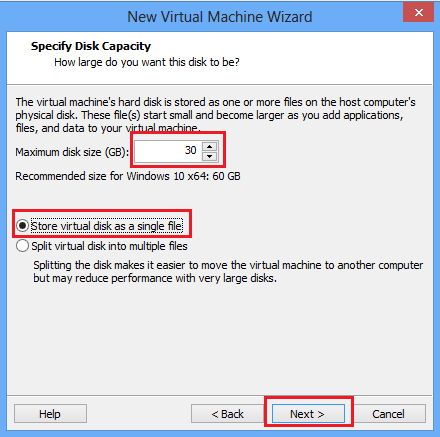
      6. Specify the disk size. Select between:
        • Store virtual disk as a single file, or
        • Split virtual disk into multiple files
      7. Click “Finish” to create the virtual machine and start the installation.
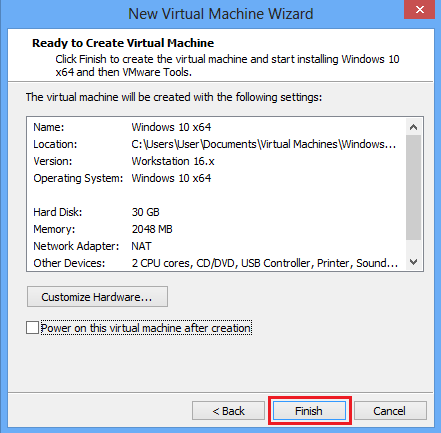
      8. When the VM is powered on, the VMware Tools installation starts. The VM may need to be restarted once the Tools installation completes.


VMware Workstation 16 Player Settings

  1. Launch VMware Workstation.
  2. Click on the VM to configure, then click “Edit virtual machine settings”.
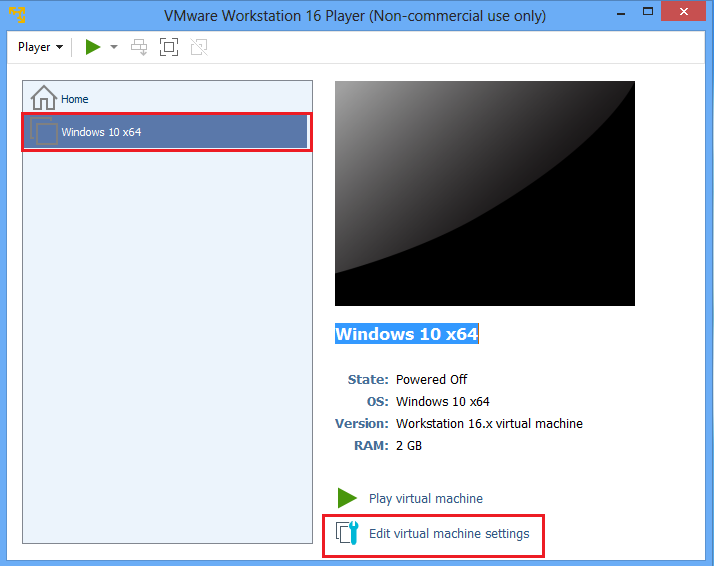
  3. In “Hardware” tab, click on “Network Adapter”. Under “Network connection”, select “Bridged: Connected directly to the physical network”. If VMWare in running on a laptop, check the “Replicate physical network connection state” checkbox. This option causes the IP address to be renewed when move from one wired or wireless network to another.
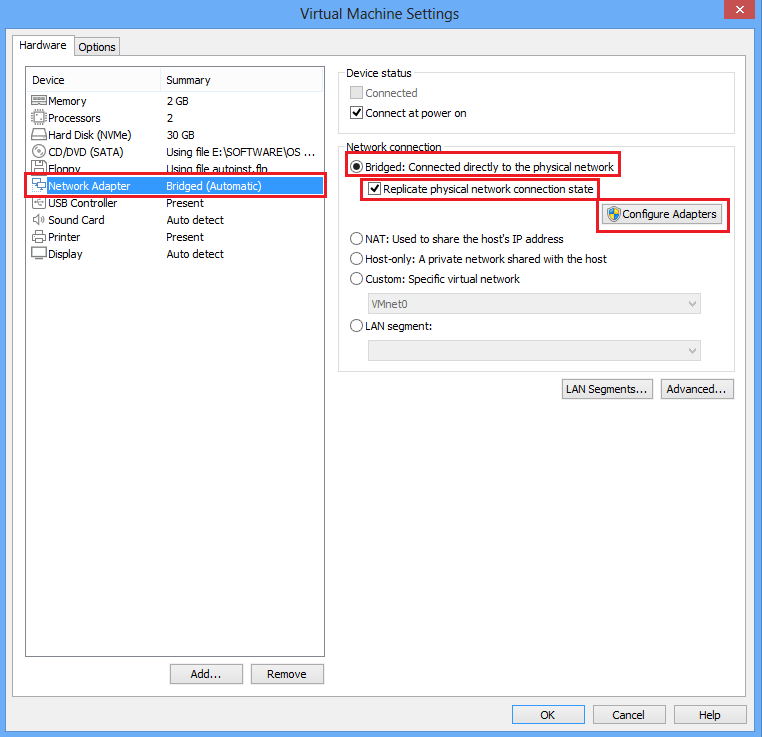
  4. Click on “Configure Adapters”.
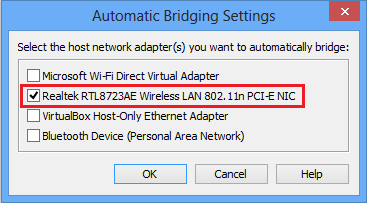
  5. In “Automatic Bridging Settings”, uncheck all adapters except the network adapter that is currently used (in this example, it is “Realtek”). Go to “Control Panel -> “Network and Internet” -> “Network Connections” to check.

 

Set-Up MOBITEK S80 Modem in VMWare

  1. Install USB driver “USBDriverInstaller_SL80XX_V11.5.0.0.exe” in VMware.
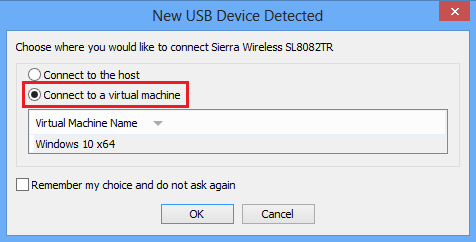
  2. Plug in MOBITEK S80 SMS Modem to the host. When the below dialog prompted, select “Connect to a virtual machine”.
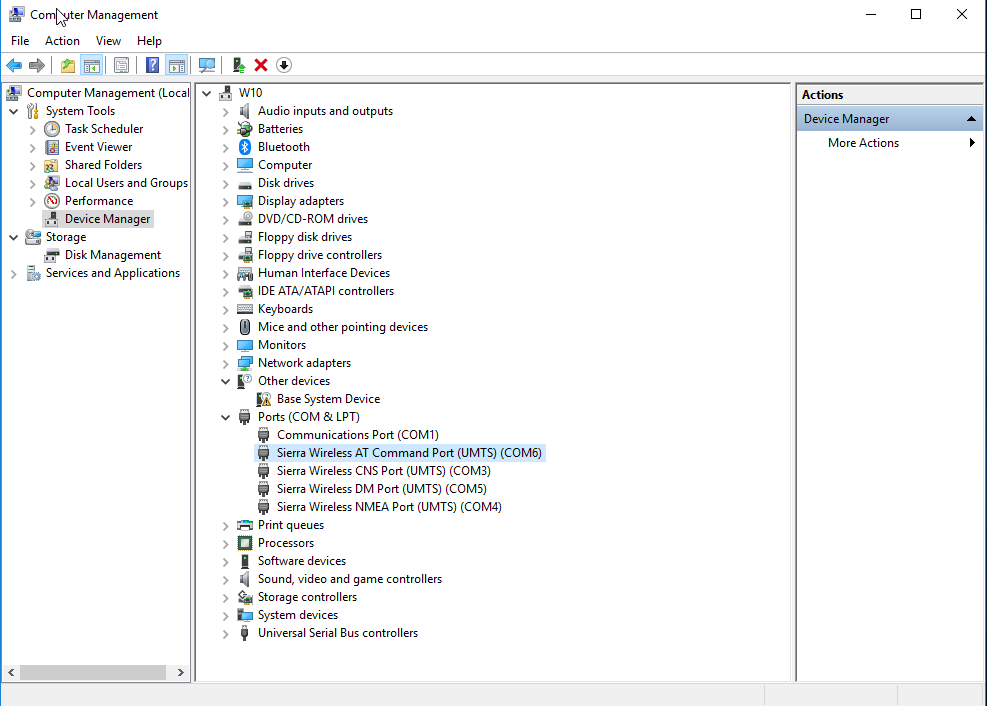
  3. Check Device Manager whether the COM port appears or not.
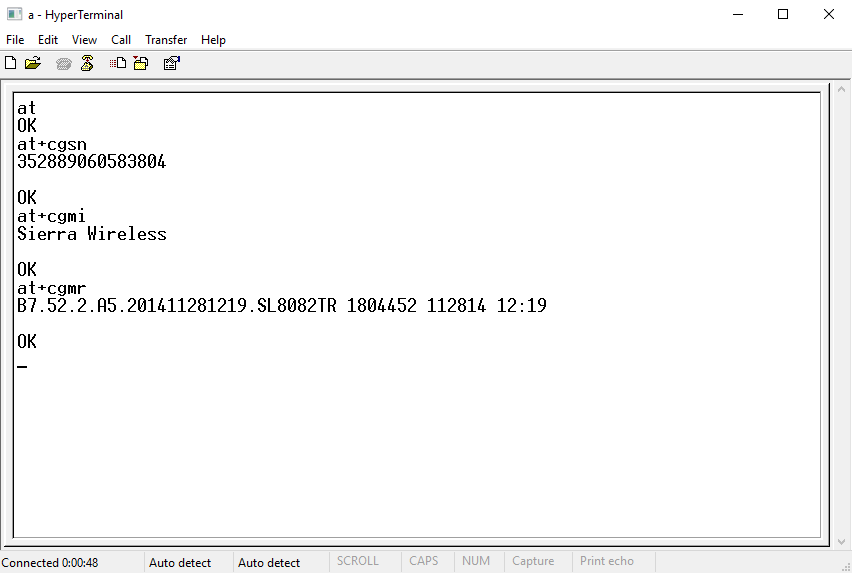
  4. In Hyper Terminal, test the MOBITEK S80 SMS Modem.
How to Transfer Virtual Machine from One Hard Disk to Another (External) Hard Disk

  1. In this example, we are going to move the Windows Server 2012 64-bit virtual machine (VirtualBox) that is stored in “C:” drive to another hard disk (external or on the local network).
  2. Go to default location where VirtualBox save “.vbox”. The default location is “C:\..\VirtualBox VMs”.
  3. Move (cut and paste) the whole folder to another hard disk (external or on the local network).
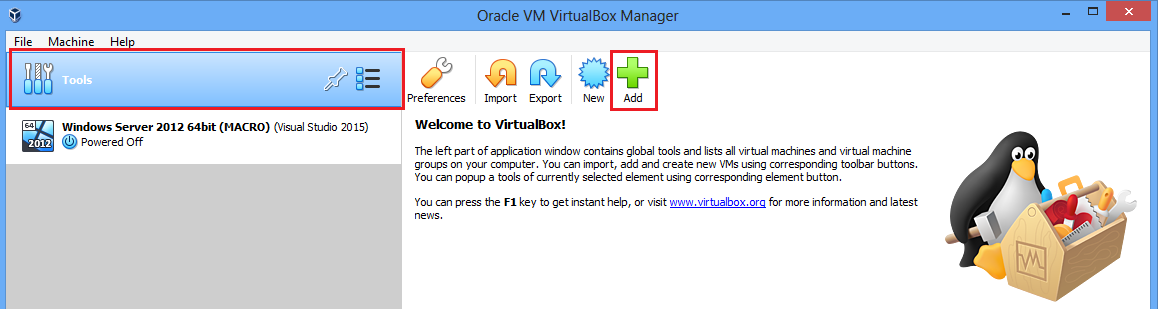
  4. Then in VirtualBox, go to “Tools”, and click “Add”.
  5. Locate the folder that you just moved.  Select the file that has the extension “.vbox”.
  6. Click “Start”, VirtualBox is running a Windows Server 2012 64-bit virtual machine that is on another hard disk.

How to Run MOBITEK STK API v. 6.5 Sample Code in Visual Studio 2015

  1. Install STK API v. 6.5 using “Setup-MOBITEK STK API version 6.5.exe”.
  2. Run “SIM Tool Kit.vb”.
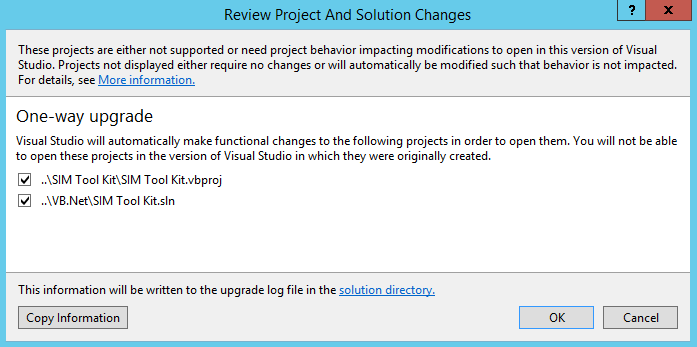
  3. Click OK in prompt dialog to migrate the project to Visual Studio 2015 project.
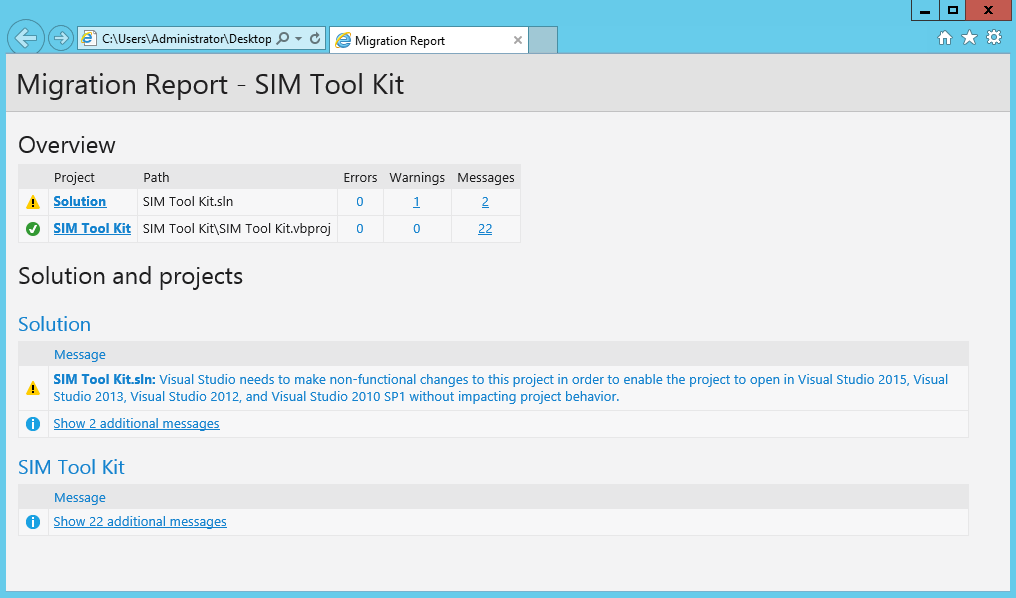
  4. After migration completed, the migration report will appear.
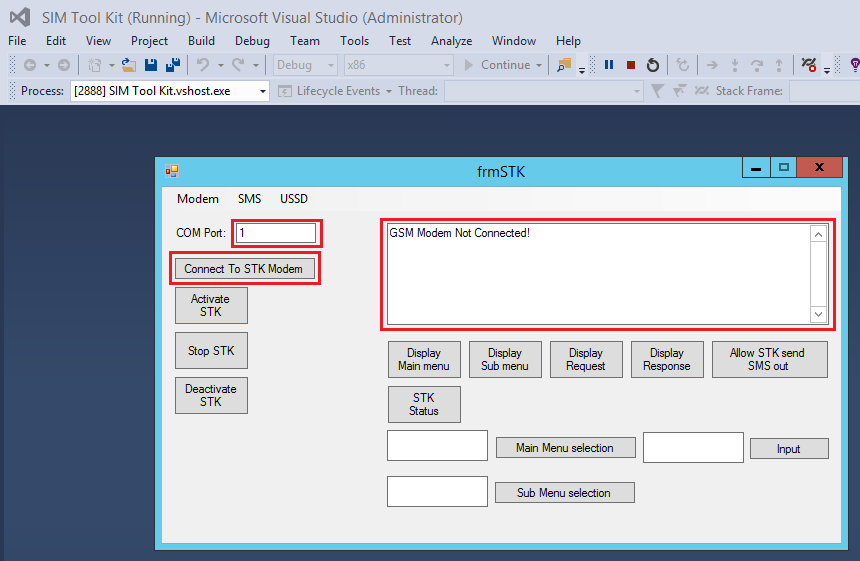
  5. In Visual Studio 2015, select “x86” in the dropdown, click “Start” to run the project.
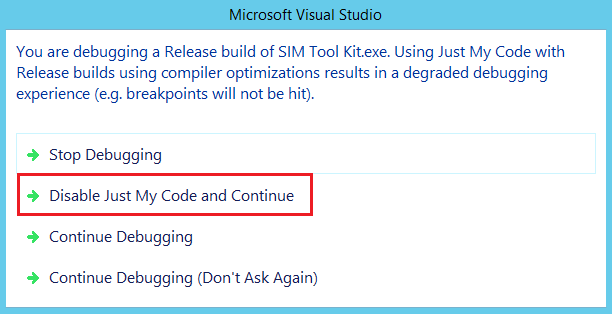
  6. If prompted the below dialog, select “Disable Just My Code and Continue”.
  7. To test the project, insert any number in “COM Port” text box and click “Connect to STK Modem” button. If the text appear in the text box and there is no runtime error, then the project is running fine.

Email Inspector Is Unable To Determine Whether an E-mail Address is Valid Or Not

Conclusion: Email Inspector  is unable to determine whether an e-mail address is valid or not.

TROUBLESHOOT SOLVED?
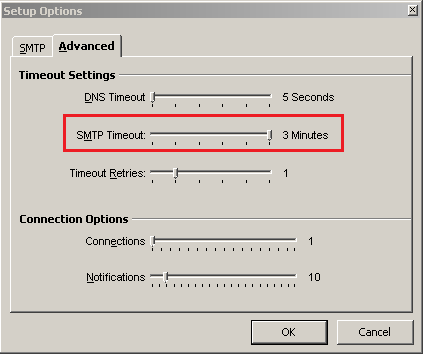
  • Increase timeout to maximum in Email Inspector
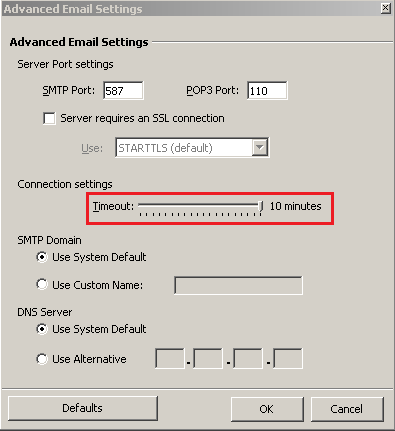
  • Increase timeout to maximum in Account Manager
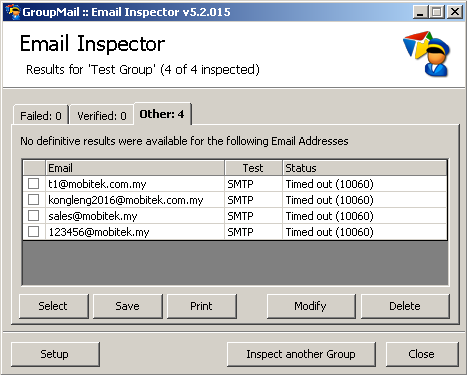
No. All emails tested with Email Inspector go to “Other” tab.

Result was:

  • Other = 4

By right:

  • Verified = 3
  • Failed = 1 (1234567@mobitek,my should be under “Failed”)

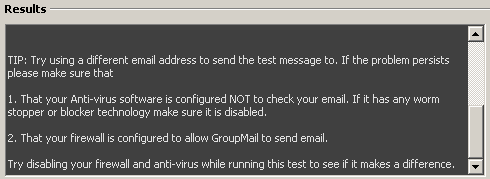
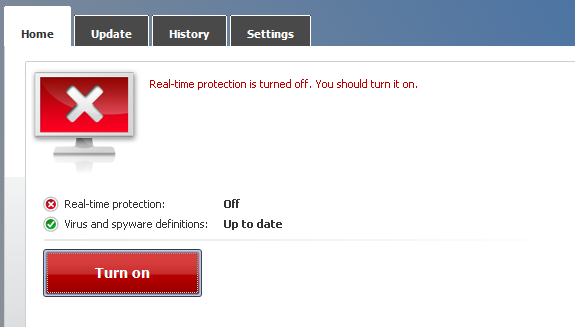
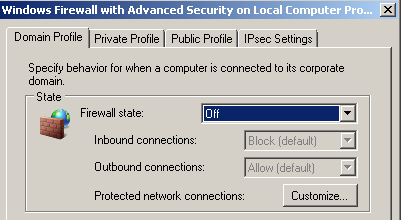
  • Disable antivirus and firewall
No. All emails tested with Email Inspector go to “Other” tab.

Result was:

  • Other = 4

By right:

  • Verified = 3
  • Failed = 1 (1234567@mobitek,my should be under “Failed”)

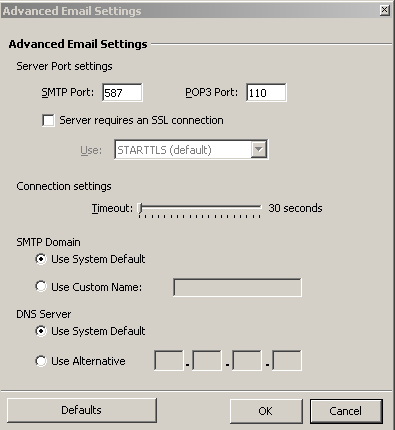
  • Open port 587 and 2525 in firewall
  • Allow GroupMail 5 program in firewall
  • Test Email Inspector with port 587 and 2525
No. All emails tested with Email Inspector go to “Other” tab.

Result was:

  • Other = 4

By right:

  • Verified = 3
  • Failed = 1 (1234567@mobitek,my should be under “Failed”)

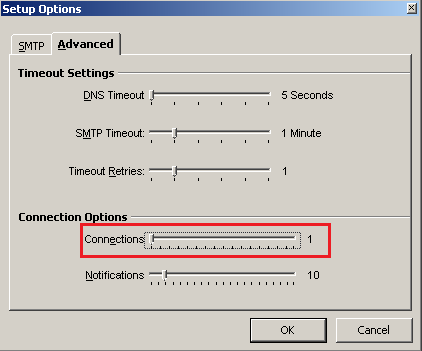
  • Default setting (Connections: 3)
  • Reduce connections = 1
  • Open port 25 in firewall
No. All emails tested with Email Inspector go to “Other” tab.

Result was:

  • Other = 4

By right:

  • Verified = 3
  • Failed = 1 (1234567@mobitek,my should be under “Failed”)


UCanAccess Driver Locks MS Access Database of SMS Engine — Basic Edition

Problem: SMS stuck in the “oubox” table and cannot be send out by SMS Engine — Basic Edition v. 5 and SMS Engine — Basic Edition v. 6.

Solution: Java application should use ODBC instead of UCanAccess to connect to “SMSEngine5.mdb” (version 5) or “SMSEngineVBNET.mdb” (version 6). Somehow, UCanAccess locks the records inserted into “outbox” table, preventing SMS Engine from retrieving those records and preventing SMS being send out.


TROUBLE SHOOTING #1: JDBC:UCanAccess

  • DB Tool: DBeaver
  • Driver: UCanAccess
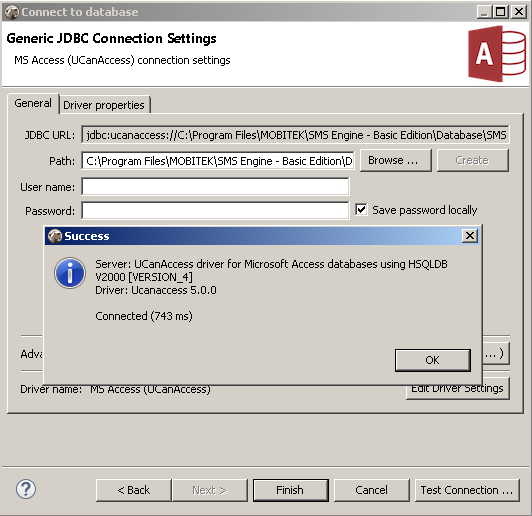
    UCanAccess-01
  • JDBC URL: jdbc:ucanaccess://C:\Program Files\MOBITEK\SMS Engine – Basic Edition\Database\SMSEngine5.mdb
  • Result:
    • All records inserted into “SMSEngine5.mdb” using DBeaver were stuck in “Outbox” table even after the DBeaver has been closed.
      UCanAccess-02
    • All SMS are stuck in “Outbox” table (SentStatus = P) after the SMS Engine has been restarted.
    • After restarting the SMS Engine a few times, all SMS finally can send out.


TROUBLE SHOOTING #2: JDBC:ODBC

  • DB Tool: DBeaver
  • Driver: ODBC
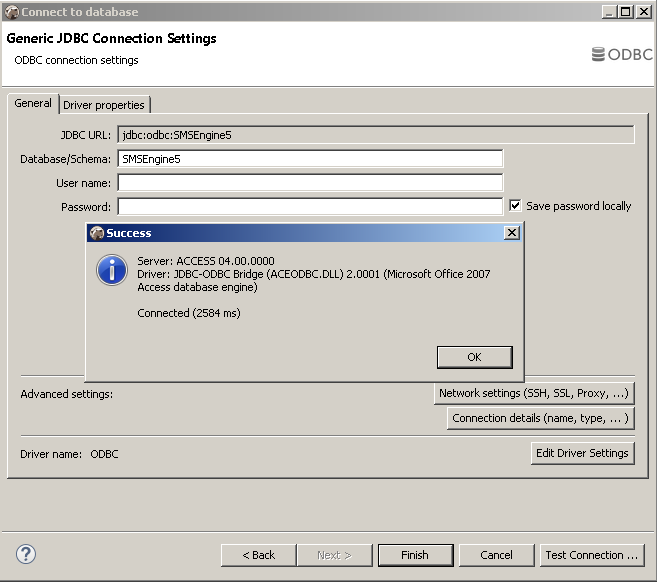
    UCanAccess-03
  • JDBC URL: jdbc:odbc:SMSEngine5
  • Result:
    • All SMS inserted into “SMSEngine5.mdb” can be send out without any problem while DBeaver is still running.
      UCanAccess-04
    • Note: the delivery status depends on the TELCO response — may be late or no status at all.

How to Connect to MS Access Database using JDBC:ODBC Connection

  1. Depending on whether your Java application is 32-bit or 64-bit, choose the correct ODBC Data Source Administrator (64bit or 32 bit) to create the Data Source Name. Otherwise, the connection cannot be established.
      • If your Java application is 64-bit then use ODBC Data Source Administrator 64-bit
      • If your Java application is 32-bit then use ODBC Data Source Administrator 32-bit
  2. Open ODBC Data Source Administrator (make sure the correct version is used).
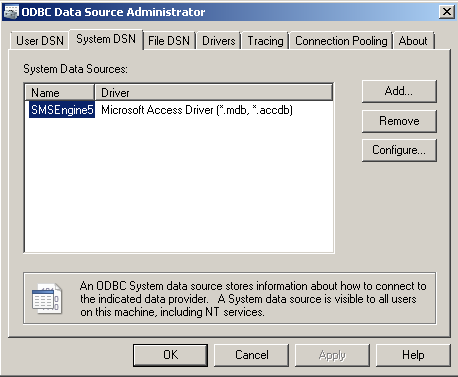
  3. Select “System DSN” tab. Click “Add”.
    JDBC-01
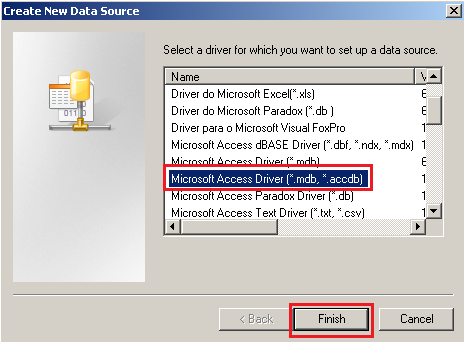
  4. In this example, we are connecting to MS Access database, in “Create New Data Source”, select “Microsoft Access Driver (*.mdb, *.accdb)” in the list. Click “Finish”.
    JDBC-02
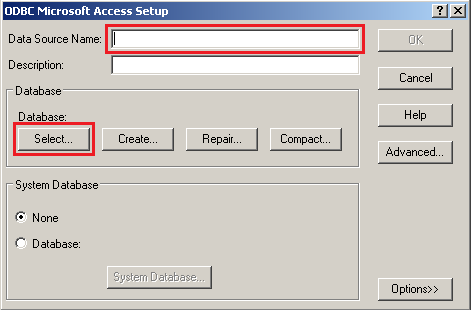
  5. In “ODBC Microsoft Access Setup”, enter any “Data Source Name”. This name will be used in DBeaver later. So remember it. After that click “Select…” button.
    JDBC-03
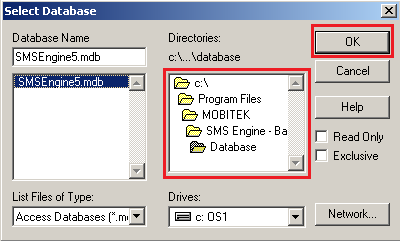
  6. Now you have to locate your MS Access file. In this example we use “SMSEngine5.mdb”. Click “OK”.
    JDBC-04
  7. Example of the Data Source Name created.
    JDBC-05
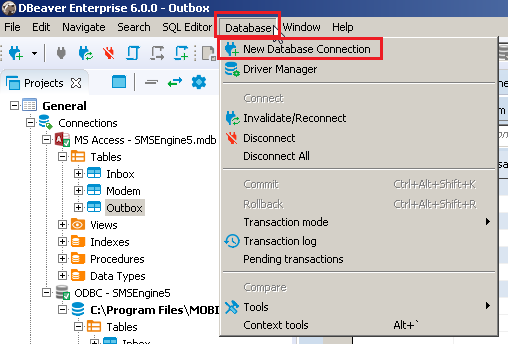
  8. Open DBeaver (or any other database management tool). Click on “Database -> New Database Connection”
    JDBC-06
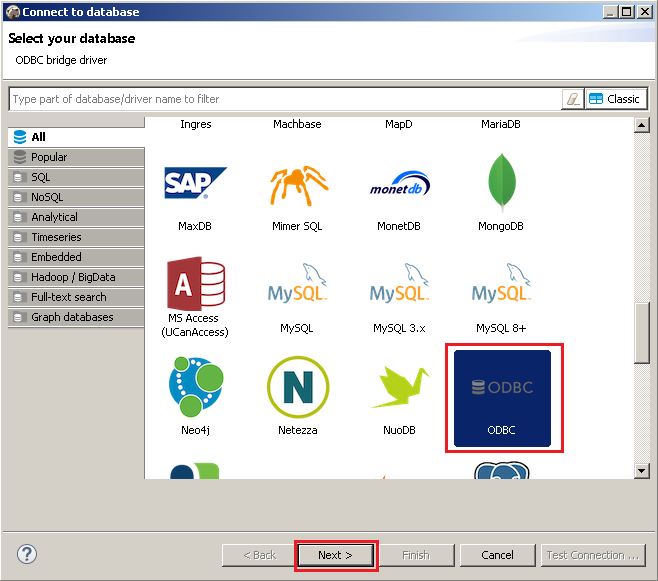
  9. In “Connect to database”, select “ODBC” in the list. Click “Next”
    JDBC-07
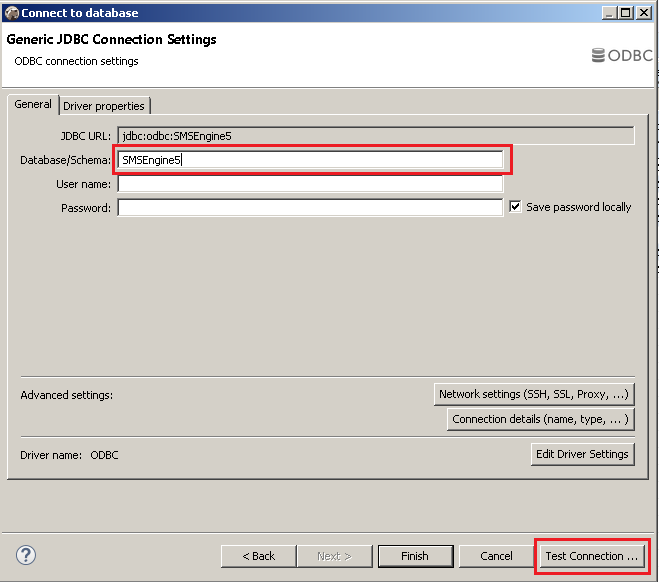
  10. Insert “Database/Schema” name the same like you created earlier in ODBC Data Source Administrator. Click “Test Connection” to test the ODBC connection.
    JDBC-08
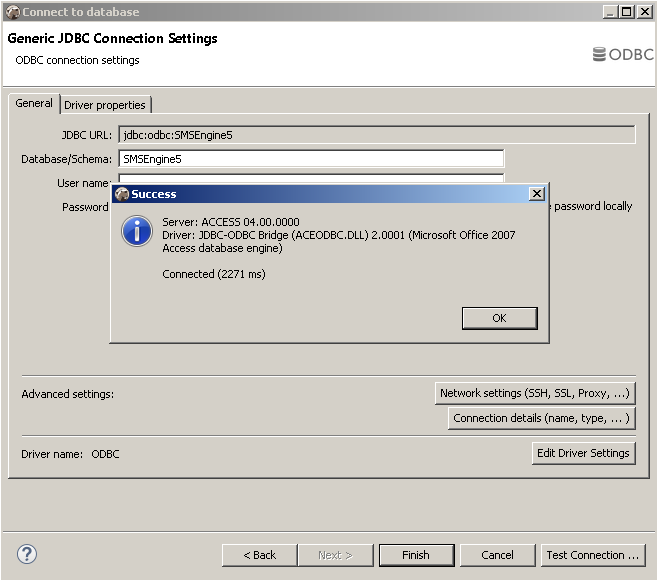
  11. If everything is setup right, you will get the below message. Click “Finish”
    JDBC-09

How to Solve “ERROR [HYT00][Microsoft][ODBC SQL Server Driver]Query timeout expired”

PROBLEM: ERROR [HYT00][Microsoft][ODBC SQL Server Driver]Query timeout expired

POSSIBLE CAUSE: Database too large, too many records in tables

SOLUTION: Create an index for “outbox” table:-

  1. Stop the SMS Engine service of MobiGATE
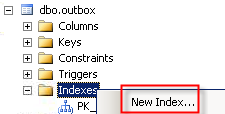
  2. Using SQL Management Studio, go to “indexes” of “dbo.outbox”, right-clickm select “New Index…”
  3. For “index name”, enter “To solve query timeout”
  4. Select “Nonclustered”
  5. Click “Add” to add 2 columns “datetime_queued” and “sent_status” (refer to red boxes below):
  6. Click “OK” button and a new index will be created:
  7. Start the SMS Engine service of MobiGATE
  8. Observe in log if this eror message still appear “ERROR [HYT00][Microsoft][ODBC SQL Server Driver]Query timeout expired
  9. If it appears again, please fill-in the table below:
    QUESTIONS ANSWERS (provide screen shot if available) REMARK
    Date of index created (as shown above)
    Take a screen capture of the SQL Management Studio showing:

    1. the new index
    2. the columns in the new index
    Date of the error message “ERROR [HYT00][Microsoft][ODBC SQL Server Driver]Query timeout expired” first appear
    Total number of records in “outbox” table when the error first appears
    Please send us:

    • the log file of the date when the error appear
    • “config.xml” file

How to Write a SQL Statement that Sums All Records of Different Items in Each Group as “Total Balance”

Problem: In “Stock Card” table, it records the stock movement, “In” and “Out”  of each item (ITEM ID).  There are different items that belongs to same group (GROUP).  And there are many groups (GROUP).


STOCK CARD TABLE
GROUP ITEM ID IN OUT
EKONOR EKONOR-1 20
EKONOR EKONOR-1 10
EKONOR EKONOR-2 40
EKONOR EKONOR-2 10
EKONOR EKONOR-2 20
SAGA SAGA-1 10
SAGA SAGA-1 5
SAGA SAGA-1 5
SAGA SAGA-2 10
SAGA SAGA-2 10
SAGA SAGA-2 20

How to get the sum (TOTAL BALANCE) of each group as below?

GROUP TOTAL RECORDS TOTAL BALANCE
EKONOR 5 20
SAGA 6 10


Solution: using this SQL statement

SELECT `Group`,
(SELECT COUNT(Stock_Description.`Group`) FROM Stock_Description WHERE Stock_Description.`Group` = sd.`Group`) As `TOTAL RECORDS`,
(SELECT SUM(COALESCE(a.`IN`,0) – COALESCE(a.`OUT`,0)) FROM Stock_Card a WHERE a.Item_ID LIKE CONCAT(sd.`Group, ‘%’) AND a.Balance IS NOT NULL) AS `TOTAL BALANCE` FROM Stock_Description sd GROUP BY `Group`;


SELECT SUM(COALESCE(a.`IN`,0) – COALESCE(a.`OUT`,0)) FROM Stock_Card a WHERE a.Item_ID LIKE CONCAT(sd.`Group`, ‘%’) AND a.Balance IS NOT NULL) AS Total_Balance

the above SQL statement will display  a “TOTAL BALANCE” of each “GROUP” by:-

  • summing all “In” records of “EKONOR” minus the sum of all “Out” of EKONOR”
    • (20 + 40) – (10 + 10 + 20)
    • = 20
  • summing all “In” records of “SAGA” minus the sum of all “Out” of  “SAGA”
    • (10 + 5 + 10 + 10) – (5 + 20)
    • = 10


SELECT COUNT(Stock_Description.`Group`) FROM Stock_Description WHERE Stock_Description.`Group` = sd.`Group`) As `TOTAL RECORDS`

the above SQL statement will display  a “TOTAL RECORDS” of each “GROUP” by:-

  • summing all records in “EKONOR” group
  • summing all records in “SAGA” group

Source:-

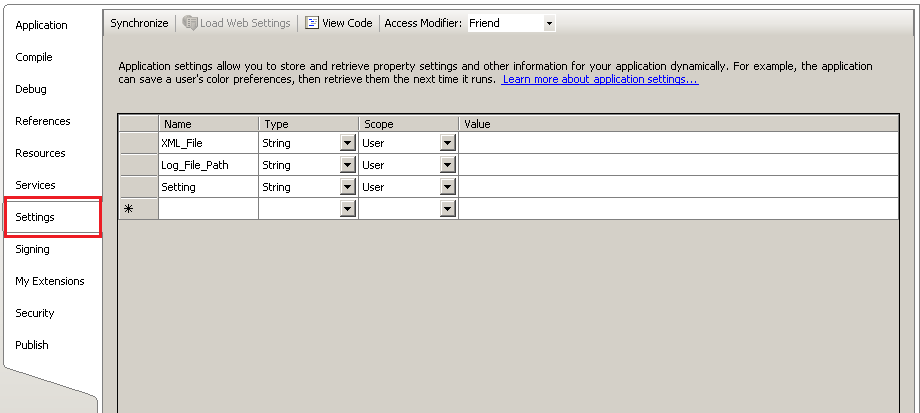
The Location of My.Settings Used by VB.Net Application

Determine whether the application saves the user settings on exit.

The SaveMySettingsOnExit property allows the user to change how the application saves settings, at run time. You can explicitly save setting changes by using the Save method of the My.Settings object.

The changes to this property are not persisted when the application closes. To change the SaveMySettingsOnExit property permanently, you must change the setting in the Project Designer:

To change the setting in the Project Designer
1. Have a project selected in Solution Explorer. Click Properties on the Project menu.
2. Click the Application tab.
3. Select Save My.Settings on Shutdown.

There are two types of application settings, based on scope:

  • Application-scoped settings can be used for information such as a URL for a web service or a database connection string. These values are associated with the application. Therefore, users cannot change them at run time.
  • User-scoped settings can be used for information such as persisting the last position of a form or a font preference. Users can change these values at run time.

The path that store My.Settings config file differ depends upon the scope that has selected and the Visual Studio version. For Microsoft Visual Studio 2008 Version 9.0.30729.4462 QFE, the config is stored in:

C:\Users\<username>\AppData\Local\<companyname>\<appdomainname>_<eid>_<hash>\<version>\user.config

Source:-

How to Assign a short-cut key (hotkey) for a LibreOffice Macro

  1. Open LibreOffice that containing the macro
  2. Click “Tools” -> “Customize…
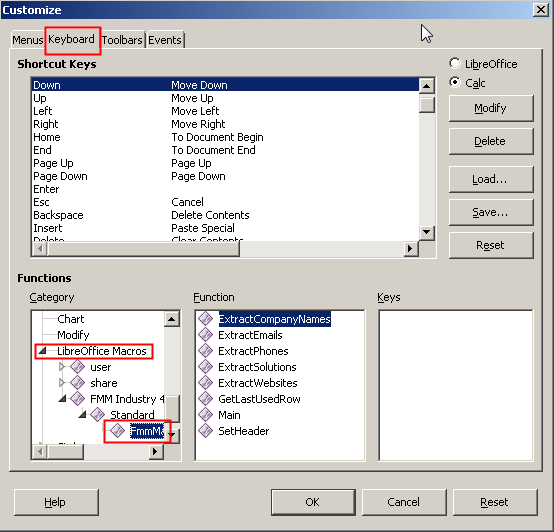
  3. In Customize, Click “Keyboard” tab and scroll down the “Category” section until you find “LibreOffice Macros“. Select the macro.
  4. Select the function that you want to assign the shortcut key in “Function” section and find the available keys in “Shortcut Keys” area. Select the key and click “Modify” button. Click “OK